Before we get started, have you tried our new Python Code Assistant? It's like having an expert coder at your fingertips. Check it out!
Disclosure: This post may contain affiliate links, meaning when you click the links and make a purchase, we receive a commission.
The importance of emotion recognition is getting popular with improving user experience and the engagement of Voice User Interfaces (VUIs). Developing emotion recognition systems that are based on speech has practical application benefits. However, these benefits are somewhat negated by the real-world background noise impairing speech-based emotion recognition performance when the system is employed in practical applications.
Speech Emotion Recognition (SER) is one of the most challenging tasks in the speech signal analysis domain, it is a research area problem that tries to infer emotion from speech signals.
Where can we use it?
Even though it isn't that popular, SER has entered so many areas these years, including:
- The medical field: In the world of telemedicine where patients are evaluated over mobile platforms, the ability for a medical professional to discern what the patient is actually feeling can be useful in the healing process.
- Customer service: In call center conversation may be used to analyze the behavioral study of call attendants with the customers which helps to improve the quality of service.
- Recommender systems: Can be useful to recommend products to customers based on their emotions towards that product.
Alright, enough theory now, let's get started!
Related: How to Perform Voice Gender Recognition using TensorFlow in Python.
Required Dependencies
First, we gonna need to install some dependencies using pip:
pip3 install librosa==0.6.3 numpy soundfile==0.9.0 sklearn pyaudio==0.2.11Let's import them:
import soundfile # to read audio file
import numpy as np
import librosa # to extract speech features
import glob
import os
import pickle # to save model after training
from sklearn.model_selection import train_test_split # for splitting training and testing
from sklearn.neural_network import MLPClassifier # multi-layer perceptron model
from sklearn.metrics import accuracy_score # to measure how good we are
The whole pipeline is as follows (as same as any machine learning pipeline):
- Preparing the Dataset: Here, we download and convert the dataset to be suited for extraction.
- Loading the Dataset: This process is about loading the dataset in Python which involves extracting audio features, such as obtaining different features such as power, pitch, and vocal tract configuration from the speech signal, we will use librosa library to do that.
- Training the Model: After we prepare and load the dataset, we simply train it on a suited sklearn model.
- Testing the Model: Measuring how good our model is doing.
First, we gonna need a dataset to train on, luckily there is RAVDESS dataset, I have downloaded it and extracted it successfully. After that we gonna need to lower the sample rate on all audio files so librosa will be happy, I have made a script to do so, if you are following step by step, you actually don't need that, because I have already prepared the dataset (download here).
Note: If you want to convert your own audio samples to 16000Hz sample rate and mono channel as suggested, you need this python script and FFmpeg installed on your machine.
Let us create the function that handles extracting features (which is changing the speech waveform to a form of parametric representation at a relatively lesser data rate):
def extract_feature(file_name, **kwargs):
    """
    Extract feature from audio file `file_name`
        Features supported:
            - MFCC (mfcc)
            - Chroma (chroma)
            - MEL Spectrogram Frequency (mel)
            - Contrast (contrast)
            - Tonnetz (tonnetz)
        e.g:
        `features = extract_feature(path, mel=True, mfcc=True)`
    """
    mfcc = kwargs.get("mfcc")
    chroma = kwargs.get("chroma")
    mel = kwargs.get("mel")
    contrast = kwargs.get("contrast")
    tonnetz = kwargs.get("tonnetz")
    with soundfile.SoundFile(file_name) as sound_file:
        X = sound_file.read(dtype="float32")
        sample_rate = sound_file.samplerate
        if chroma or contrast:
            stft = np.abs(librosa.stft(X))
        result = np.array([])
        if mfcc:
            mfccs = np.mean(librosa.feature.mfcc(y=X, sr=sample_rate, n_mfcc=40).T, axis=0)
            result = np.hstack((result, mfccs))
        if chroma:
            chroma = np.mean(librosa.feature.chroma_stft(S=stft, sr=sample_rate).T,axis=0)
            result = np.hstack((result, chroma))
        if mel:
            mel = np.mean(librosa.feature.melspectrogram(X, sr=sample_rate).T,axis=0)
            result = np.hstack((result, mel))
        if contrast:
            contrast = np.mean(librosa.feature.spectral_contrast(S=stft, sr=sample_rate).T,axis=0)
            result = np.hstack((result, contrast))
        if tonnetz:
            tonnetz = np.mean(librosa.feature.tonnetz(y=librosa.effects.harmonic(X), sr=sample_rate).T,axis=0)
            result = np.hstack((result, tonnetz))
    return result
We will use MFCC, Chroma, and Mel Frequency Cepstrum as speech features rather than raw waveform which may contain unnecessary information that doesn't help on the classification.
Let us write the function to load the data we have:
# all emotions on RAVDESS dataset
int2emotion = {
    "01": "neutral",
    "02": "calm",
    "03": "happy",
    "04": "sad",
    "05": "angry",
    "06": "fearful",
    "07": "disgust",
    "08": "surprised"
}

# we allow only these emotions ( feel free to tune this on your need )
AVAILABLE_EMOTIONS = {
    "angry",
    "sad",
    "neutral",
    "happy"
}

def load_data(test_size=0.2):
    X, y = [], []
    for file in glob.glob("data/Actor_*/*.wav"):
        # get the base name of the audio file
        basename = os.path.basename(file)
        # get the emotion label
        emotion = int2emotion[basename.split("-")[2]]
        # we allow only AVAILABLE_EMOTIONS we set
        if emotion not in AVAILABLE_EMOTIONS:
            continue
        # extract speech features
        features = extract_feature(file, mfcc=True, chroma=True, mel=True)
        # add to data
        X.append(features)
        y.append(emotion)
    # split the data to training and testing and return it
    return train_test_split(np.array(X), y, test_size=test_size, random_state=7)
Note: a folder called "data" needs to exist (download here) in the same directory, otherwise it won't work.
int2emotion dictionary contains the available emotions on this dataset, whereas AVAILABLE_EMOTIONS is the emotions we want to classify, feel free to add/remove whatever emotion you desire.
Let's actually load it:
# load RAVDESS dataset, 75% training 25% testing
X_train, X_test, y_train, y_test = load_data(test_size=0.25)
Logging some information about the dataset:
# print some details
# number of samples in training data
print("[+] Number of training samples:", X_train.shape[0])
# number of samples in testing data
print("[+] Number of testing samples:", X_test.shape[0])
# number of features used
# this is a vector of features extracted
# using extract_features() function
print("[+] Number of features:", X_train.shape[1])
After I have performed a grid search on MLPClassifier to get the best possible hyperparameters, I came up with these parameters (so far), let's use them directly:
# best model, determined by a grid search
model_params = {
    'alpha': 0.01,
    'batch_size': 256,
    'epsilon': 1e-08,
    'hidden_layer_sizes': (300,),
    'learning_rate': 'adaptive',
    'max_iter': 500,
}
So, this is basically a fully connected (dense) neural network with one layer that contains 300 units, a batch size of 256, 500 iterations, and an adaptive learning rate (this is not the optimal hyperparameters, so feel free to tweak).
Now let's initialize the model with these parameters:
# initialize Multi Layer Perceptron classifier
# with best parameters ( so far )
model = MLPClassifier(**model_params)
We now need to train the model with the dataset that we just loaded:
# train the model
print("[*] Training the model...")
model.fit(X_train, y_train)
It will take several seconds to finish, then we gonna need to calculate the accuracy score and print it to measure how good we are:
# predict 25% of data to measure how good we are
y_pred = model.predict(X_test)

# calculate the accuracy
accuracy = accuracy_score(y_true=y_test, y_pred=y_pred)

print("Accuracy: {:.2f}%".format(accuracy*100))
Saving the model:
# now we save the model
# make result directory if doesn't exist yet
if not os.path.isdir("result"):
    os.mkdir("result")

pickle.dump(model, open("result/mlp_classifier.model", "wb"))
Here is a screenshot of my output result:
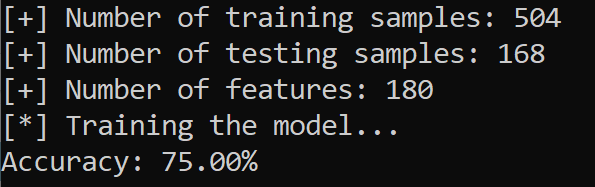
That is great! We have obtained 75% accuracy on 4 emotions using only a few training samples, feel free to use and merge other datasets such as Emo-DB and TESS and tweak the model (or use another one) as you wish to get better performance.
If you want to test your voice tune on the model you saved, head to this file.
All code shown here is in this GitHub repository. Feel free to leave a star!
Also, I have created a separate repository which makes this whole process very easy! It also uses Deep Learning for better performance! Feel free to leave a star!
Finally, if you want to learn Machine Learning, I suggest you take Andrew Ng's Coursera course on Machine Learning, you'll appreciate it!
Read Also: How to Use Transfer Learning for Image Classification using Keras in Python.
Happy Learning ♥
Ready for more? Dive deeper into coding with our AI-powered Code Explainer. Don't miss it!
View Full Code Assist My Coding


Got a coding query or need some guidance before you comment? Check out this Python Code Assistant for expert advice and handy tips. It's like having a coding tutor right in your fingertips!