Before we get started, have you tried our new Python Code Assistant? It's like having an expert coder at your fingertips. Check it out!
Disclosure: This post may contain affiliate links, meaning when you click the links and make a purchase, we receive a commission.
As you may already know, a video is made up of a series of images. These images are called frames and are played continuously one by one at a certain rate which will be recognized as motion by the human eye.
In this tutorial, you will learn two methods of extracting frames from video files in Python. First, we'll go into how we can do that with the well-known OpenCV library. After that, we'll explore the other method of extracting frames using the MoviePy library.
To get started, let's install the libraries:
$ pip install python-opencv moviepyMethod 1: Extracting Frames using OpenCV
I'll create extract_frames_opencv.py file and import the necessary modules:
from datetime import timedelta
import cv2
import numpy as np
import os
Since not all videos have the same length and FPS, we will define a parameter to adjust how many frames we want to extract and save per second:
# i.e if video of duration 30 seconds, saves 10 frame per second = 300 frames saved in total
SAVING_FRAMES_PER_SECOND = 10
We will use this parameter on both methods. For instance, if it's set to 10 as for now, it will save only 10 frames per second of the video, even though the video FPS is say 24. If the video has 30 seconds of duration, then 300 frames will be saved in total. You can also set this parameter to say 0.5, which will save one frame per 2 seconds, and so on.
Next, let's define two helper functions:
def format_timedelta(td):
    """Utility function to format timedelta objects in a cool way (e.g 00:00:20.05)
    omitting microseconds and retaining milliseconds"""
    result = str(td)
    try:
        result, ms = result.split(".")
    except ValueError:
        return (result + ".00").replace(":", "-")
    ms = int(ms)
    ms = round(ms / 1e4)
    return f"{result}.{ms:02}".replace(":", "-")


def get_saving_frames_durations(cap, saving_fps):
    """A function that returns the list of durations where to save the frames"""
    s = []
    # get the clip duration by dividing number of frames by the number of frames per second
    clip_duration = cap.get(cv2.CAP_PROP_FRAME_COUNT) / cap.get(cv2.CAP_PROP_FPS)
    # use np.arange() to make floating-point steps
    for i in np.arange(0, clip_duration, 1 / saving_fps):
        s.append(i)
    return s
The format_timedelta() function accepts a timedelta object, returns a nice string representation with milliseconds, and omits the microseconds.
The get_saving_frames_durations() function accepts the VideoCapture object from OpenCV, and the saving parameter we discussed earlier and returns a list of duration spots on where we should save the frames.
Now that we have these helper functions, let's define the main function and explain it:
def main(video_file):
    filename, _ = os.path.splitext(video_file)
    filename += "-opencv"
    # make a folder by the name of the video file
    if not os.path.isdir(filename):
        os.mkdir(filename)
    # read the video file
    cap = cv2.VideoCapture(video_file)
    # get the FPS of the video
    fps = cap.get(cv2.CAP_PROP_FPS)
    # if the SAVING_FRAMES_PER_SECOND is above video FPS, then set it to FPS (as maximum)
    saving_frames_per_second = min(fps, SAVING_FRAMES_PER_SECOND)
    # get the list of duration spots to save
    saving_frames_durations = get_saving_frames_durations(cap, saving_frames_per_second)
    # start the loop
    count = 0
    while True:
        is_read, frame = cap.read()
        if not is_read:
            # break out of the loop if there are no frames to read
            break
        # get the duration by dividing the frame count by the FPS
        frame_duration = count / fps
        try:
            # get the earliest duration to save
            closest_duration = saving_frames_durations[0]
        except IndexError:
            # the list is empty, all duration frames were saved
            break
        if frame_duration >= closest_duration:
            # if closest duration is less than or equals the frame duration,
            # then save the frame
            frame_duration_formatted = format_timedelta(timedelta(seconds=frame_duration))
            cv2.imwrite(os.path.join(filename, f"frame{frame_duration_formatted}.jpg"), frame)
            # drop the duration spot from the list, since this duration spot is already saved
            try:
                saving_frames_durations.pop(0)
            except IndexError:
                pass
        # increment the frame count
        count += 1
The above function looks complicated, but it's not; here's what we're doing:
- First, we make the filename variable which is the folder name we're going to create and save our frames in; we append
"-opencv"just to distinguish the methods, but you can delete that. - Then, we create the folder using the
os.mkdir()function if not already created. - After that, we read the video file using
cv2.VideoCapture, and retrieves the FPS using thecap.get()method and pass the code for FPS, which iscv2.CAP_PROP_FPS. - We set the saving frames per second to the minimum of the actual video FPS and our parameter. So we ensure we cannot bypass a higher saving fps than the actual video fps.
- After we get the saving durations, we enter the loop of reading the frames, and we only save when we're sure that the duration is in our
saving_frames_durationslist. We save the frame usingcv2.imwrite(), and set the frame name to the actual duration.
Defining the main code:
if __name__ == "__main__":
    import sys
    video_file = sys.argv[1]
    main(video_file)
Since we're passing the video file using command-line arguments, let's run it:
$ python extract_frames_opencv.py zoo.mp4After the execution of the above command, a new folder "zoo-opencv" is created, and that's what is included in it:
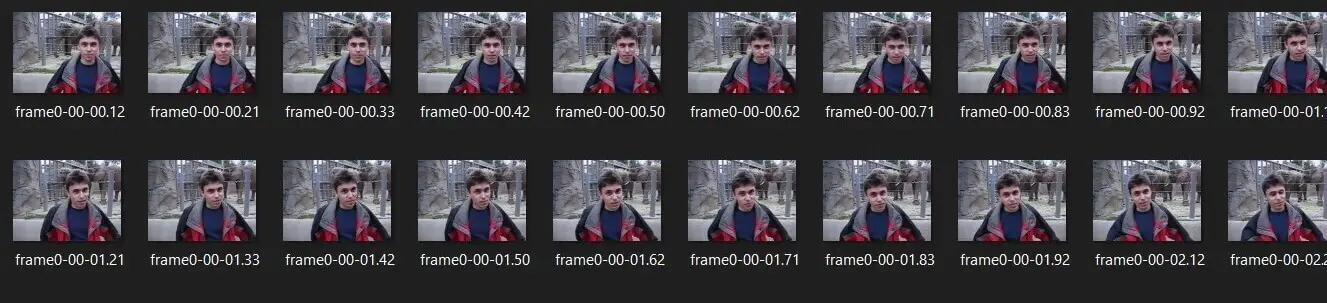 As you can see, the frames are saved along with the timestamp in the file name.
Related: How to Extract Audio from Video in Python
Method 2: Extracting Frames using MoviePy
In this method, we're not going to use OpenCV, but with another library called MoviePy, I'm going to create a file called extract_frames_moviepy.py and import the necessary modules:
from moviepy.editor import VideoFileClip
import numpy as np
import os
from datetime import timedelta
As in the first method, we'll be using the SAVING_FRAMES_PER_SECOND parameter here too:
# i.e if video of duration 30 seconds, saves 10 frame per second = 300 frames saved in total
SAVING_FRAMES_PER_SECOND = 10
Refer to the first section of this tutorial to know what does it exactly mean. As previously, we need the format_timedelta() function too:
def format_timedelta(td):
    """Utility function to format timedelta objects in a cool way (e.g 00:00:20.05)
    omitting microseconds and retaining milliseconds"""
    result = str(td)
    try:
        result, ms = result.split(".")
    except ValueError:
        return (result + ".00").replace(":", "-")
    ms = int(ms)
    ms = round(ms / 1e4)
    return f"{result}.{ms:02}".replace(":", "-")
Going to the main function now:
def main(video_file):
    # load the video clip
    video_clip = VideoFileClip(video_file)
    # make a folder by the name of the video file
    filename, _ = os.path.splitext(video_file)
    filename += "-moviepy"
    if not os.path.isdir(filename):
        os.mkdir(filename)

    # if the SAVING_FRAMES_PER_SECOND is above video FPS, then set it to FPS (as maximum)
    saving_frames_per_second = min(video_clip.fps, SAVING_FRAMES_PER_SECOND)
    # if SAVING_FRAMES_PER_SECOND is set to 0, step is 1/fps, else 1/SAVING_FRAMES_PER_SECOND
    step = 1 / video_clip.fps if saving_frames_per_second == 0 else 1 / saving_frames_per_second
    # iterate over each possible frame
    for current_duration in np.arange(0, video_clip.duration, step):
        # format the file name and save it
        frame_duration_formatted = format_timedelta(timedelta(seconds=current_duration))
        frame_filename = os.path.join(filename, f"frame{frame_duration_formatted}.jpg")
        # save the frame with the current duration
        video_clip.save_frame(frame_filename, current_duration)
As you may already notice, this method requires less code. First, we load our video clip using VideoFileClip() class, create our folder and ensure that the saving fps is less than or equal to the video fps.
We then define our looping step, which is 1 divided by the saving fps. If we set the SAVING_FRAMES_PER_SECOND to 10, then the step would be 0.1 (i.e., saving frame every 0.1 seconds).
The difference here is that the VideoFileClip object has the save_frame() method, which accepts two arguments: the frame filename and the duration of the frame you want to save. So what we did is that we loop using np.arange() (floating-point version of the regular range() function) to take steps on each frame that we want and call the save_frame() method accordingly.
Here is the main code:
if __name__ == "__main__":
    import sys
    video_file = sys.argv[1]
    main(video_file)
Let's test it out:
$ python extract_frames_moviepy.py zoo.mp4After a few seconds, the zoo-moviepy folder is created, and the frames were saved inside that folder.
Conclusion
After using both methods in my case, I notice that method one (using OpenCV) is faster in terms of time execution but saves larger images than MoviePy.
In the case of that demo video, the size of 190 frames was 2.8MB using the second method (using MoviePy) and 5.46MB using OpenCV. However, the duration of the MoviePy method was 2.3 seconds, whereas the OpenCV took about 0.6 seconds.
That being said, I have put two methods of extracting frames from videos in your hands in Python; it is up to you to choose which method suits you best.
Check the full code of both methods here.
Finally, if you're a beginner and want to learn Python, I suggest you take the Python For Everybody Coursera course, in which you'll learn a lot about Python. You can also check our resources and courses page to see the Python resources I recommend on various topics!
Learn also: How to Concatenate Video Files in Python
Happy coding ♥
Ready for more? Dive deeper into coding with our AI-powered Code Explainer. Don't miss it!
View Full Code Understand My Code


Got a coding query or need some guidance before you comment? Check out this Python Code Assistant for expert advice and handy tips. It's like having a coding tutor right in your fingertips!