Step up your coding game with AI-powered Code Explainer. Get insights like never before!
GraphQL has gained popularity as a flexible and efficient query language for APIs. Its ability to empower clients to request precisely the data they need has made it a compelling alternative to traditional REST APIs. If you're a Python developer looking to build a GraphQL server, you're in luck! In this article, we'll explore how to create a GraphQL server in Python using FastAPI, Strawberry, and Postgres by creating a simple project.
Our project revolves around building a GraphQL server that leverages the strengths of these technologies. FastAPI, a modern and high-performance web framework, serves as the foundation, providing robust request handling and efficient routing. Strawberry, a GraphQL library inspired by data classes and type hints, simplifies schema definition and query resolution. Finally, we'll integrate Postgres, a widely adopted and feature-rich database, to store and retrieve data efficiently.
Throughout this tutorial, you'll learn step-by-step how to set up a GraphQL server using FastAPI, define GraphQL schemas using Strawberry, and leverage the capabilities of Postgres for data storage. By the end, you'll have a solid understanding of how these technologies work together and be able to build your own GraphQL server in Python.
To help you follow along, the complete code for this tutorial is available on this repo.
Table of Contents:
- The Tech Stack
- The Project
- Prerequisites
- Start a Virtual Environment
- Install the Dependencies
- Initialize the Server
- Build the GraphQL API
- Build the Data Layer
- Wiring in Postgres to GraphQL
- Testing the API
- Conclusion
The Tech Stack
 Python GraphQL API tech stack - FastAPI, Strawberry, and Postgres
The tech stack we'll be using in this tutorial consists of FastAPI, Strawberry, and Postgres. Each component plays a vital role in the creation of our GraphQL server.
The diagram above depicts how our tech stack will be connected to each other to build the Python GraphQL API.
FastAPI, a modern web framework inspired by Flask and Django, forms the backbone of our server. It is built on top of Starlette and provides a highly performant and asynchronous foundation for handling HTTP requests. FastAPI's intuitive syntax and automatic data validation make it a popular choice for building APIs. With FastAPI, we can effortlessly handle incoming GraphQL requests and efficiently route them to the appropriate endpoint (/graphql).
Strawberry, our next piece of the puzzle, is a GraphQL library for Python that simplifies schema definition and query resolution. What sets Strawberry apart is its innovative use of data classes and type hints, which allow us to define our GraphQL schema in a concise and intuitive manner. By leveraging Strawberry's powerful type inference capabilities, we can easily map Python data types to GraphQL types. Strawberry seamlessly integrates with FastAPI, enabling us to create a robust GraphQL API on top of the FastAPI framework.
For data storage, we've chosen Postgres as our database of choice. However, it's important to note that the selection of the database is not limited to Postgres. You can connect to various databases such as SQLite, MySQL, MongoDB, or any other databases out there. In our case, we’ll be using Postgres and accessing it through SQLAlchemy, a popular and versatile database toolkit for Python. SQLAlchemy provides an abstraction layer to the database, allowing us to work with the database in a database-agnostic manner. By leveraging SQLAlchemy's ORM (Object-Relational Mapping) capabilities, we can easily define and execute queries to retrieve and store data in our Postgres database.
It's worth mentioning that the choice of Postgres as the database in this tutorial is purely optional. Readers are free to utilize any other database that suits their requirements and preferences. Strawberry's flexibility enables seamless integration with different database systems, empowering developers to leverage their preferred data storage solutions.
The Project
Now that you have an idea of what technologies we’re going to use in this tutorial and how they will work together, it’s time to discuss briefly what are we going to build.
In this tutorial, we will build a simple Python GraphQL API for a simple To Do App. This GraphQL API can handle the following CRUD (Create, Read, Update, Delete) operations:
- Get all the tasks in the to-do list
- Get a certain task by its ID
- Add a new task
- Update a task
- Delete a task
At the end of this tutorial, you’ll have a functioning GraphQL API that can handle the CRUD operations for a simple To Do App and persist the data to a database. Optionally, you can build from this tutorial and use the GraphQL API to build a fully functioning To Do App with whatever Front-End or user-facing interface you want, be it a simple CLI, a web front-end, a mobile app, or a desktop app. Or better yet, you can improve upon the simple API and build Authorization and Authentication so that multiple users can create their accounts and have To Do lists of their own.
Prerequisites
Before we dive into building our GraphQL server with FastAPI, Strawberry, and Postgres, make sure you have the following prerequisites in place:
- Python 3.11+: The code in this tutorial is written in and is compatible with Python version 3.11+
- ElephantSQL Account (optional): If you plan to use Postgres as your database, you'll need a Postgres server to connect to. One option is to sign up for an account with ElephantSQL, which provides managed Postgres hosting. This step is optional, as you can choose to use any other Postgres server or even a different database altogether. If you decide to use ElephantSQL, sign up for an account and take note of the connection details (URL, username, password, etc.) for configuring your Postgres connection later in the tutorial.
With these prerequisites in place, we're ready to move on and set up our GraphQL server.
Start a Virtual Environment
Now that you have a good understanding of the background of this tutorial, it’s time to start building our project!
To start with, create a new folder for this new project. Let’s name our project PythonGQL but feel free to name it whatever you want:
$ mkdir PythonGQL && cd PythonGQLThen, let’s create a virtual environment for this project. If you don’t know what it is, a Python virtual environment is an isolated Python environment that allows you to manage packages and dependencies specific to a project, separate from your system-wide Python installation.
Using a virtual environment is highly recommended for Python projects as it offers several advantages. Firstly, it helps keep your project dependencies organized and isolated, preventing conflicts between different projects or system-wide packages. Secondly, it allows you to easily reproduce your project's environment on different machines, making it more portable. Lastly, virtual environments facilitate a clean and controlled development environment, ensuring that your project's dependencies are consistent and easily managed.
To learn more about virtual environments, check out the official Python documentation.
To ensure that you have the virtual environment module installed, open your terminal or command prompt and run the following command:
$ python3 -m venv --helpIf the command displays information about the venv module, you're good to go! Otherwise, you may need to install the module. The method for installing the virtual environment module may vary depending on your operating system and Python installation. Refer to the official Python documentation or search for instructions specific to your setup.
Once you have the virtual environment module installed, let's create and activate a virtual environment for our project. In your project directory, run the following command to create a new virtual environment:
python3 -m venv pygqlYou can replace pygql with your desired name for your virtual environment or leave it as is. This command creates a new directory named pygql that contains the isolated Python environment for your project.
Next, activate the virtual environment by running the appropriate command for your operating system:
- On macOS and Linux:
$ source pygql/bin/activate- On Windows:
$ pygql\Scripts\activateYou should now see the name of your virtual environment (e.g., pygql) in your command prompt or terminal, indicating that it's active. Any subsequent Python commands or package installations will be confined to this virtual environment.
Install the Dependencies
To get started with our GraphQL server, we need to install a few dependencies. Make sure your virtual environment is activated before proceeding.
The dependencies required for this tutorial are as follows:
strawberry-graphql[fastapi]: This package provides the necessary tools to integrate Strawberry with FastAPI, enabling us to build a GraphQL server efficiently.uvicorn[standard]: Uvicorn is a lightning-fast ASGI server that we'll use to run our FastAPI application.sqlalchemy: SQLAlchemy is a powerful SQL toolkit and Object-Relational Mapping (ORM) library that will allow us to interact with the database.psycopg2: We'll also need to install thepsycopg2package, which provides the PostgreSQL adapter for Python.
To ensure consistency and compatibility, we've prepared a requirements.txt file with the specific versions of these dependencies.
Create a new file at the root of your project and name it requirements.txt. You can find the dependencies listed in the requirements.txt here or just copy the following:
anyio==3.7.0
click==8.1.3
fastapi==0.97.0
graphql-core==3.2.3
h11==0.14.0
httptools==0.5.0
idna==3.4
psycopg2-binary==2.9.6
pydantic==1.10.9
python-dateutil==2.8.2
python-decouple==3.8
python-dotenv==1.0.0
python-multipart==0.0.6
PyYAML==6.0
six==1.16.0
sniffio==1.3.0
SQLAlchemy==2.0.16
starlette==0.27.0
strawberry-graphql==0.186.1
typing_extensions==4.6.3
uvicorn==0.22.0
uvloop==0.17.0
watchfiles==0.19.0
websockets==11.0.3
Then paste these values to your requirements.txt file.
Installing the dependencies from this file will ensure that everything works smoothly throughout this tutorial. To do that, navigate to your project directory in the terminal or command prompt and run the following command:
$ pip install -r requirements.txtThis command reads the requirements.txt file and installs all the specified packages and their respective versions into your virtual environment.
If you're unfamiliar with installing dependencies via a requirements.txt file, don't worry. You can check out this article to learn more about this common practice.
Once the installation process is complete, you're ready to move on to the next steps of building our GraphQL server.
Initialize the Server
Take note that your virtual environment must be active and the dependencies are properly installed.
Now create a new file at the root of your project and name it main.py:
# The `touch` command only works for MacOS/Linux
# You can use GitBash in Windows or just manually add a new file
touch main.py
We will write the FastAPI app instance in this file to initiate the server. So open this file and paste the following code:
from fastapi import FastAPI

app = FastAPI()
The FastAPI app instance is ready, but we still need to provide at least one route and a route handler to it for us to have a functioning API. In our case, we are building a GraphQL API, which requires only one route — /graphql. The route handler that we will pass to FastAPI to handle the /graphql route will be our GraphQL server, which we will build in the next section.
Build the GraphQL API
Alright, let’s build the GraphQL server!
For this, we will build it as a Python package and pass it as a route handler to the /graphql route later.
So first, create a new folder from the root of your directory and name it graphql_server:
$ mkdir graphql_serverTo declare graphql_server as a Python package, we need to add a new file in it called __init__.py:
$ touch graphql_server/__init__.pyDefine the Schema
Alright, now, the first step to building a GraphQL server is to define the Schema.
If you don’t know what a GraphQL schema is, basically it’s a data model where you define what data attributes belong to a certain model or object, as well as the types of those data attributes. For example, if you need to define the schema for a User, its data attributes (and types) might include:
username: stringemail: stringage: intisVerified: bool
Basically, it’s describing to GraphQL how your data will be structured, much like in Relational Databases (RDBs) or SQL.
When building your GraphQL schemas, there are generally two ways you can do this: either code-first or schema-first approach. We won’t go that deep into this topic, but basically, in the code-first approach, you define your GraphQL schema directly through code or the programming language you’re using. On the other hand, the schema-first approach is when you define GraphQL schemas through GraphQL’s Schema Definition Language (SDL), which is the syntax created to represent GraphQL data models.
Strawberry, which we will use in this tutorial, uses a code-first approach. Meaning, we will define the schema of our data through Python. Strawberry uses the type annotation feature in Python to build the GraphQL schema.
Since our project is just a GraphQL API for a simple To Do app, we only need one Schema: Task.
Now, create a new file under the graphql_server package and name it schemas.py (this is where we’ll define the Task schema):
$ touch graphql_server/schemas.pyHere, we will define the Task schema to have the following attributes:
id— the identifier of a task (which will be an integer type)content— the actual “to do” content of a task object (e.g. “Wash the dishes”)is_done— which is of type boolean and tells if a given task is marked finished or not. It should also be set toFalseby default.
Here’s how the Task schema will look like with Strawberry:
import strawberry
@strawberry.type
class Task:
	id: int
	content: str
	is_done: bool = False
Notice that we define each attribute’s type as Python type annotations. You can also optionally set default values in your data attributes, like the is_done.
You can copy this code and paste it in your schemas.py file.
Define the Resolvers
Now that the Task schema is done, it’s time to define the resolvers for our GraphQL API.
But first, let’s define what a resolver is.
Basically, a resolver in GraphQL is a function or method that handles the queries to the GraphQL API and determines how to fetch the data requested by a GraphQL query. In a sense, a resolver acts as a bridge between the GraphQL schema and the underlying data sources (e.g. databases like Postgres).
When you make a GraphQL query, you specify the fields you want to retrieve, but you don't directly define how the data should be fetched. This is where the resolver comes in. Each field in the GraphQL schema is associated with a resolver function that knows how to retrieve the data for that field.
Resolvers are essential when building GraphQL APIs because if you notice from our Task schema, there’s no way GraphQL knows how and where to retrieve the data associated with this schema. So for example, if the client requests a list of Tasks in their To Do list, a resolver will handle the data fetching from the data source. In our case, the resolvers will interact with the Postgres database to respond to the GraphQL queries.
So going back to our project, we want to cover the following CRUD (Create, Read, Update, Delete) operations in our resolvers:
Create: Add a new taskRead:- Get all the tasks in the to do list
- Get a single task (by its
id)
Update: Update a task from the to do listDelete: Delete a certain task from the to do list
First, create a new file, still under the graphql_server package, and name it resolvers.py:
$ touch graphql_server/resolvers.pyWe will group our resolver methods into two classes:
- The
QueryResolverclass - Its methods will handle theREADoperations or retrieving of data from the database. - The
MutationResolverclass - Its methods will handle theWRITEoperations or create, update and delete.
We will define each resolver as a static method under those two classes:
from strawberry import ID
from . import schemas
from typing import List

class QueryResolver:
	@staticmethod
	def get_tasks(pagination: any) -> List[schemas.Task]:
		# TODO: update the pagination type
		# TODO: Connect to the data layer
		pass

	@staticmethod
	def get_task(task_id: ID) -> (schemas.Task | None):
		# TODO: Connect to the data layer
		pass

class MutationResolver:
	@staticmethod
	def add_task(task_content: str) -> Task:
		# TODO: Connect to the data layer
		pass

	@staticmethod
	def update_task(task_id: ID, task: any) -> (schemas.Task | None):
		# TODO: update the task type
		# TODO: Connect to the data layer
		pass

	@staticmethod
	def delete_task(task_id: ID) -> None:
		# TODO: Connect to the data layer
		pass
We only have the template for our resolvers here and haven’t defined the resolvers yet since we have to set up the data layer (in the next section). We’ll go back here later after we finished building the data layer. For now, let’s just leave TODO comments and the pass keyword to each method so that we know where we left off from here.
Define the Query and Mutation Schemas
Now that we have our Task schema and template resolvers in place, we can now start defining the most important schemas in our GraphQL API, the Query and Mutation schemas.
These two are special types of schemas as they are what Strawberry will use to handle Query and Mutation. As a convention, these special schemas are always named this way — Query and Mutation.
In our project, we want the Query schema to have the following data attributes as per our CRUD operation requirements:
tasks:List[schemas.Task]- A list of Taskstask:(schemas.Task | None)- A singleTaskobject (orNoneif theidpassed to the query doesn’t match anyTask)
Notice how these two attributes’ types match the return types of the two Query resolver methods: get_tasks: -> List[schemas.Task] and get_task: -> (schemas.Task | None). That’s because we will connect those resolvers to these Query data attributes later. We will use the return value of the resolver methods for these attributes. This is also what I meant earlier when I said "resolvers handle the data fetching of the queries."
The same goes for the Mutation schema:
add_task:schema.Task- Adds a new task to the to do list and returns the newly addedTaskupdate_task:(schema.Task | None)- Updates a certainTaskobject and returns the updated task or null if no task exists with the giveniddelete_task— Deletes the task with the givenidand returns null regardless if the operation succeeds or not. Also, you don’t need to annotate this one.
We will define these two directly within the __init__.py file of the graphql_package:
import strawberry
from .schemas import Task
from .resolvers import QueryResolver, MutationResolver
from typing import List

@strawberry.type
class Query:
	tasks: List[Task] = strawberry.field(resolver=QueryResolver.get_tasks)
	task: (Task | None) = strawberry.field(resolver=QueryResolver.get_task)

@strawberry.type
class Mutation:
    add_task: Task = strawberry.field(resolver=MutationResolver.add_task)
    update_task: (Task | None) = strawberry.field(
        resolver=MutationResolver.update_task)
    delete_task = strawberry.field(resolver=MutationResolver.delete_task)
Now that we have our Query and Mutation schemas in place, it’s time to instantiate the GraphQL route handler and wire in these two schemas.
Instantiate the GraphQL Route Handler
Alright, we’re almost done setting up our GraphQL API.
For this step, we will instantiate the GraphQL route handler that FastAPI will use to route traffics from the /graphql route. We will also pass the Query and Mutation schemas to this route handler.
Still in the __init__.py file of graphql_server, add this import at the top:
from strawberry.fastapi import GraphQLRouter
# other imports ...
Then, add the following code at the bottom of the __init__.py file, underneath the Query and Mutation schema declarations:
# ...
schema = strawberry.Schema(query=Query, mutation=Mutation)
graphql_app = GraphQLRouter(schema)
Now it’s time to connect this route handler to FastAPI.
Add the GraphQL Route to FastAPI
The last step in setting up our GraphQL API is to include it in the FastAPI app we instantiated earlier.
So going back to the main.py file, import the graphql_app from the graphql_server package that we just created. Then, create a new FastAPI route /graphql and set graphql_app as its route handler. The final code of main.py should look like this:
from fastapi import FastAPI
# This is the GraphQL route handler from the package we created
from graphql_server import graphql_app

app = FastAPI()
# Add the `/graphql` route and set `graphql_app` as its route handler
app.include_route(graphql_app, prefix='/graphql')
And that’s it! Our GraphQL API is nearly ready. Now it’s time to build the data layer that will interact with our database which the resolvers will rely on.
Build the Data Layer
Alright, the next step in building our GraphQL API is to work on the data layer. The data layer gives an interface for our GraphQL server to interact with the database and perform CRUD operations.
Here, we will first set up a managed Postgres instance in the cloud using ElephantSQL and connect to it in Python using SQLAlchemy. You can also use other databases, like SQLite, MySQL, or MongoDB if you prefer to use any other database.
Create a new Postgres DB Instance
You can skip this step if you’re using other databases, such as SQLite, MySQL, or just running Postres locally on your machine. But if you opt-in to follow along, the first step in building our data layer is to create an instance of a Postgres Database. I’ll use ElephantSQL here, which gives us a generous free tier to create a managed Postgres DB instance in the cloud.
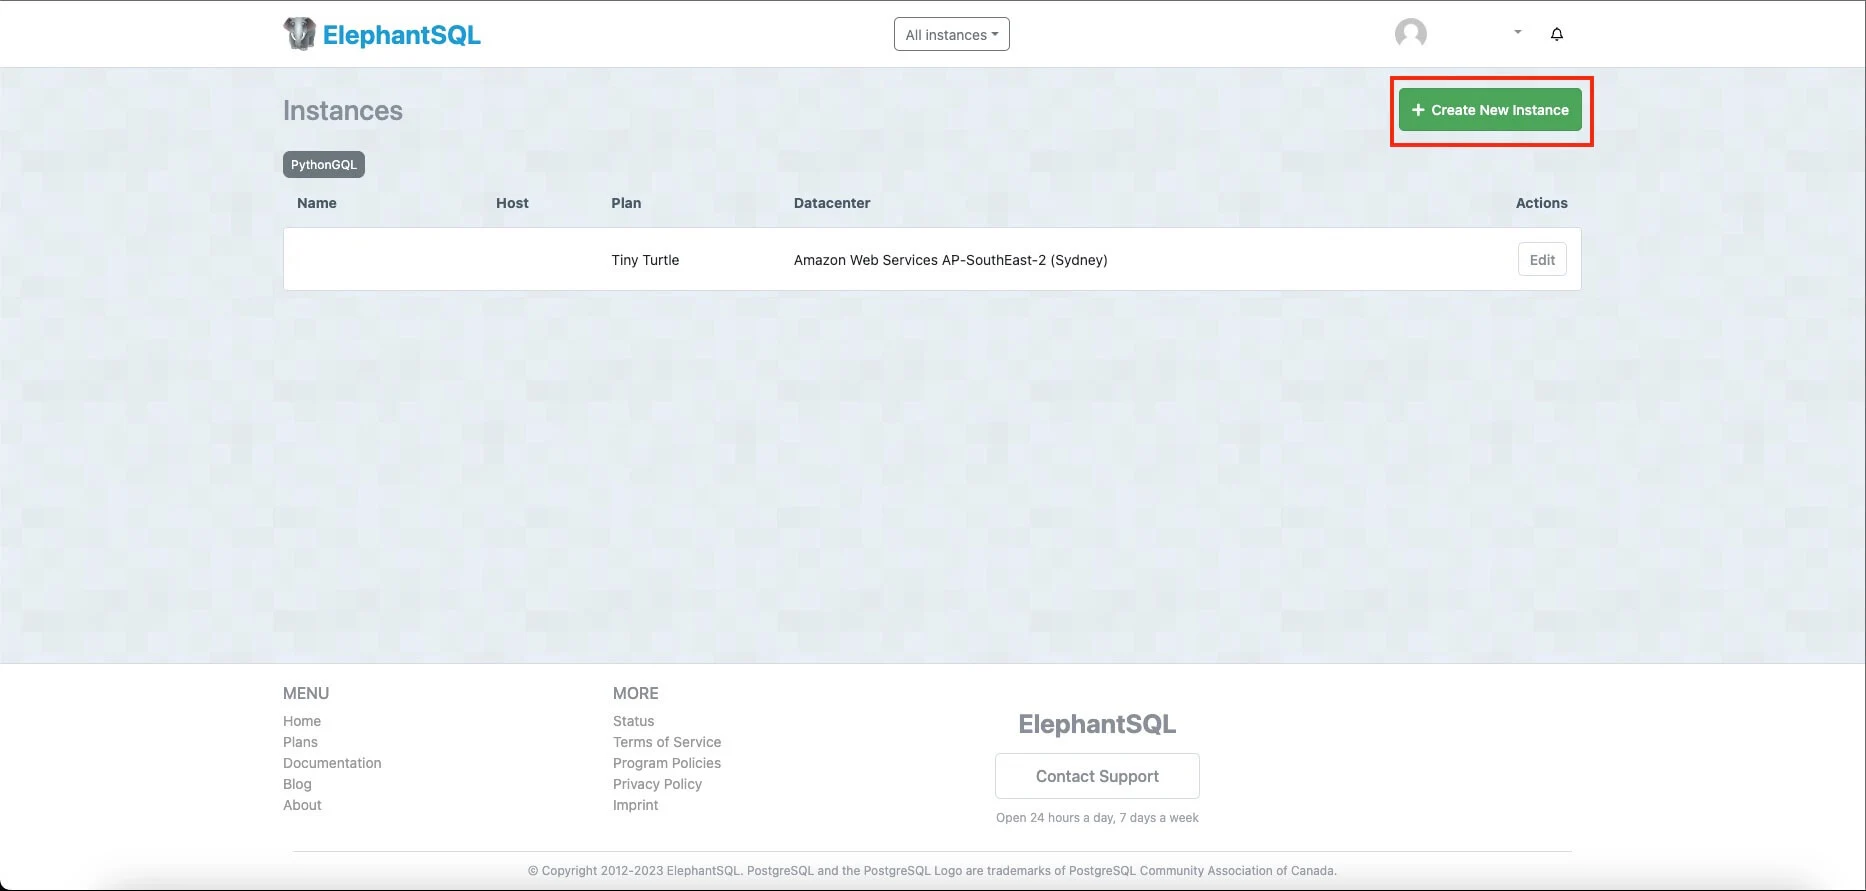
So, login to ElephantSQL if you haven’t yet, and create a new Postgres database instance:
Then, go to your newly created Postgres DB instance, click on Details, and copy the database URL:
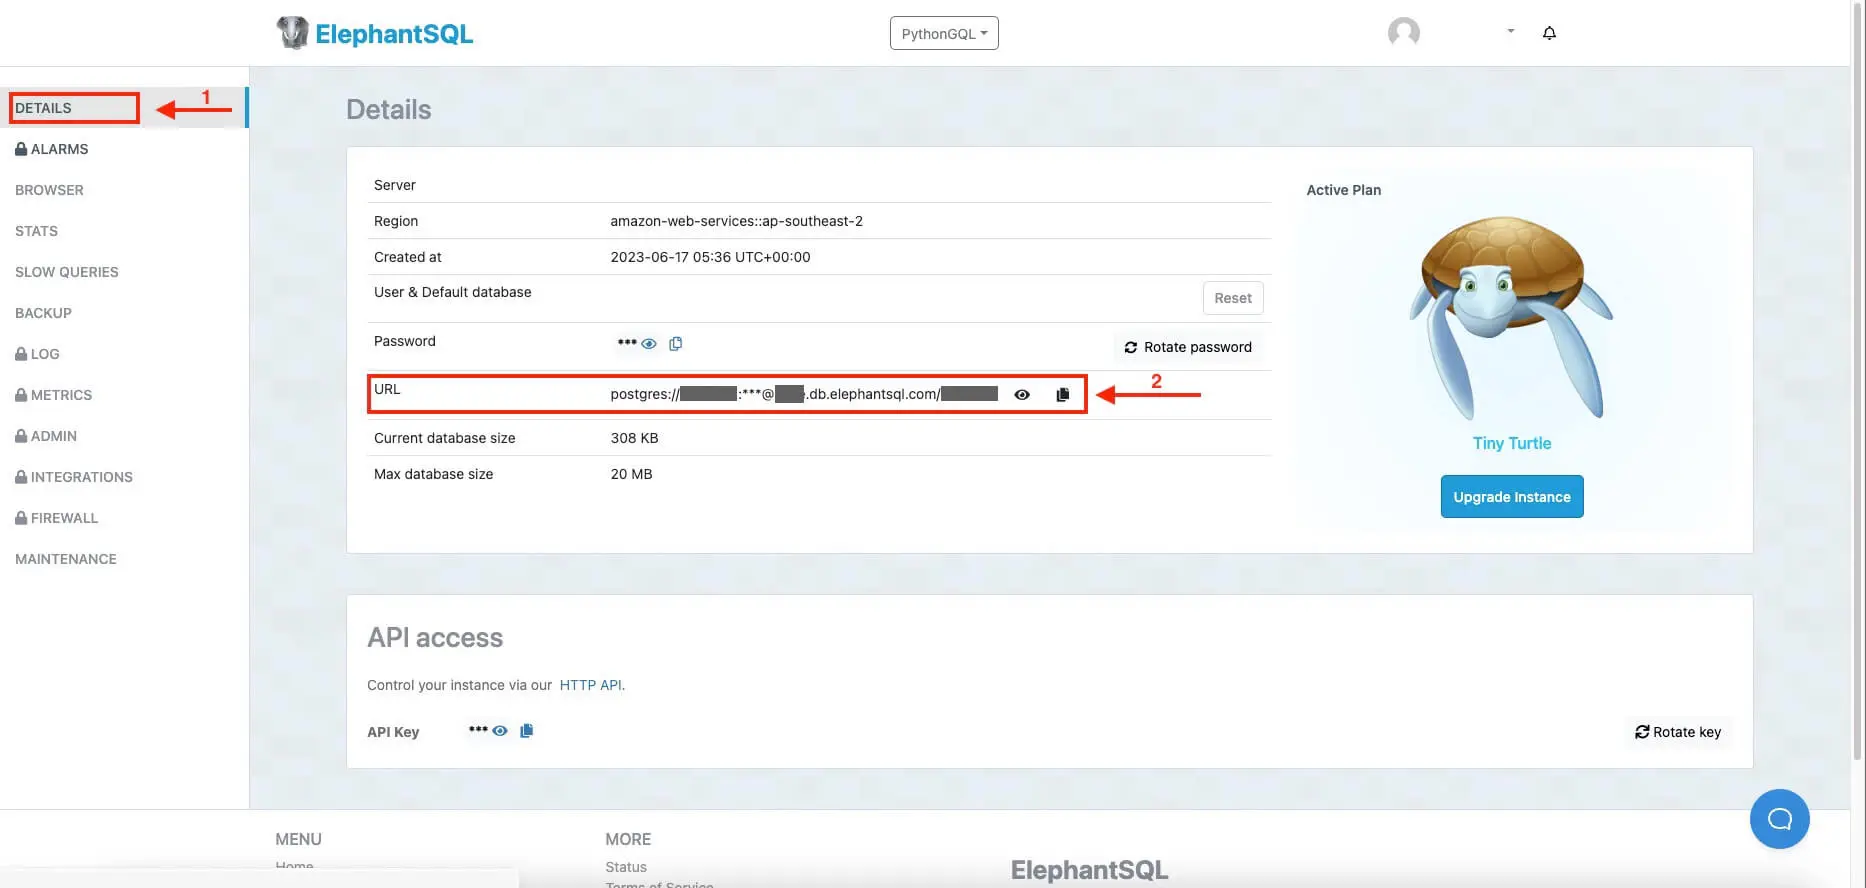 We will pass this database URL later to the GraphQL server which it will use to connect to this database instance. Remember to keep your database URL secure and never include it in your source code. It’s a common good practice to put sensitive info like this in an environment variable.
So, create a new file at the root of your project and name it .env. Remember to not push this to your remote repo (e.g. Github) if you’re using version control like Git. Instead, ensure including it in your .gitignore.
Inside this new file, create a new variable named POSTGRES_DB_URL and paste there the value of your database URL:
# .env
# Note that from `postgres://` I added `postgresql://`
POSTGRES_DB_URL="postgresql://user:password@host.db.elephantsql.com/user"
Also, take note that I added ql to postgresql:// due to a recent update in SQLAlchemy (which we’re going to use to interact with the database). So after pasting your database URL here, don’t forget to add ql to postgres to make it postgresql:///
Now that we have a Postgres DB instance ready, it’s time to build the data layer using SQLAlchemy.
Setup SQLAlchemy
For our data layer, we will create a new Python package, which we will import into our GraphQL API.
So at the root of your project, create a new folder and name it model, then add __init__.py file inside it to make it a Python package:
$ mkdir model && touch model/__init__.pyNow let’s set up SQLAlchemy. Inside the model directory, create a new file and name it database.py:
$ touch mode/database.pyInside this file, we will create an instance of the Engine class and the Session class from SQLAlchemy. The Session instance is what opens a connection to the database and interacts with it. The Session instance requires an Engine instance that tells what database to connect to. For that, paste this code to your database.py file:
from sqlalchemy import create_engine
from sqlalchemy.orm import sessionmaker
from sqlalchemy.ext.declarative import declarative_base
from decouple import config

SQLALCHEMY_DATABASE_URL = config("POSTGRES_DB_URL")
engine = create_engine(SQLALCHEMY_DATABASE_URL)
DBSession = sessionmaker(bind=engine, autoflush=False)
Base = declarative_base()
The database URL string is pulled in from the POSTGRES_DB_URL environment variable using the config function. The decouple module where config is imported from, is not a built-in Python module. Rather, it is installed together with other dependencies as indicated in the requirements.txt and should be installed in your virtual environment if you followed along.
We then pass this database URL string to the create_engine() function to create a new instance of the Engine class, which in turn, was passed to the sessionmaker() function to create an instance of the Session class that is then saved into the DBSession variable, which we will import and use later in our resolvers to interact with the database.
And lastly, the Base class: it is what we will use later to model the data of our SQL table (tasks). Our class models later will inherit from the Base class, which includes some methods and functionalities that will handle the ORM for us.
Define the Model
Now that SQLAlchemy is set up, it’s time to define our data models which SQLAlchemy will use to map to our database table (tasks). This step is similar to a schema definition in GraphQL, as we did earlier, where you’ll also define what attributes your model has as well as their data types.
So first, create a new file within the models folder and name it models.py.
$ touch models/models.pyReferring to our schema from GraphQL earlier, we only have one model, which is Task.
And if you can remember, this Task model has the following attributes:
id:intcontent:stris_done:bool
This will also be the same with our Task model in SQLAlchemy. But this time, rather than using the model for the API, this model will be used for the database.
So, to define the Task model, copy this code and paste it into your models.py file.
from sqlalchemy import Column, String, Integer, Boolean
from .database import Base

class Task(Base):
	__tablename__ = "tasks"
	id = Column(Integer, primary_key=True)
	content = Column(String)
	is_done = Column(Boolean, default=False)

	def __repr__(self):
		return f'Task(id={self.id}, content={self.content}, is_done={self.is_done})'
As mentioned earlier, the Task class inherits the Base class from database.py. As you can remember, this Base class is the returned value of the declarative_base() function in our database.py module.
We also give it a “dunder” (double underscore) variable __tablename__, which SQLAlchemy will use to refer to the SQL table this model is mapped to. We named the table tasks since it’s a convention that we name SQL tables in the plural form of the objects they contain.
Now for the attributes. Like in the Task schema earlier in GraphQL, the Task model also has the same attributes: id, content, and is_done. But this time, instead of just annotating the type of these attributes, we pass them instances of the Column class, which SQLAlchemy will use to refer to each column of the SQL table it is mapped to. So for this Task model, the columns referred to here represent the columns in the actual tasks table in Postgres, which will look something like this:
tasks
id |
content |
is_done |
| 1 | Wash the dishes | false |
| 2 | Buy Groceries | true |
| ... | .... | ... |
Lastly, the __repr__() method is optional and just gives us a string representation of this class so that we can print instances of it when we need to (i.e. for debugging).
Ensure the SQL Table Exists
Alright, we’re on the final step of building the data layer of our GraphQL API. We will add functionality where SQLAlchemy will automatically add the tasks table to the database if it doesn’t exist yet. SQLAlchemy will use the schema we defined in our schemas.py file. This step is also an optional step, but we included it as we always want to make sure that real SQL tables actually exist for the data models we defined. You can treat this as insurance that you can always make sure that your data models will have corresponding SQL tables to connect to.
So, open up your models/__init__.py file and paste the following code:
from . import models, database
# This will create the `tasks` table in the database
# if it doesn't exist yet
models.Base.metadata.create_all(bind=database.engine)
We put this functionality in the __init__.py file of the model package since we want this to take effect every time we import the model package (or anything we import from models).
Our data layer is all good and ready to go. Now it’s time to go back to our resolvers and connect our GraphQL API to Postgres.
Wiring in Postgres to GraphQL
For this step, we will need to connect our GraphQL API to the data layer by importing the model package to our resolvers.
Go back to the graphql_server/resolvers.py file and import the DBSession instance from model.database as well as the model.models module:
# other imports
from model import models
from model.database import DBSession
Now let’s work with the Query resolvers.
Query Resolvers
Earlier, we defined our QueryResolver class with two static methods in it:
get_tasks- retrieves a list of Tasks (the To Do list)get_task- retrieves a Task (byid)
Let’s start with the get_tasks() method. Replace the pass keyword in the get_tasks() method and paste the following code:
class QueryResolver:

	@staticmethod
	def get_tasks(pagination: (schemas.PaginationInput | None) = None) -> List[schemas.Task]:
		db = DBSession()
		try:
            query = db.query(models.Task)

            if pagination is not None:
                query = query\
                    .offset(pagination.offset)\
                    .limit(pagination.limit)

            tasks = query.all()
        finally:
            db.close()
        return tasks
	...
We have an optional argument for pagination which defaults to None. If the query doesn’t include parameters for pagination, this method will return everything in the tasks table in the database. Otherwise, it will query the database with the pagination parameters and return the resulting query. The get_tasks resolver uses the Session instance (saved to the db variable) from DBSession that we defined earlier in our data layer. This Session instance is what we use to connect to and query the database.
Moreover, the Task model from our data layer is used by the query() method to target the database table we need (tasks). Note that the database query is wrapped inside a try block wherein we specified db.close() in the finally block so that whatever happens during the database connection session (say an error occurred), we’re closing the database connection. This is important for security purposes, especially in production, as you don’t want an open session in your database just lying around as it can be potentially stolen by malicious parties and take control of your database.
This resolver method is all good, but we still need one more component: the schema definition of the pagination input, which is an object with offset and limit attributes.
In strawberry, when you have object inputs (like in our case: pagination), you can define a separate schema for it to keep your code clean and more organized. This is a pretty common practice in statically typed languages like TypeScript, Java, and C#.
So, going back to the graphql_server/schemas.py file, paste this code to define the schema of pagination. We will use it later to annotate the pagination input:
@strawberry.input
class PaginationInput:
    offset: int
    limit: int
The PaginationInput should automatically be scoped in the schemas import in resolvers.py.
Now let’s proceed to the get_task() resolver. Again, replace the pass keyword within get_task() with the following code:
class QueryResolver:
	...
	@staticmethod
    def get_task(task_id: ID) -> (schemas.Task | None):
        db = DBSession()
        try:
            task = db.query(models.Task)\
                     .filter(models.Task.id == task_id)\
                     .first()
        finally:
            db.close()
        return task
The get_task() resolver is similar to the get_tasks() resolver in the way we structure our code (with try block and the db variable storing the Session instance). Only here, the get_task() resolver only returns one Task object instead of a list. We also query the database but filter the result with the matching id passed by the client. If the id parameter matches an entry in the tasks table from the database, it will return the matching Task object, otherwise, it will return None (or null).
Mutation Resolvers
Finally, we need to wire in the mutation resolvers of our GraphQL API to the data layer.
As a recap, our mutation resolver has these three resolver methods:
add_task()update_task()delete_task()
Let’s start with the add_task() resolver. Replace pass in the add_task() method with this code:
class MutationResolver:
	@staticmethod
    def add_task(task_content: str) -> schemas.Task:
        db = DBSession()
        try:
            new_task = models.Task(content=task_content)
            db.add(new_task)
            db.commit()
            db.refresh(new_task)
        finally:
            db.close()
        return new_task
Notice that the structure of this code is similar to the query resolver methods earlier. This resolver requires one parameter, task_content (which refers to the task content of a to do item, like "wash the dishes"). We only require the task content from the client since the id attribute will be autogenerated by SQLAlchemy (as we specified it as the primary key), while we want is_done to always default to False.
Using the Session instance, we added the new_task to the database, commit (to save the changes), and refresh to refresh the attributes of new_task. This resolver also returns the newly added Task object from the database as a way to verify the operation succeeded.
Alright, moving to the update_task() resolver. Again, replace the pass from the update_task method with the following code:
class MutationResolver:
	...
	@staticmethod
    def update_task(task_id: ID, task: schemas.UpdateTaskInput) -> (schemas.Task | None):
        db = DBSession()
        try:
            modified_task = db.query(models.Task).filter(models.Task.id == task_id).first()
            modified_task.content = task.content if task.content is not None else modified_task.content
            modified_task.is_done = task.is_done if task.is_done is not None else modified_task.is_done
            db.commit()
            db.refresh(modified_task)
        finally:
            db.close()
        return modified_task
	...
The update_task() has some similarities with the query resolvers. Like the get_task() resolver, the update_task() resolver also queries a certain task object from the database, but with an extra step of modifying one or two of its attribute/s.
This resolver allows modifying the task’s content or is_done attribute. Both are optional, so the client can update one or both attributes (or none at all, although it won’t do anything other than mocking the behavior of the get_task() resolver).
One more important thing. Notice that the update_task() resolver also has an object input (task) like the get_tasks() resolver method. That means we also need to define a schema for this object input.
So, going back to the schemas.py file, copy and paste the following code to define the UpdateTaskInput schema:
@strawberry.input
class UpdateTaskInput:
    content: Optional[str] = None
    is_done: Optional[bool] = None
Notice that the content and is_done attributes of UpdateTaskInput are both optional and they default to None as defined earlier from the update_task() resolver method.
Like the PaginationInput, the UpdateTaskInput should automatically be scoped to the schemas import as well in the resolvers.py.
Alright, now we’re down to the last resolver, delete_task().
Replace the pass with the following code:
class MutationResolver:
	...
	@staticmethod
    def delete_task(task_id: ID) -> None:
        db = DBSession()
        try:
            deleted_task = db.query(models.Task)\
                             .filter(models.Task.id == task_id)\
                             .first()
            db.delete(deleted_task)
            db.commit()
        finally:
            db.close()
First off, the code structure is the same with the try block. We also use the Session instance stored in db to query the database. And like the get_task() and update_task() resolvers, we query the database for a specific task object. But unlike the update_task() resolver, it deletes the matching task object (or deletes nothing if there’s no match). Regardless if it matches and deletes a task object or not, it will return None (or null), which is a common practice when making GraphQL APIs.
And with that, we’re all done with the code, our GraphQL API is finished and ready!
If you come this far, give yourself a pat on the back. But hold on, there’s still one more thing we have to do: testing our GraphQL API and see if everything works properly.
Testing the API
Now for the exciting part! Let's check our work. So first, open your terminal (or command line) and run the server using the following command:
$ uvicorn main:app --reloadThe main in this command refers to the Python module main.py where our FastAPI app is located, while the app is the name of the variable where we store the FastAPI instance in main.py. The --reload just tells uvicorn to reload the server for every code change as we don’t want to constantly restart the server manually during development.
The uvicorn command should be available in your virtual environment if you installed properly the dependencies specified in the requirements.txt from earlier.
Alright, if your server is running properly, it should give you the host and port as to where your server is served locally, most likely:
http://127.0.0.1:8000/
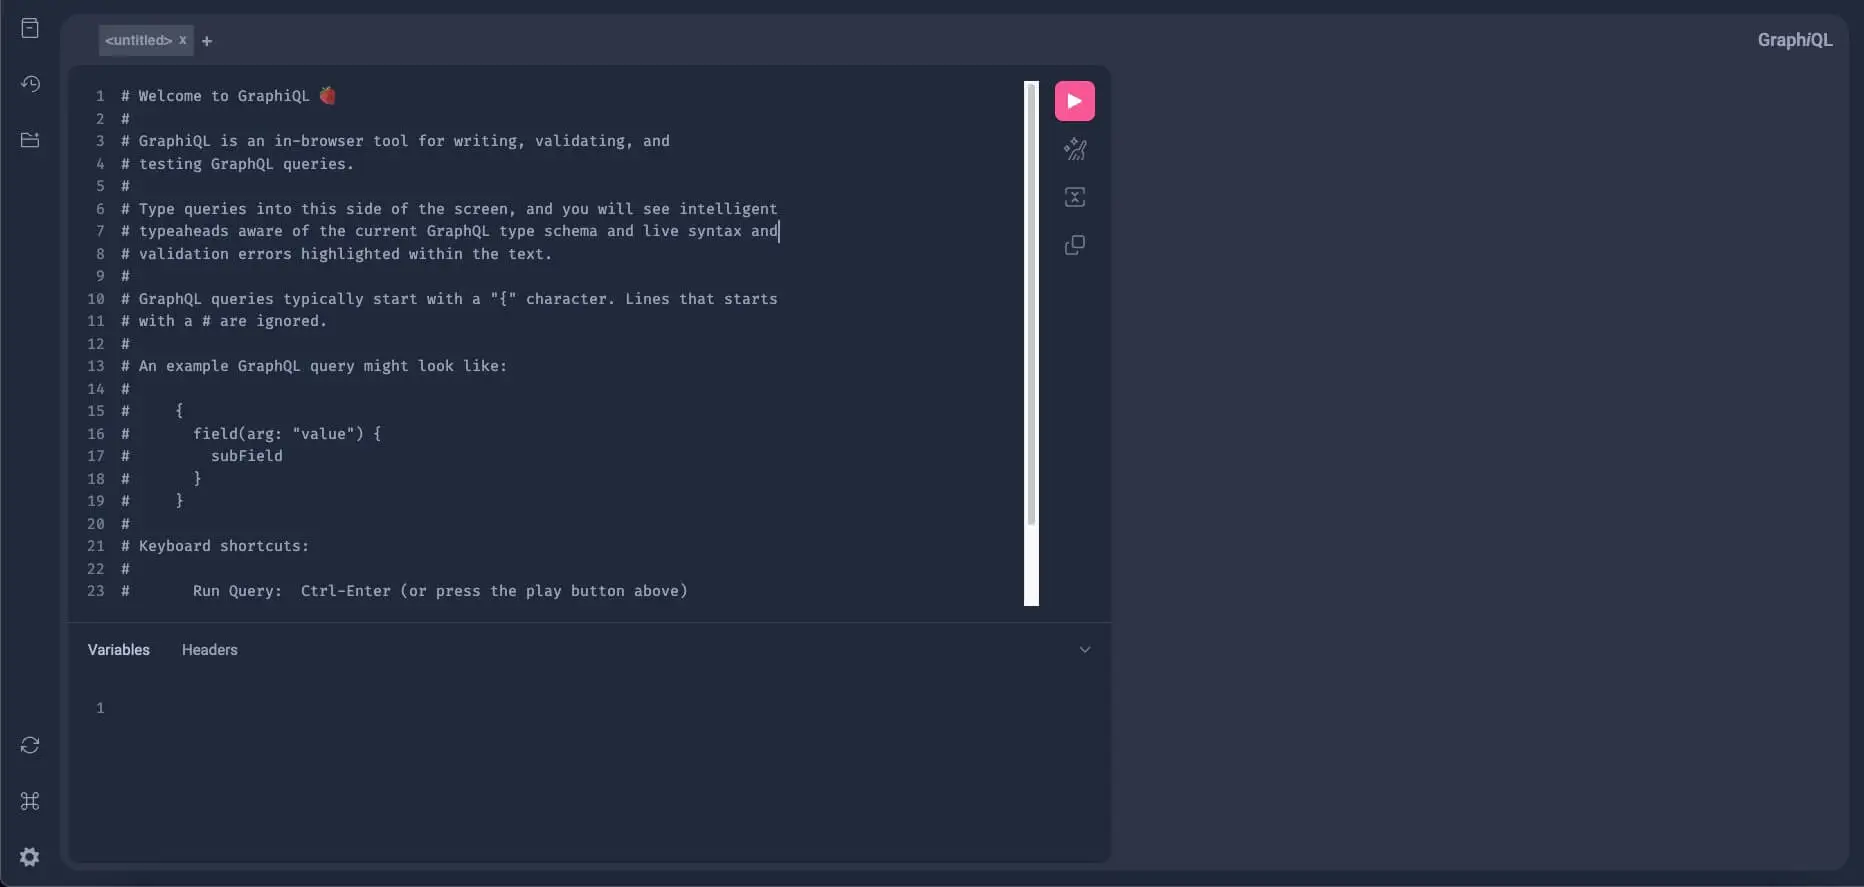
# or http://localhost:8000/Open this in your browser and head over to http://localhost:8000/graphql. You should see the GraphiQL of Strawberry which is a sandbox where you can query your GraphQL API:
 First, let's query the database for all the tasks we have (note that Strawberry will transform the snake casing in Python to camel casing by default - although you can change this if you want to. So,
 is_done will become isDone):
query GetTasks {
  tasks {
    id
    content
    isDone
  }
}
Paste this GraphQL query to the left panel of your GraphiQL and click the play button. Since we haven't added anything to our tasks yet, we’re expecting to receive an empty list.
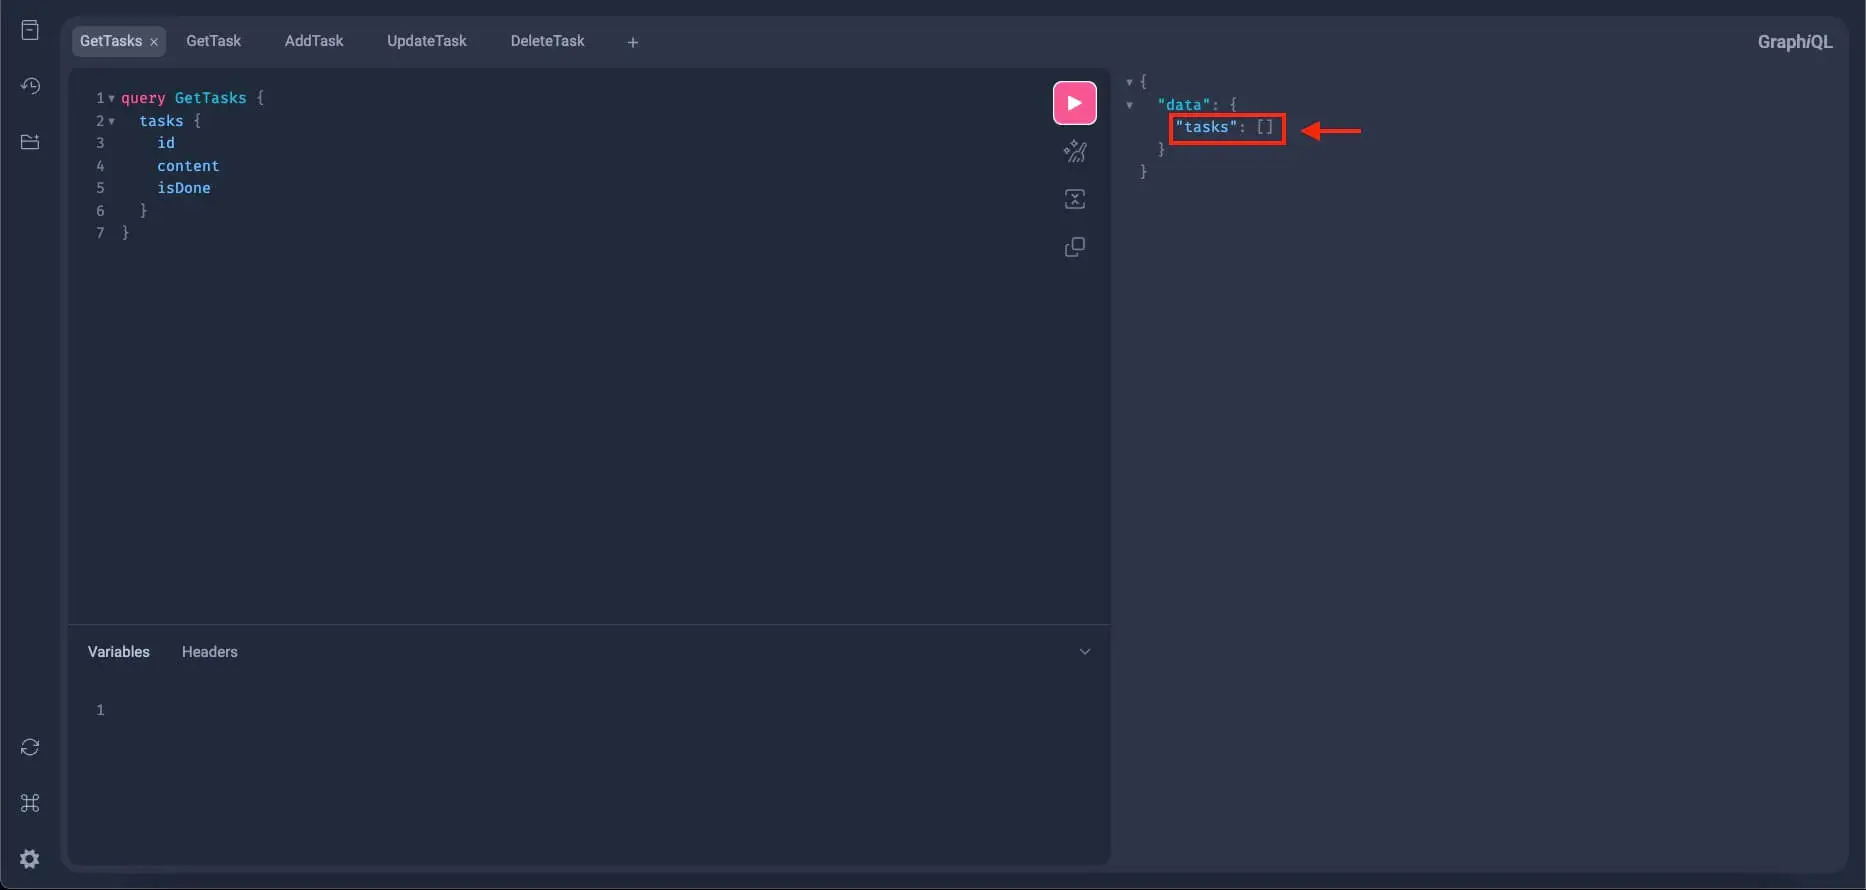
The get_tasks query resolver seems to be working properly.
Now we need to add some tasks to further test get_tasks and also check if the mutation addTask is properly working.
Add a new tab in the left panel of GraphiQL and write this mutation query:
mutation AddTask($taskContent: String!) {
  addTask(taskContent: $taskContent) {
    id
    content
    isDone
  }
}
Notice that we have input here; $taskContent which is a required string (String!) parameter, since, as you can remember, the add_task resolver from earlier accepts one required parameter: task_content, to create a new task.
So for that, go to the Variables section at the bottom of GraphiQL and add this JSON input:
{
  "taskContent": "Wash the dishes"
}
Now, run this mutation query and you should get something like this:
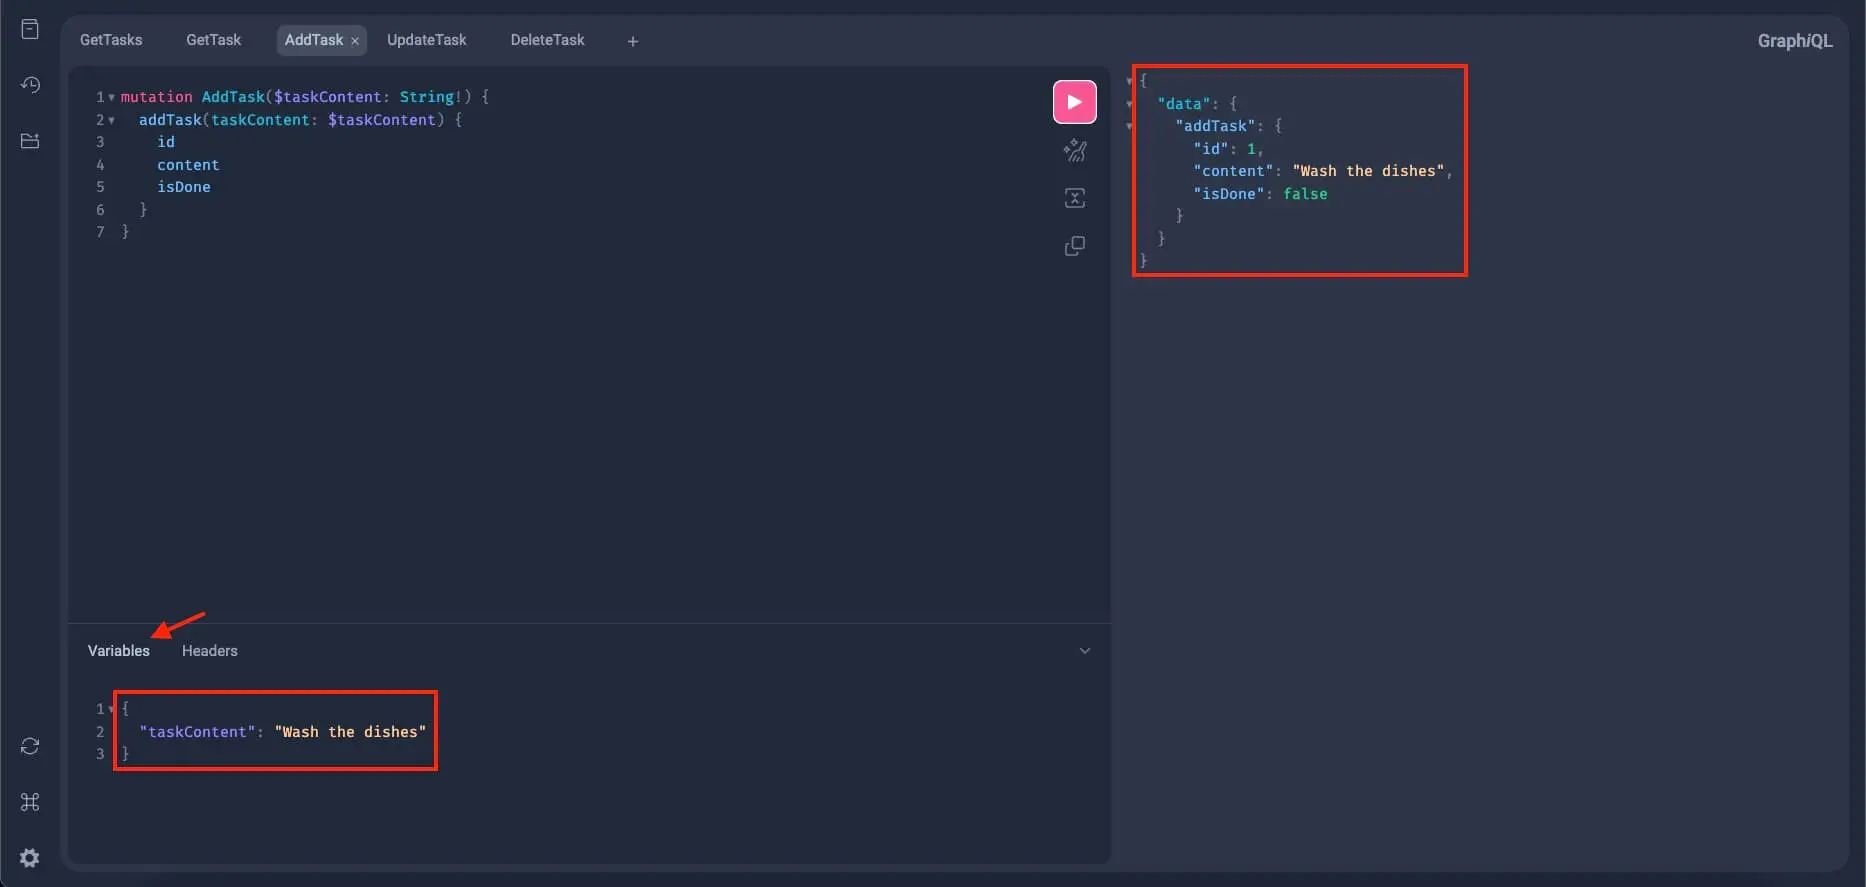
If the server responds with a task object, it means the new task was added to the database and the add_task mutation resolver seems to be working properly.
Let's add a couple more tasks to further test the add_task mutation. This time, we will only modify the input or the JSON object in the Variables section:
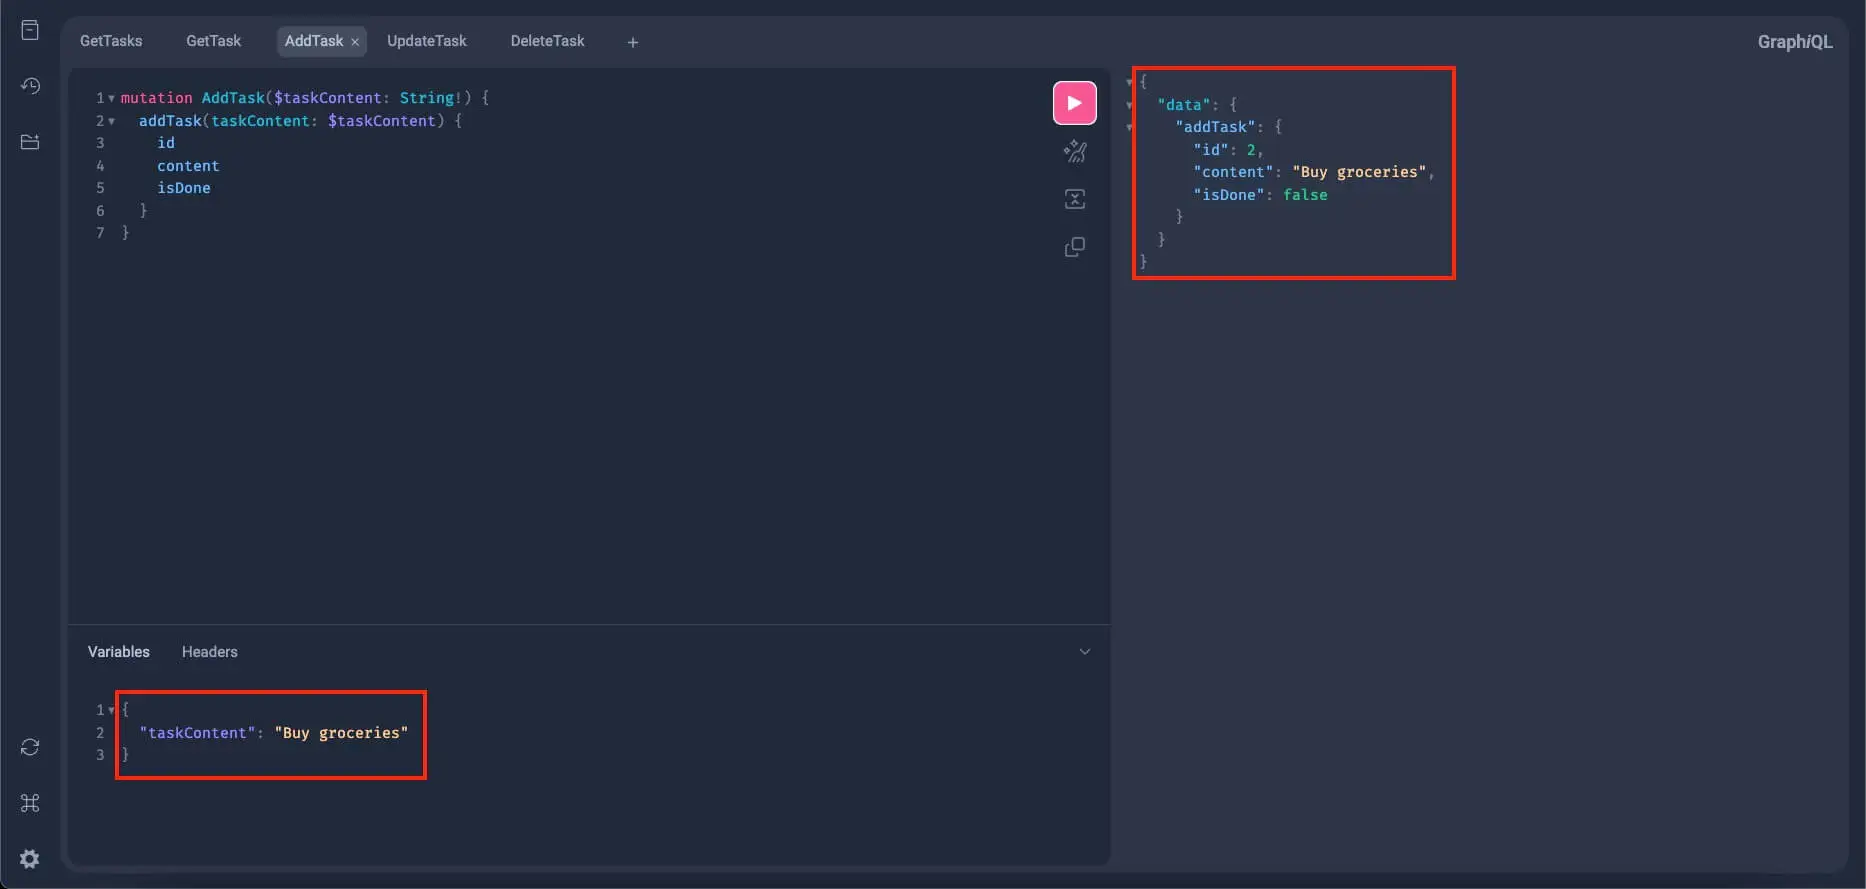
If no errors occurred and the mutation still works, let's add one more task:
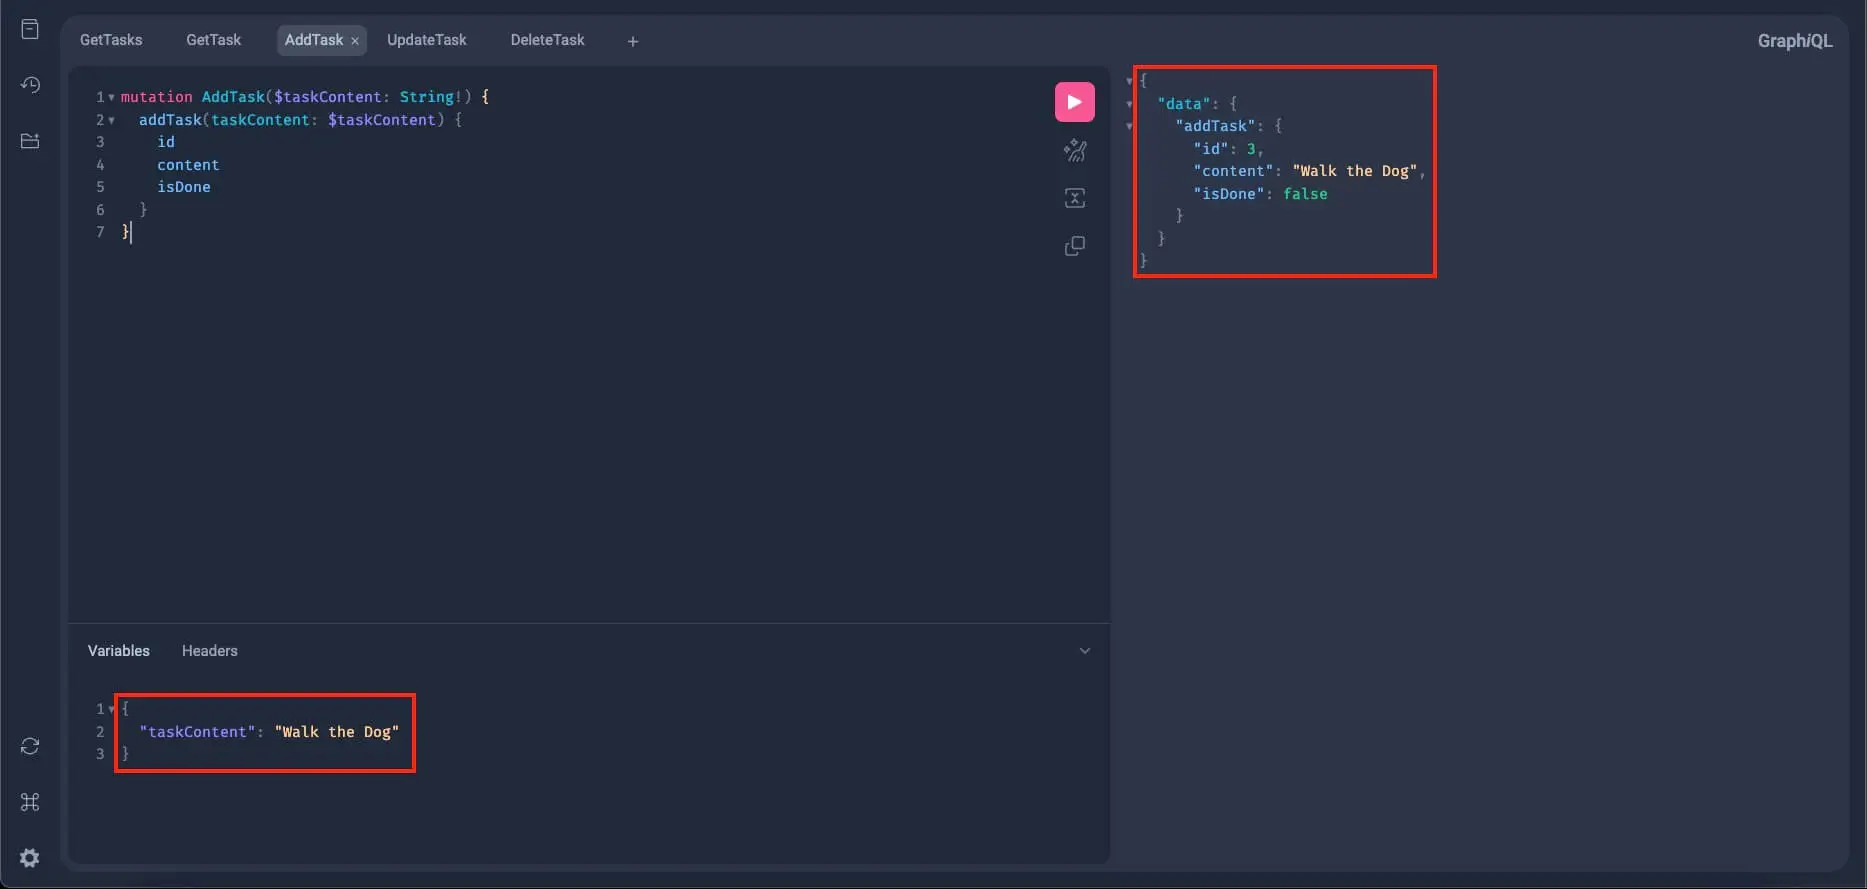
Alright, we will now query all the tasks we added to verify if the add_task and get_tasks mutation resolvers are working properly.
Go back to the GetTasks query from earlier and re-run it:
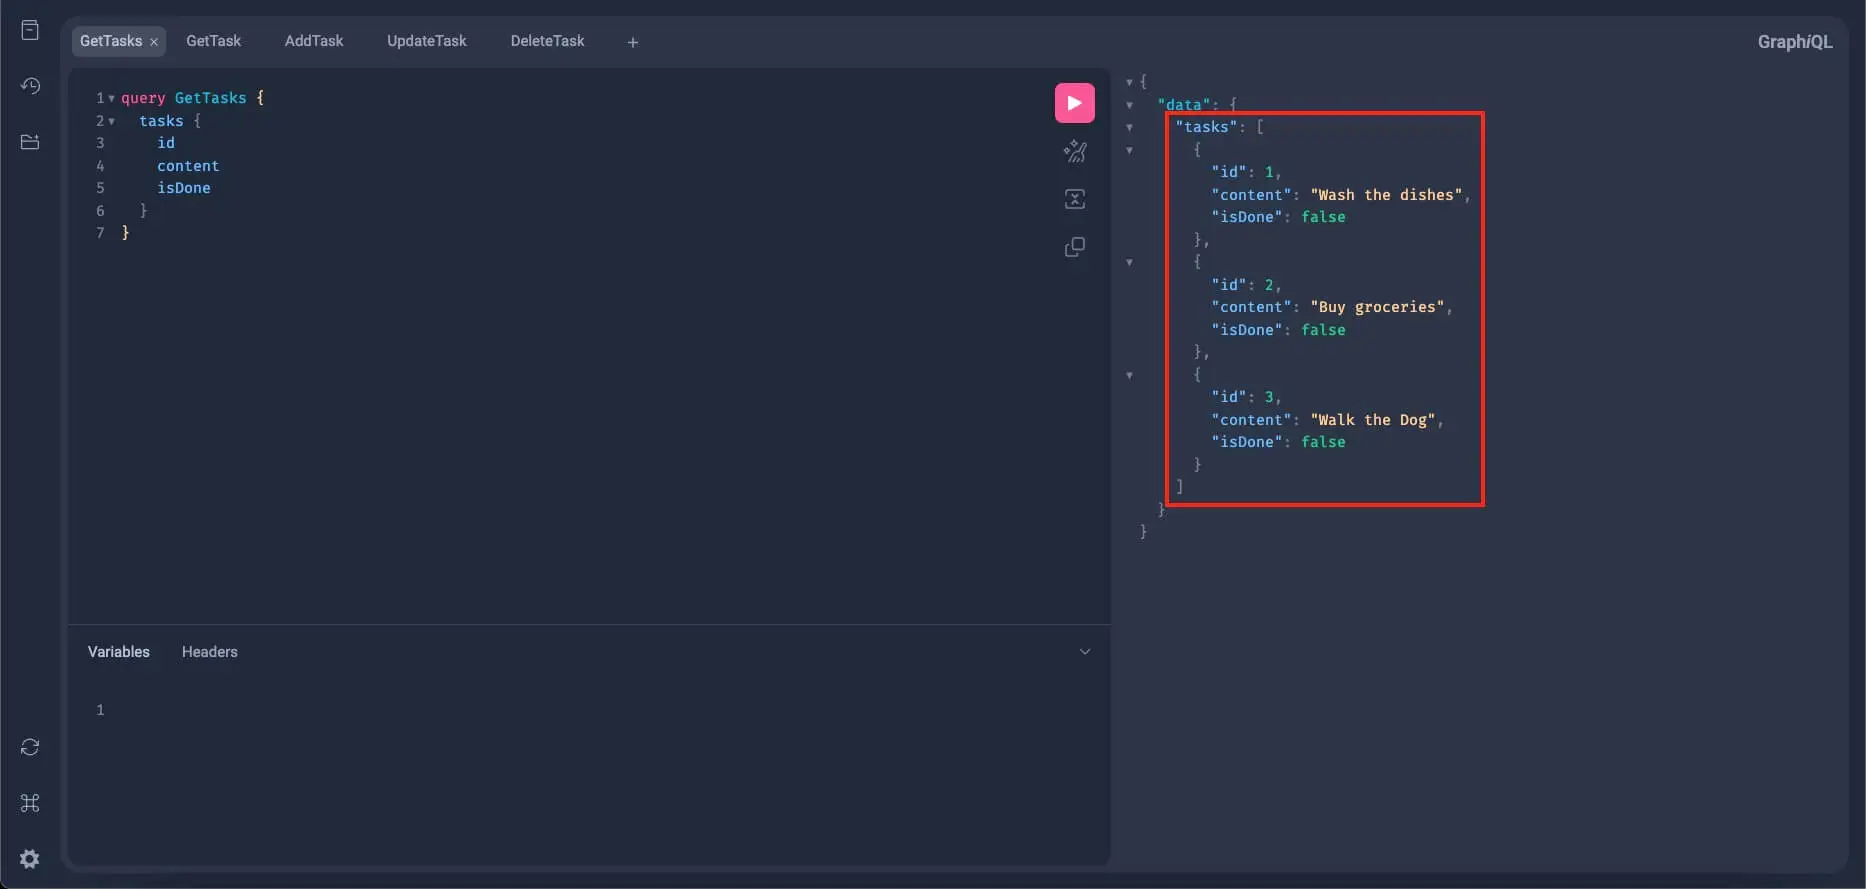
If you get all the tasks we added earlier (like what we have here), that means the add_task mutation resolver is working properly. For the get_tasks, we need to further test it out with pagination.
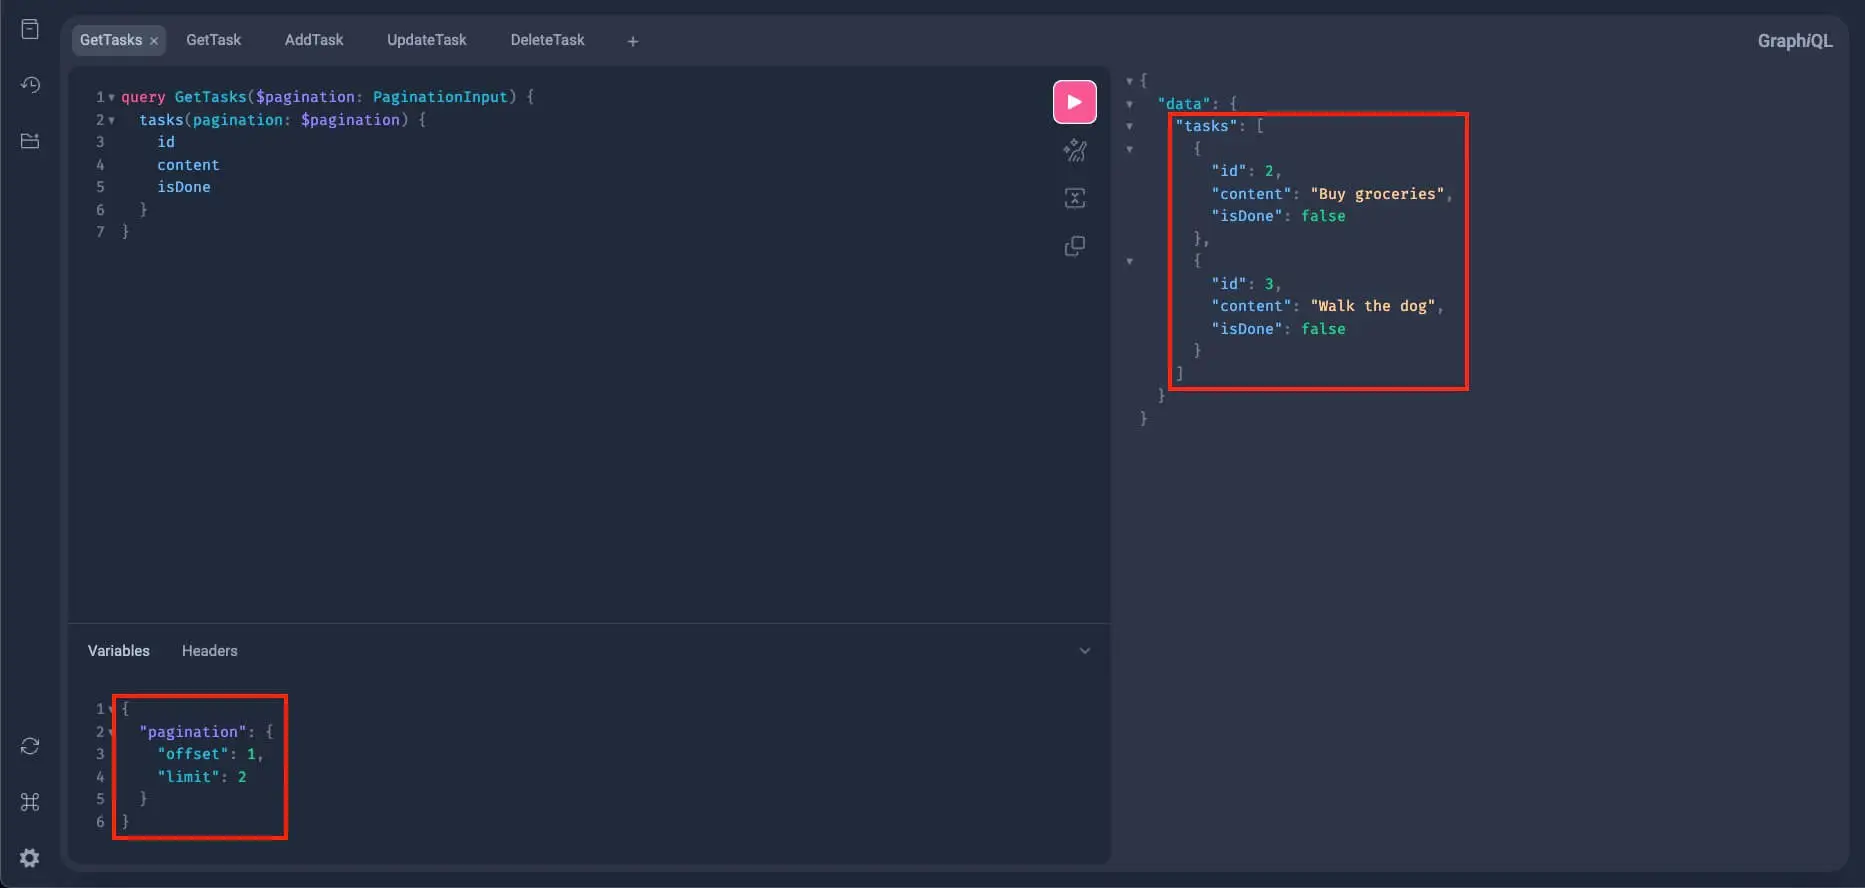
Re-write the GetTasks query to make it accept inputs:
query GetTasks($pagination: PaginationInput) {
  tasks(pagination: $pagination) {
    id
    content
    isDone
  }
}
Then, in the Variables section, add the following:
{
  "pagination": {
    "offset": 1,
    "limit": 2
  }
}
With this pagination input, our resulting query should skip the first entry in the database (the offset) and limit the results to 2 items. This query should then return the following:
Alright! Now we have more assurance that the get_tasks query is working, but still, we need to test it with other mutation queries to fully make sure it's working.
But before that, if you can remember, we have one more query named get_task. Let's test this query also.
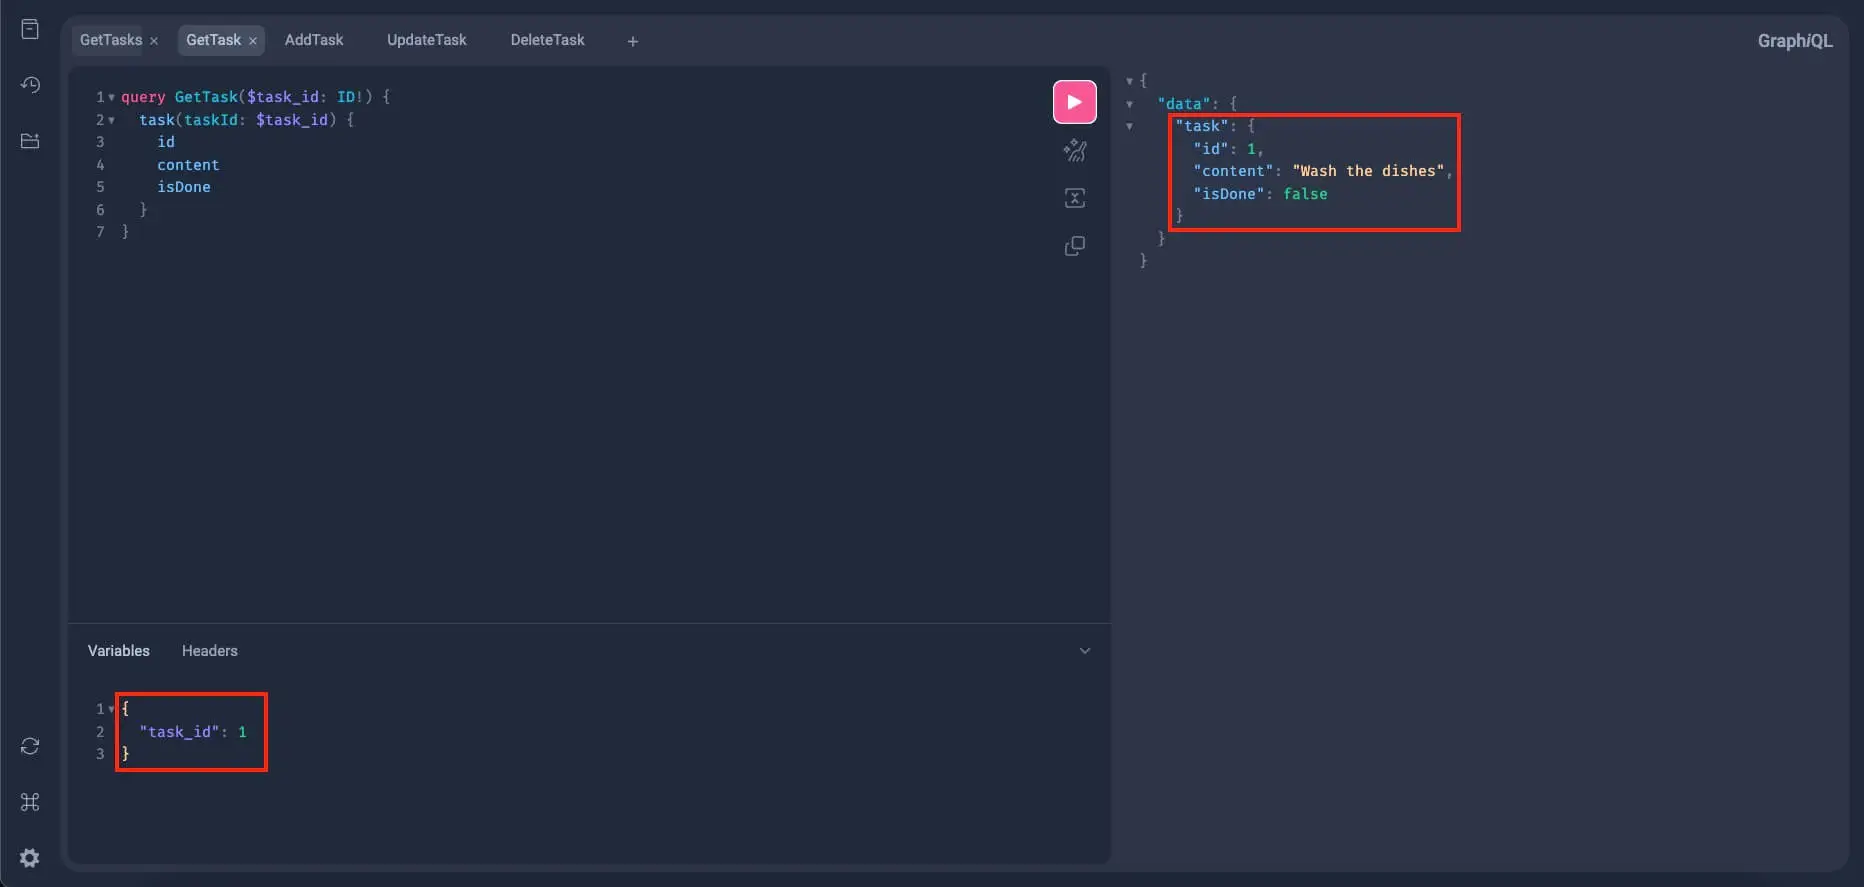
Create a new tab in GraphiQL and write this query:
query GetTask($task_id: ID!) {
  task(taskId: $task_id) {
    id
    content
    isDone
  }
}
Again, we have input here, $id, so back to the Variables section. Let's first try to get a task with an id of 1:
{
  "id": 1
}
Run this query and we should get the matching task like this:
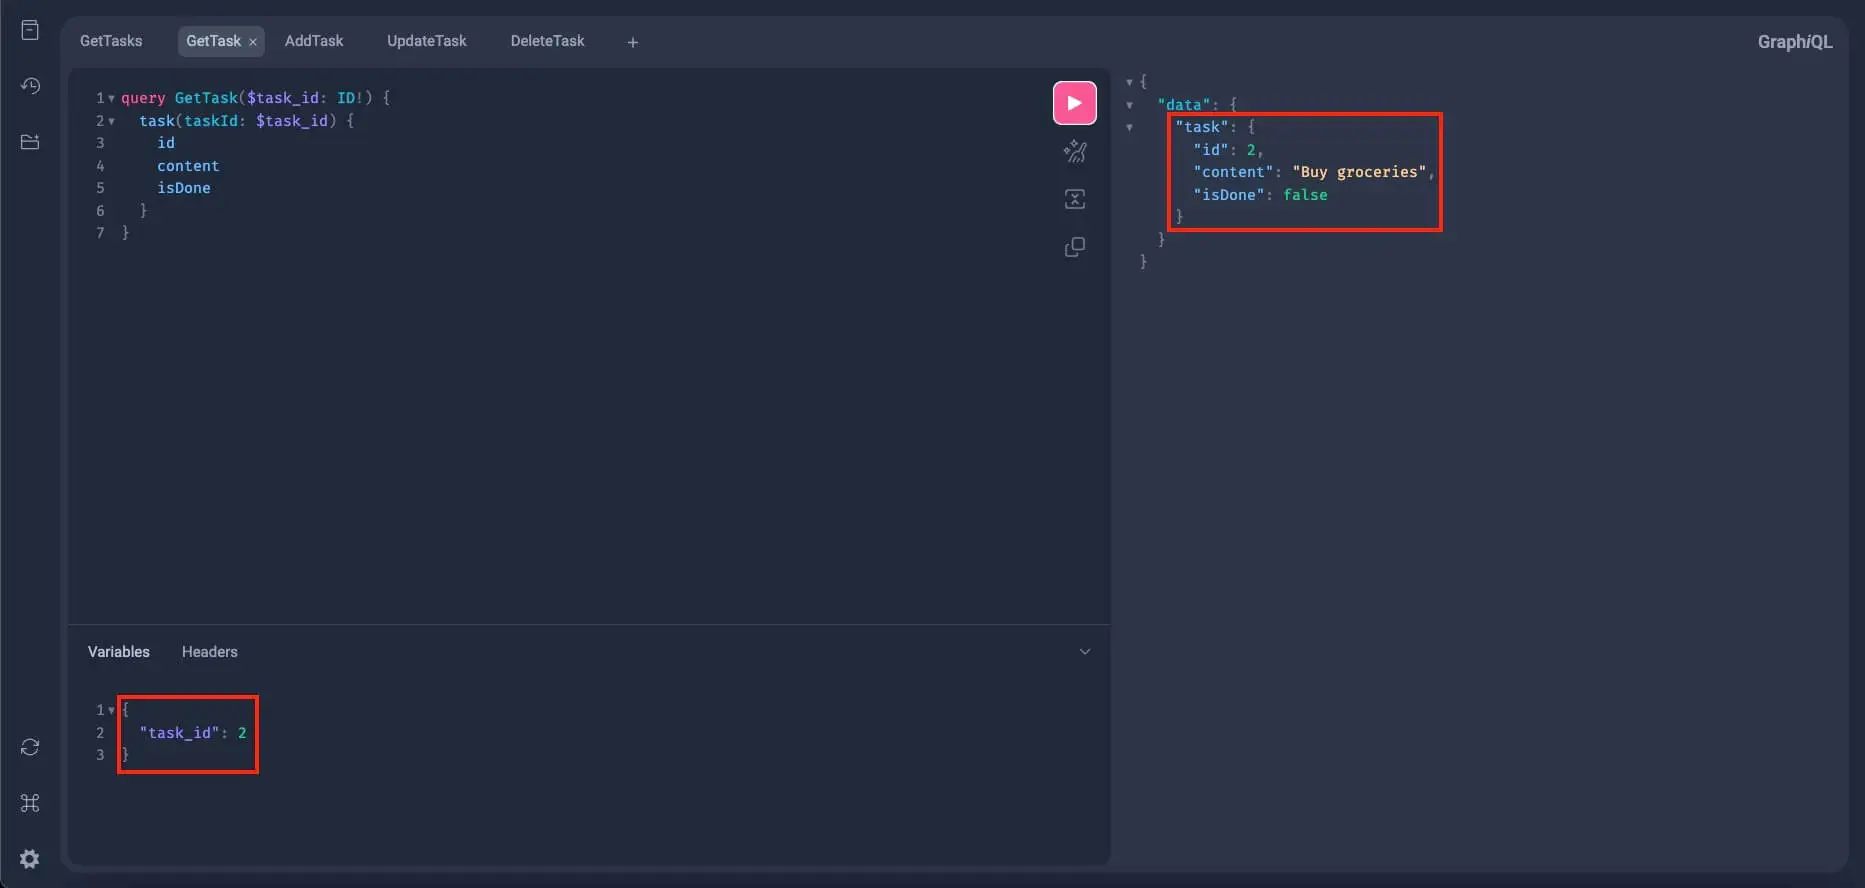
Let's further test this with the other two tasks. Query the task with an id of 2:
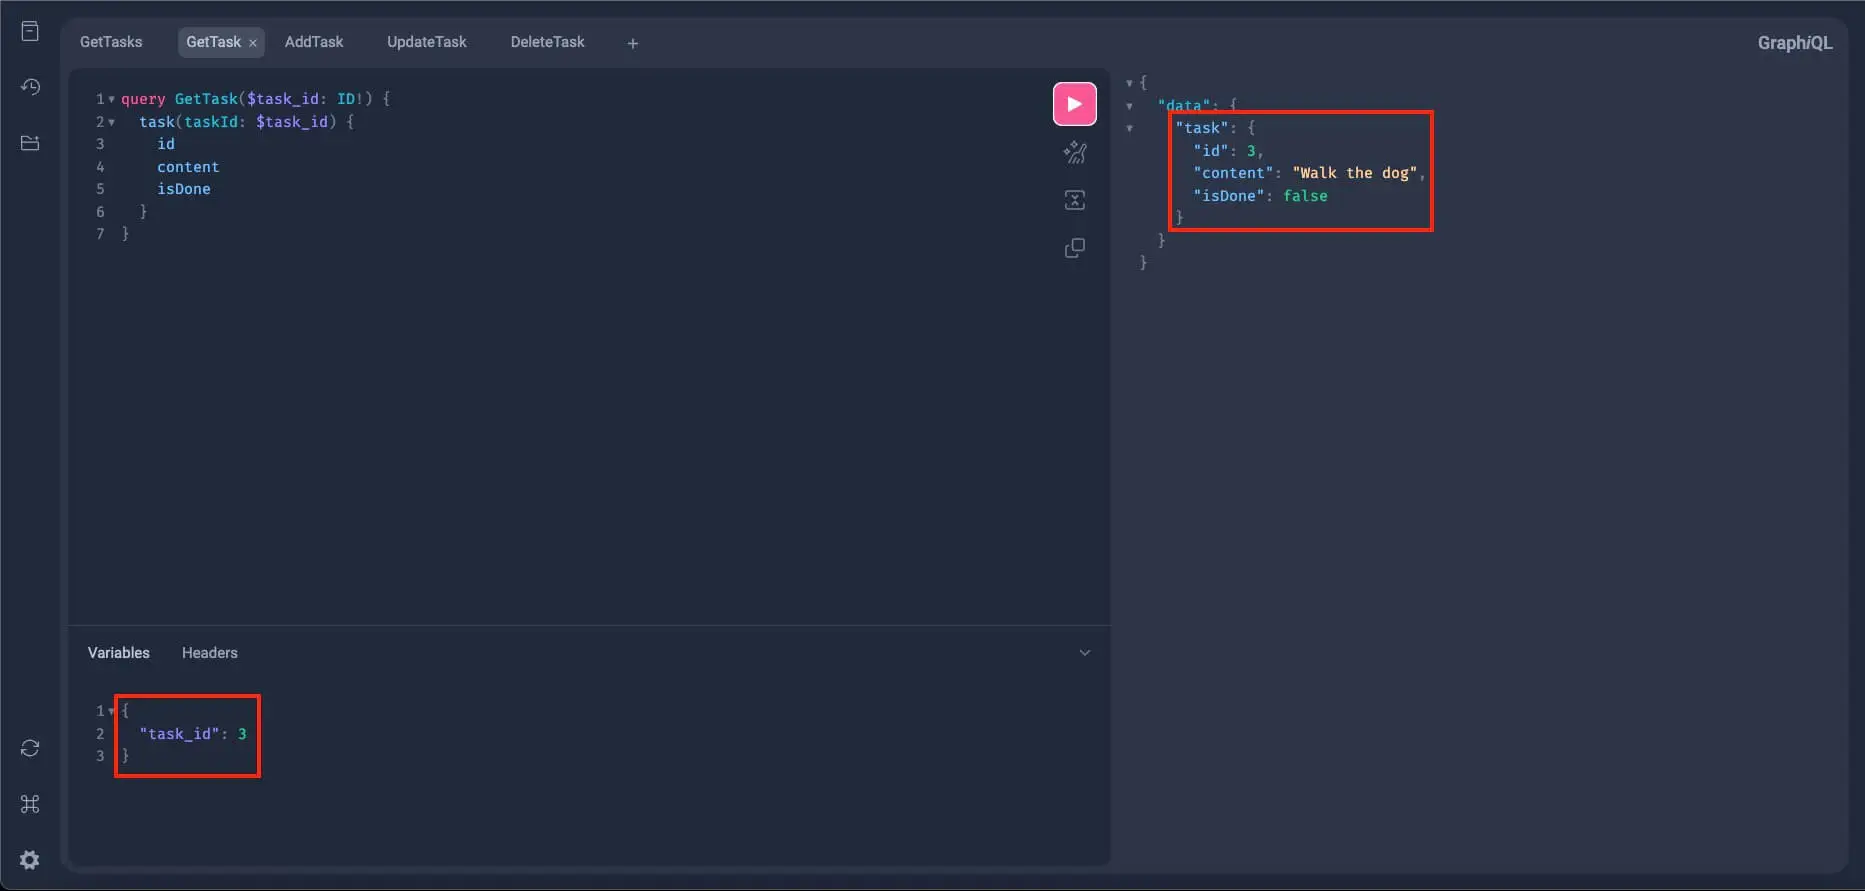
And the last task we have which has the id of 3:
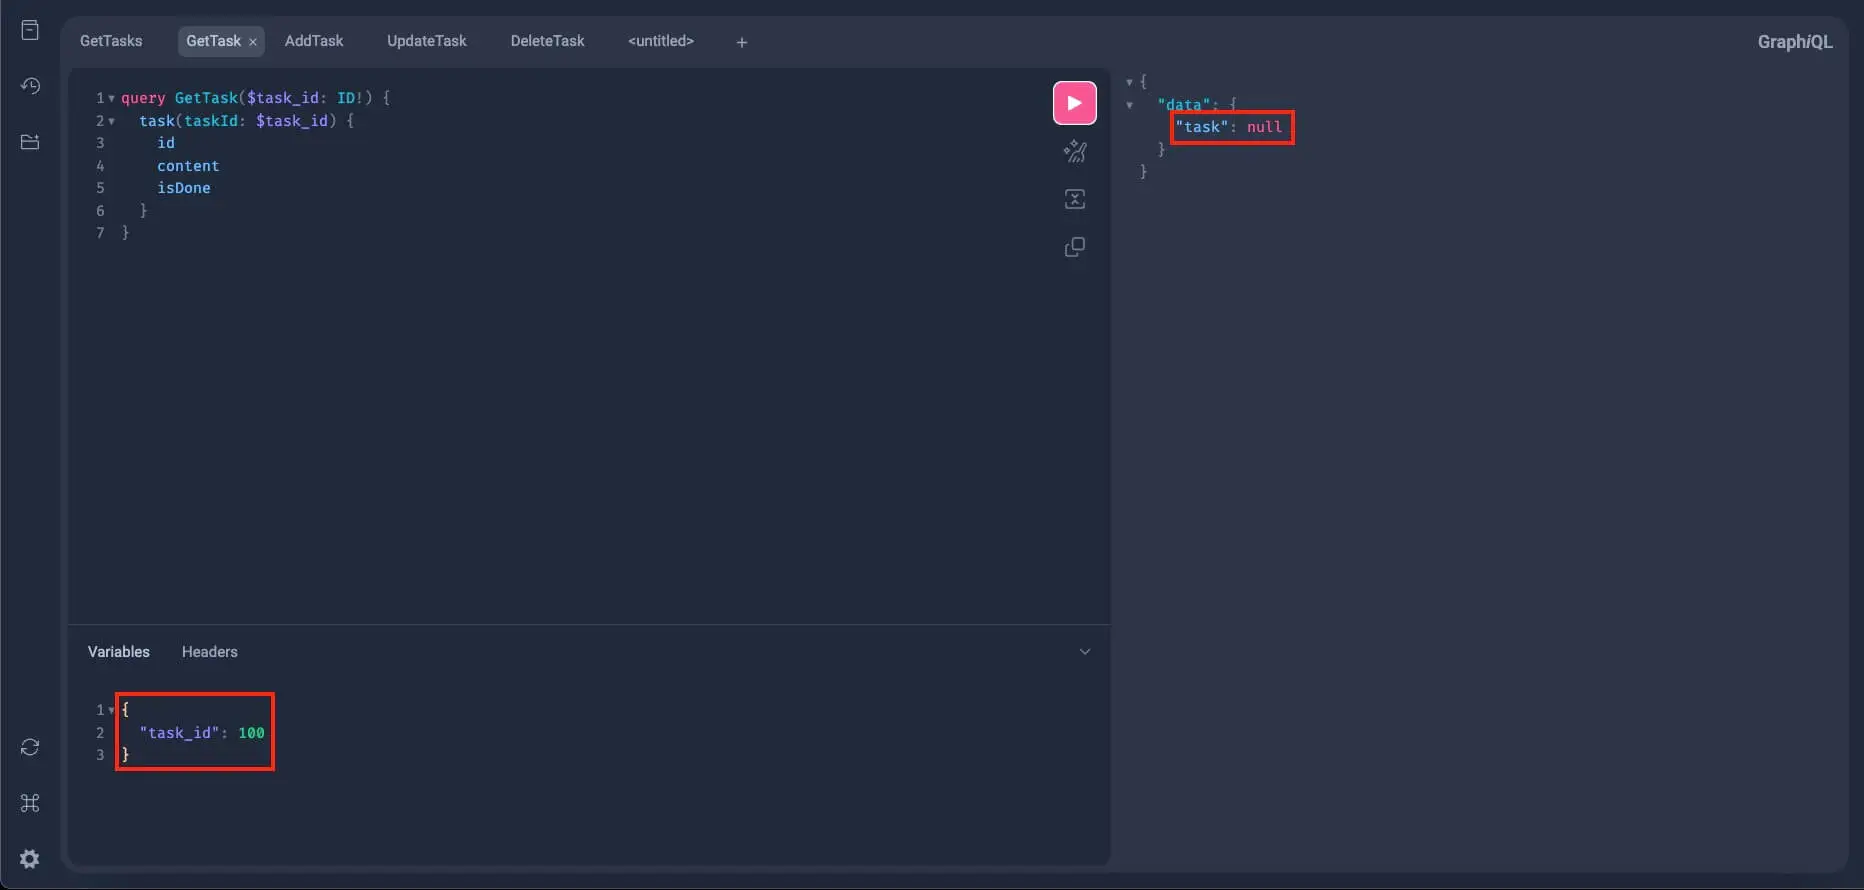
Alright, now let's try it with an id of 100. As per our early querying of all the tasks, we don't have a task with this id, so we should receive a null response:
Alright! Everything seems to be properly working as expected. Now let's try updating one of our tasks and test if the update_task works.
So, create a new tab in GraphiQL and write this mutation query:
mutation UpdateTask($id: ID!, $task: UpdateTaskInput!) {
  updateTask(id: $id, task: $task) {
    id
    content
    isDone
  }
}
We have two inputs here: $id and $task.
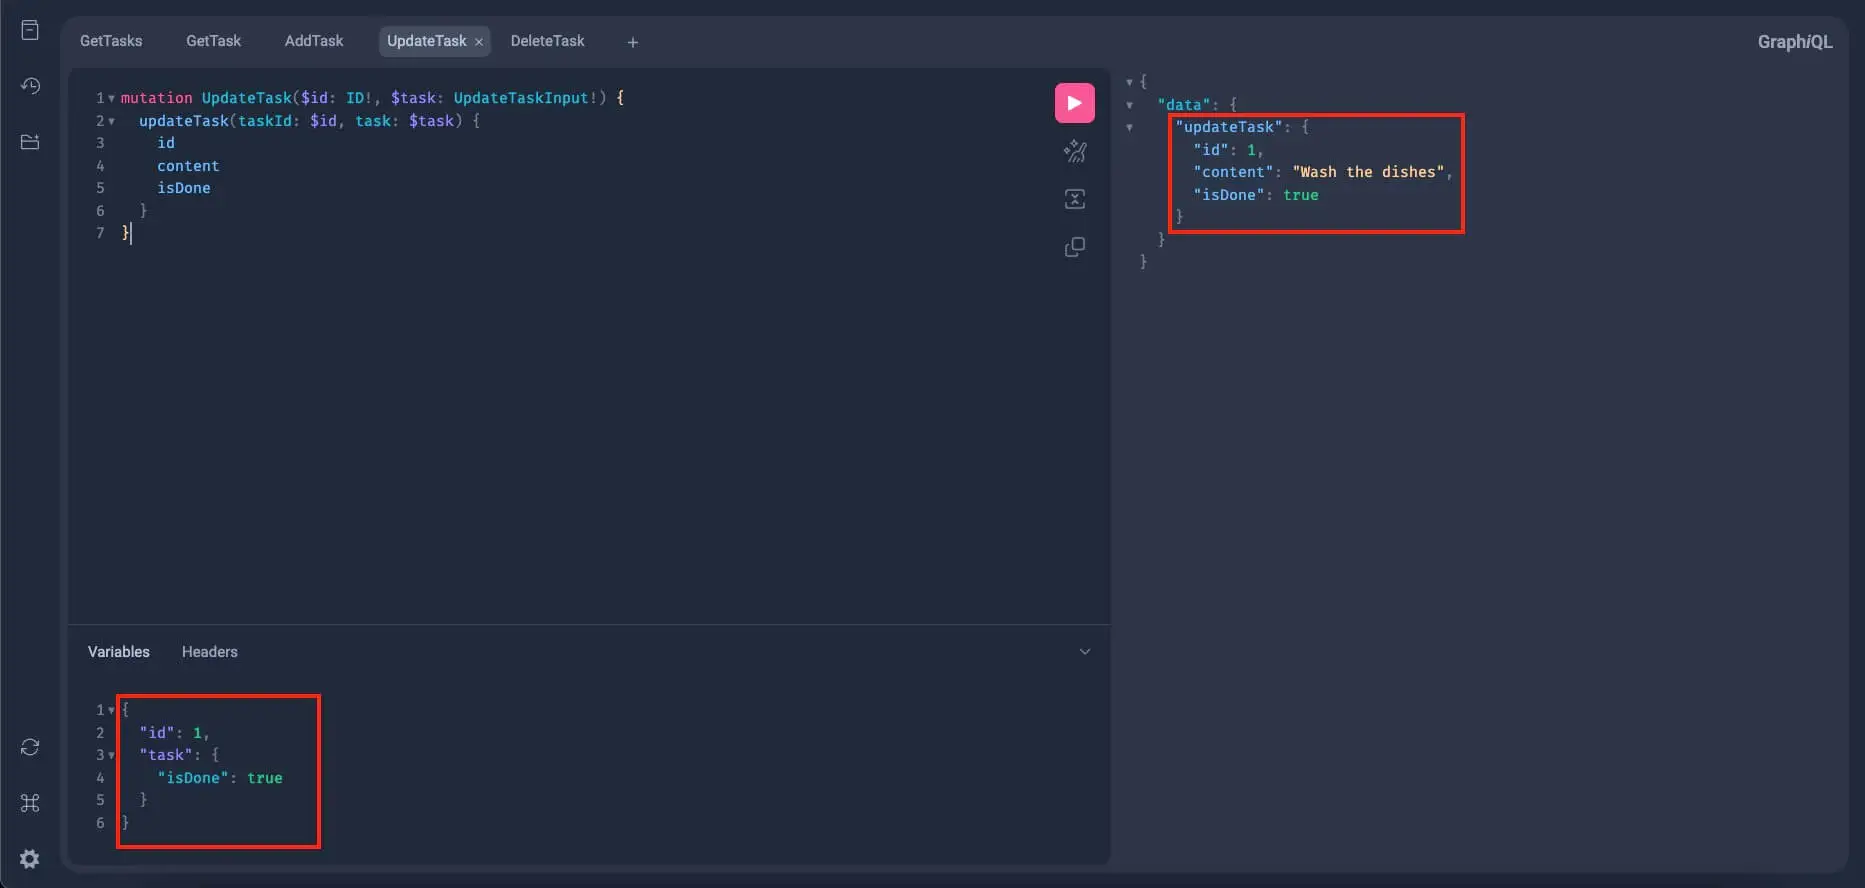
In the Variables section. Let's update the task with an id of 1 and let's say we finished this task, so we'll update isDone to true:
{
  "id": 1,
  "task": {
    "isDone": true
  }
}
If the update mutation works, we should get the following:
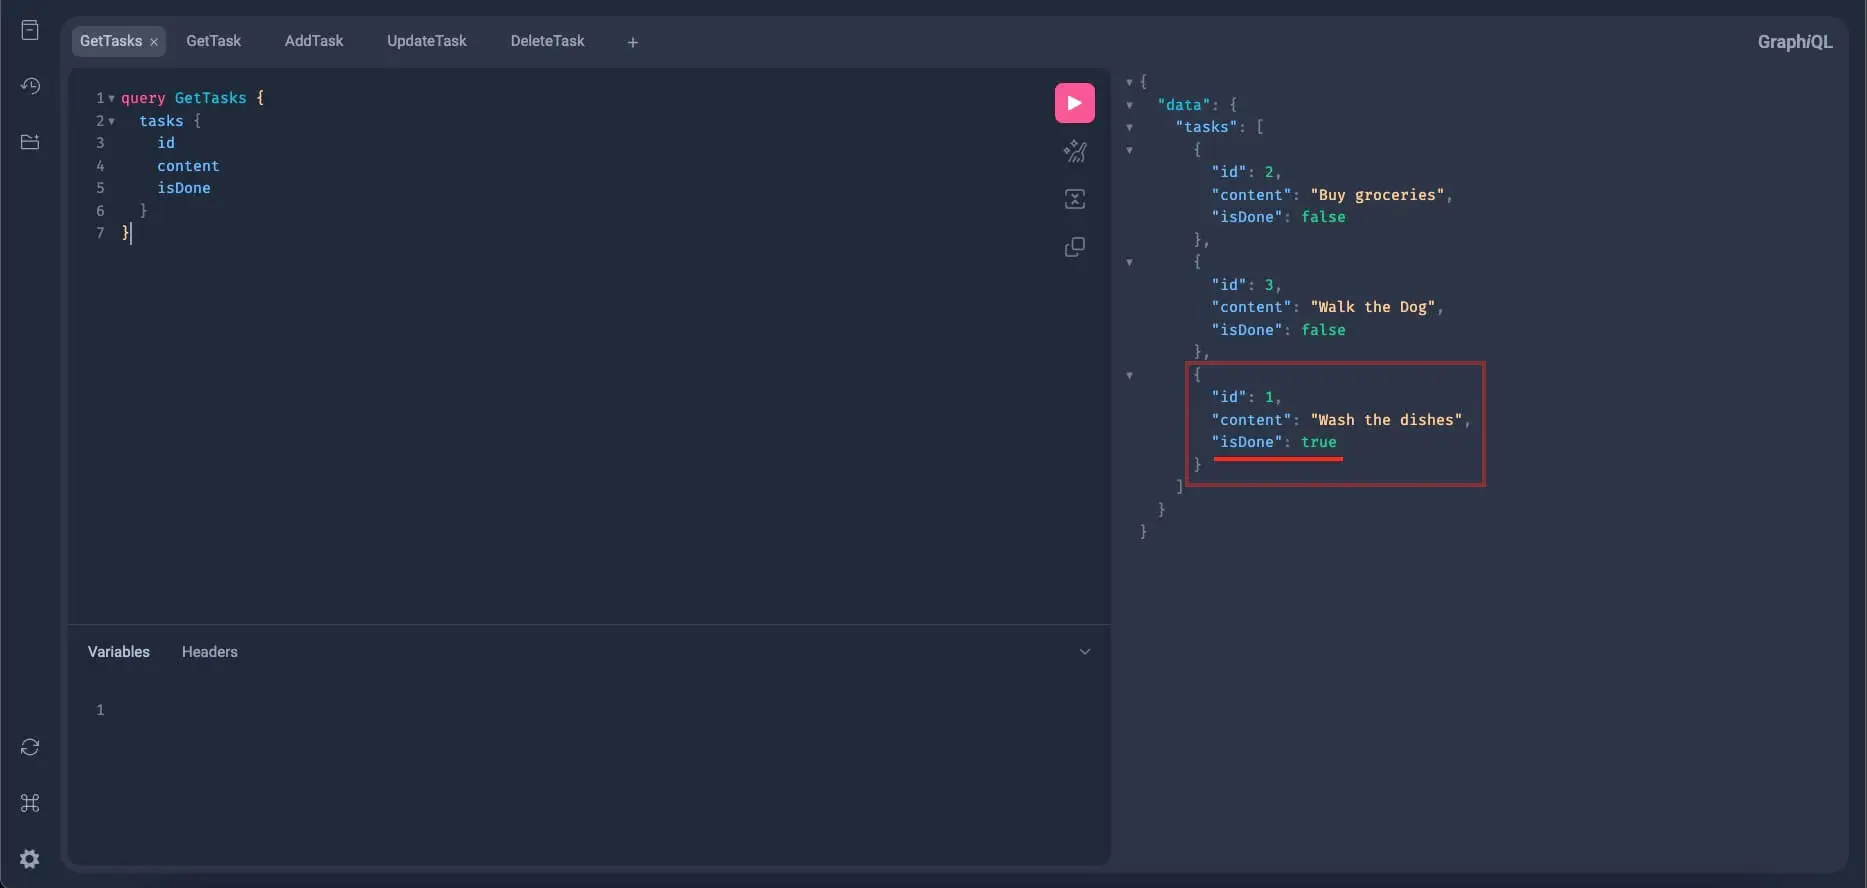
Alright, now to test if the update mutation really took effect, let's go back to the GetTasks query, remove the pagination input from the Variables section, and re-run the query. If everything works properly, the task with an id of 1 should have its isDone set to true:
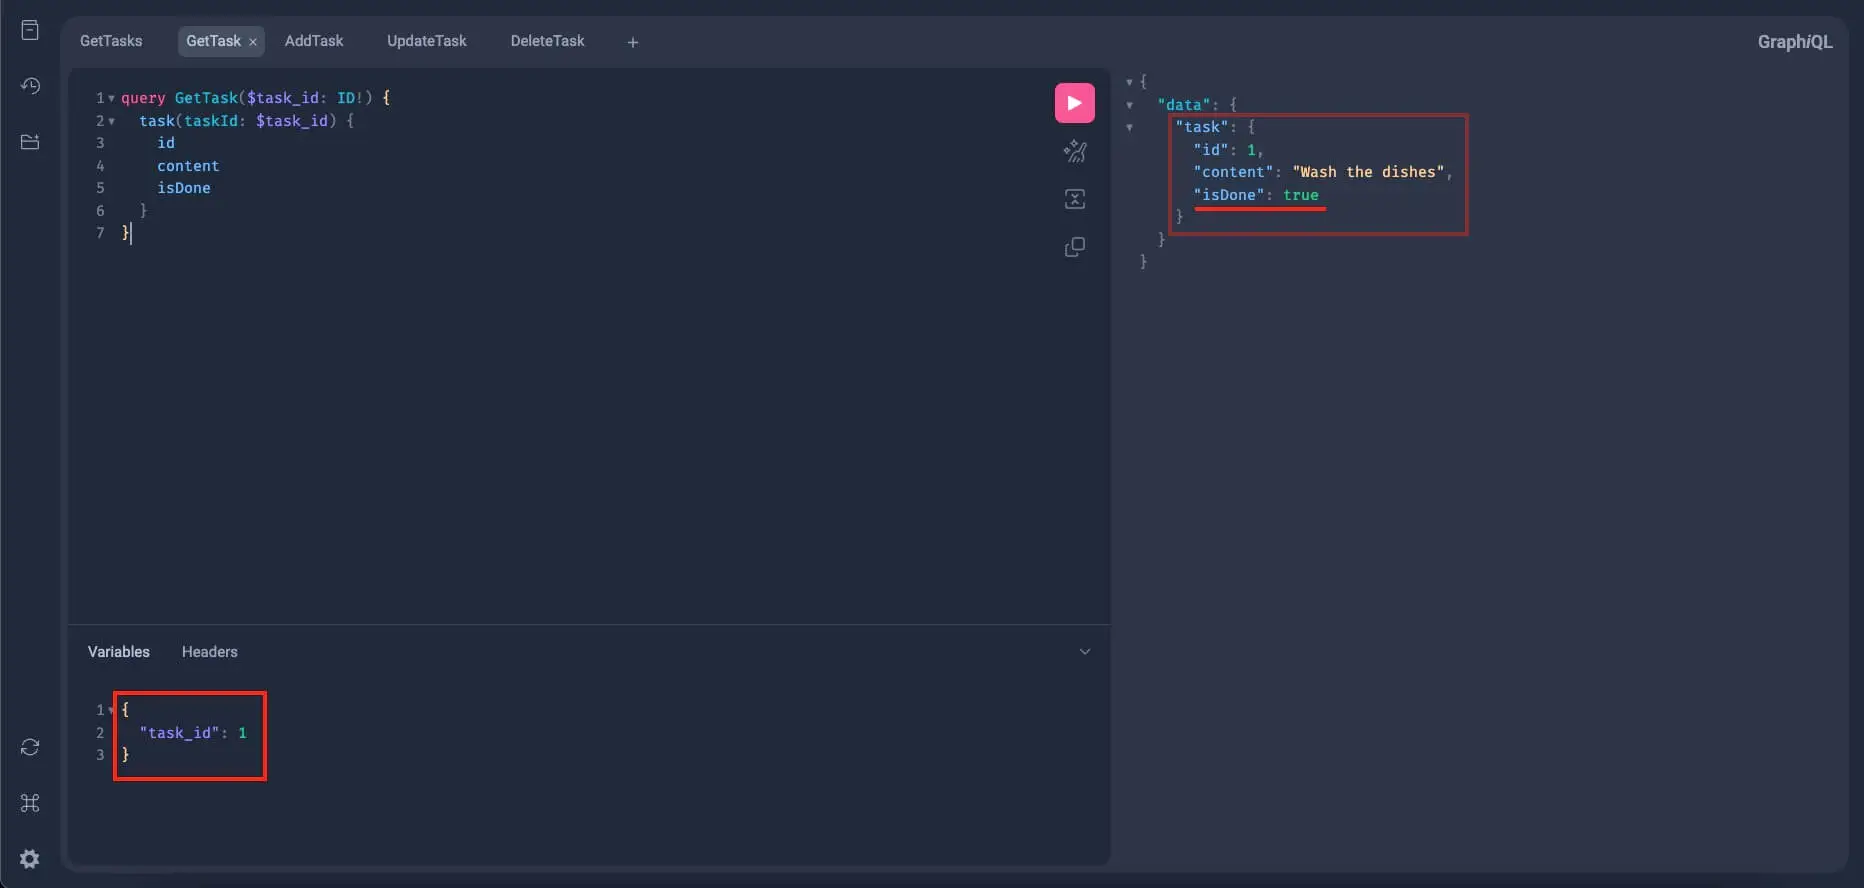
Alright, great! Now let's try this on the GetTask query and query this task. Remember that it has an id of 1. Again, we're expecting is_done to be updated to true:
Finally, we need to test the delete mutation. Add a new tab in GraphiQL and write this mutation:
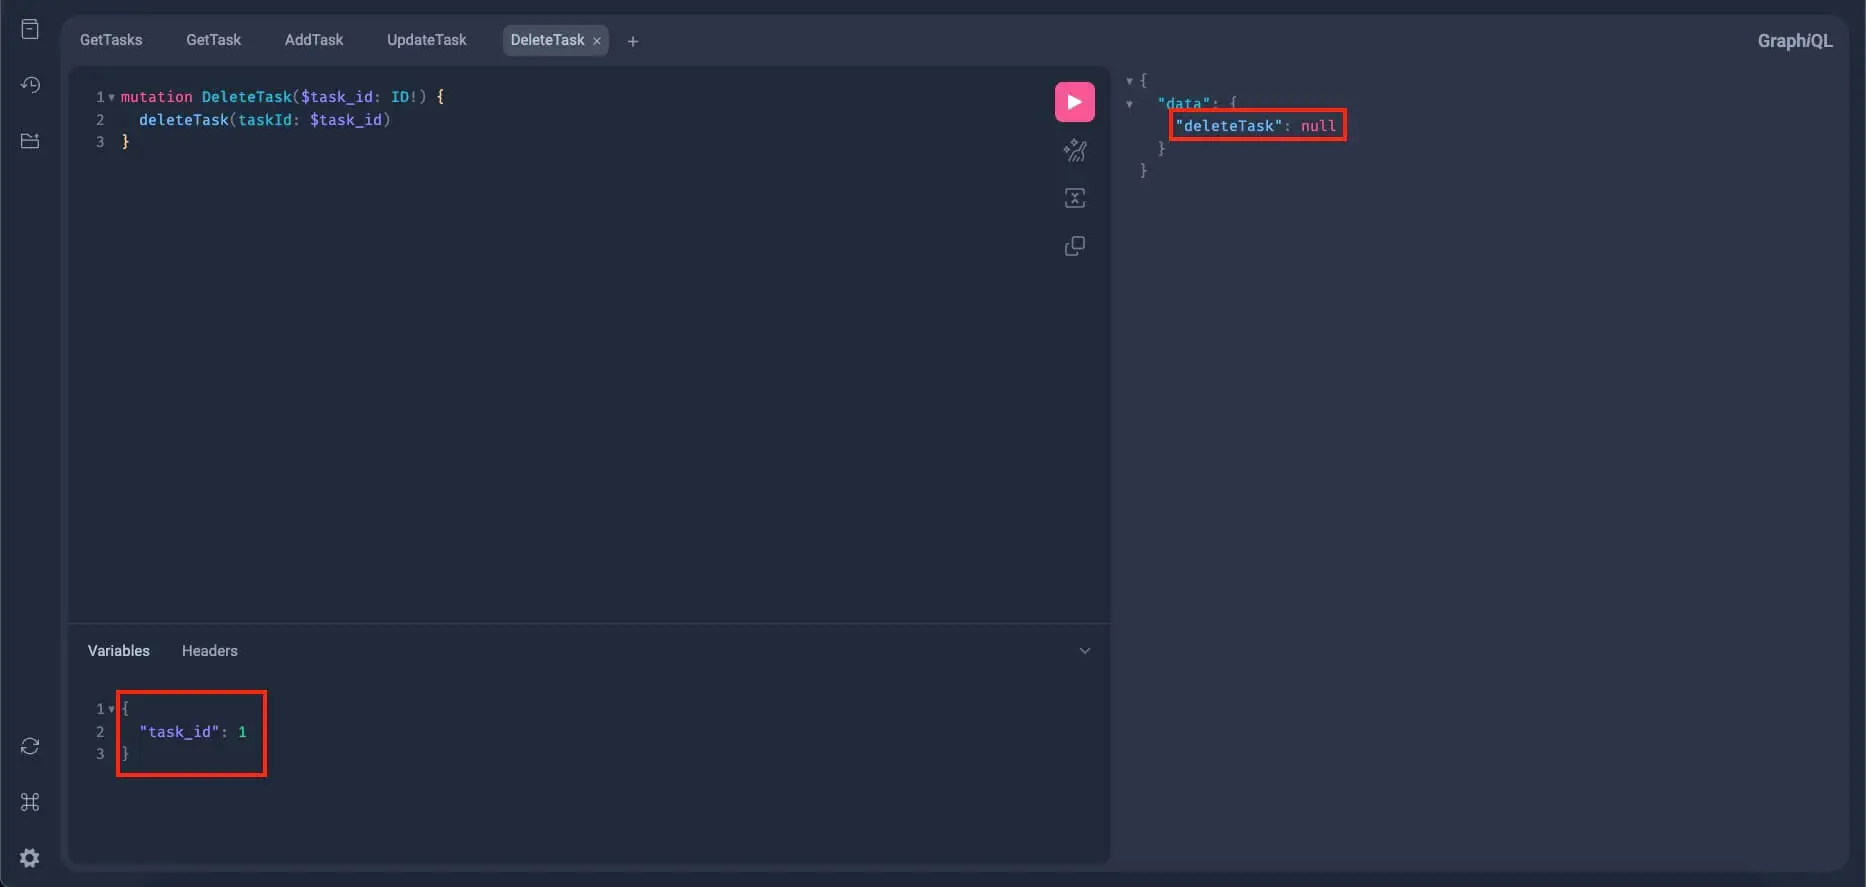
mutation DeleteTask($task_id: ID!) {
  deleteTask(taskId: $task_id)
}
The delete mutation always returns a null, thus, we don't have anything to query from its return value. And also, we have input here, the $task_id, which the delete mutation will use to target the task to be deleted.
Alright, for this let's delete the task we marked earlier as done, the task with an id of 1. So in the Variables section, write:
{
  "id": 1
}
Run this query and you should get something like this:
Since the delete mutation always returns null regardless if it succeeds or not, we can't make sure if the item is deleted, so let's try to query all the tasks again:
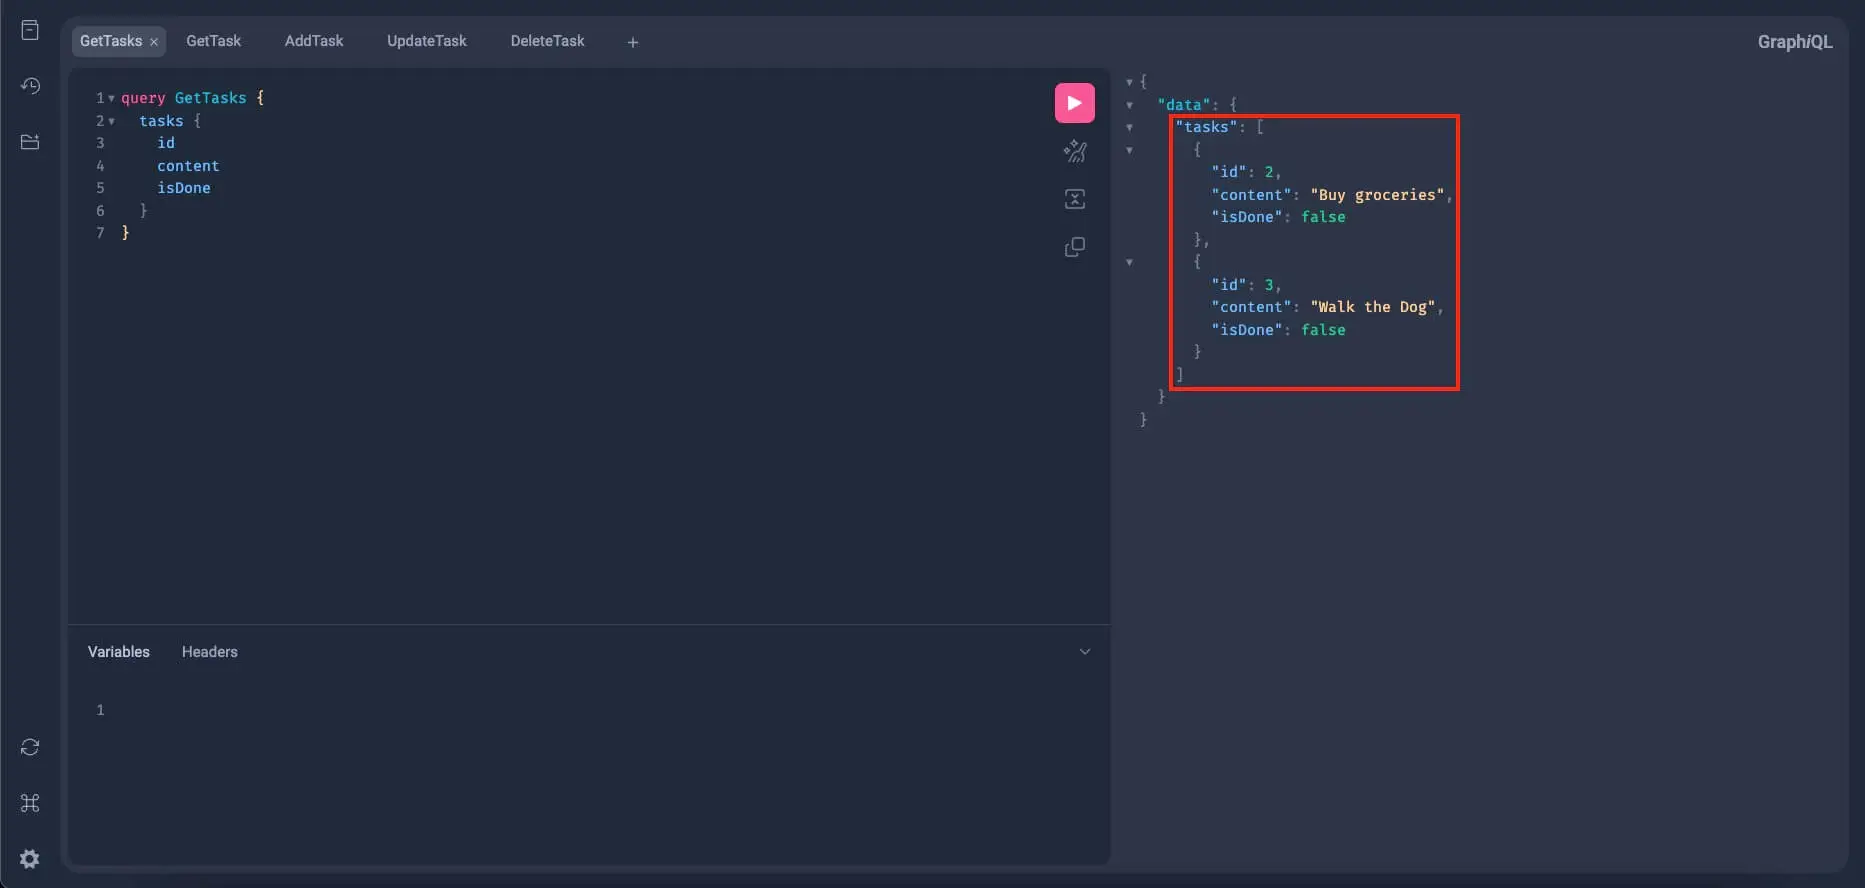
If everything works properly, the task with an id 1 should be gone from the list.
Alright, now we are sure that our delete mutation and get_tasks query are working properly.
So, for the final test, let's query the deleted task with get_task and check its returned value:
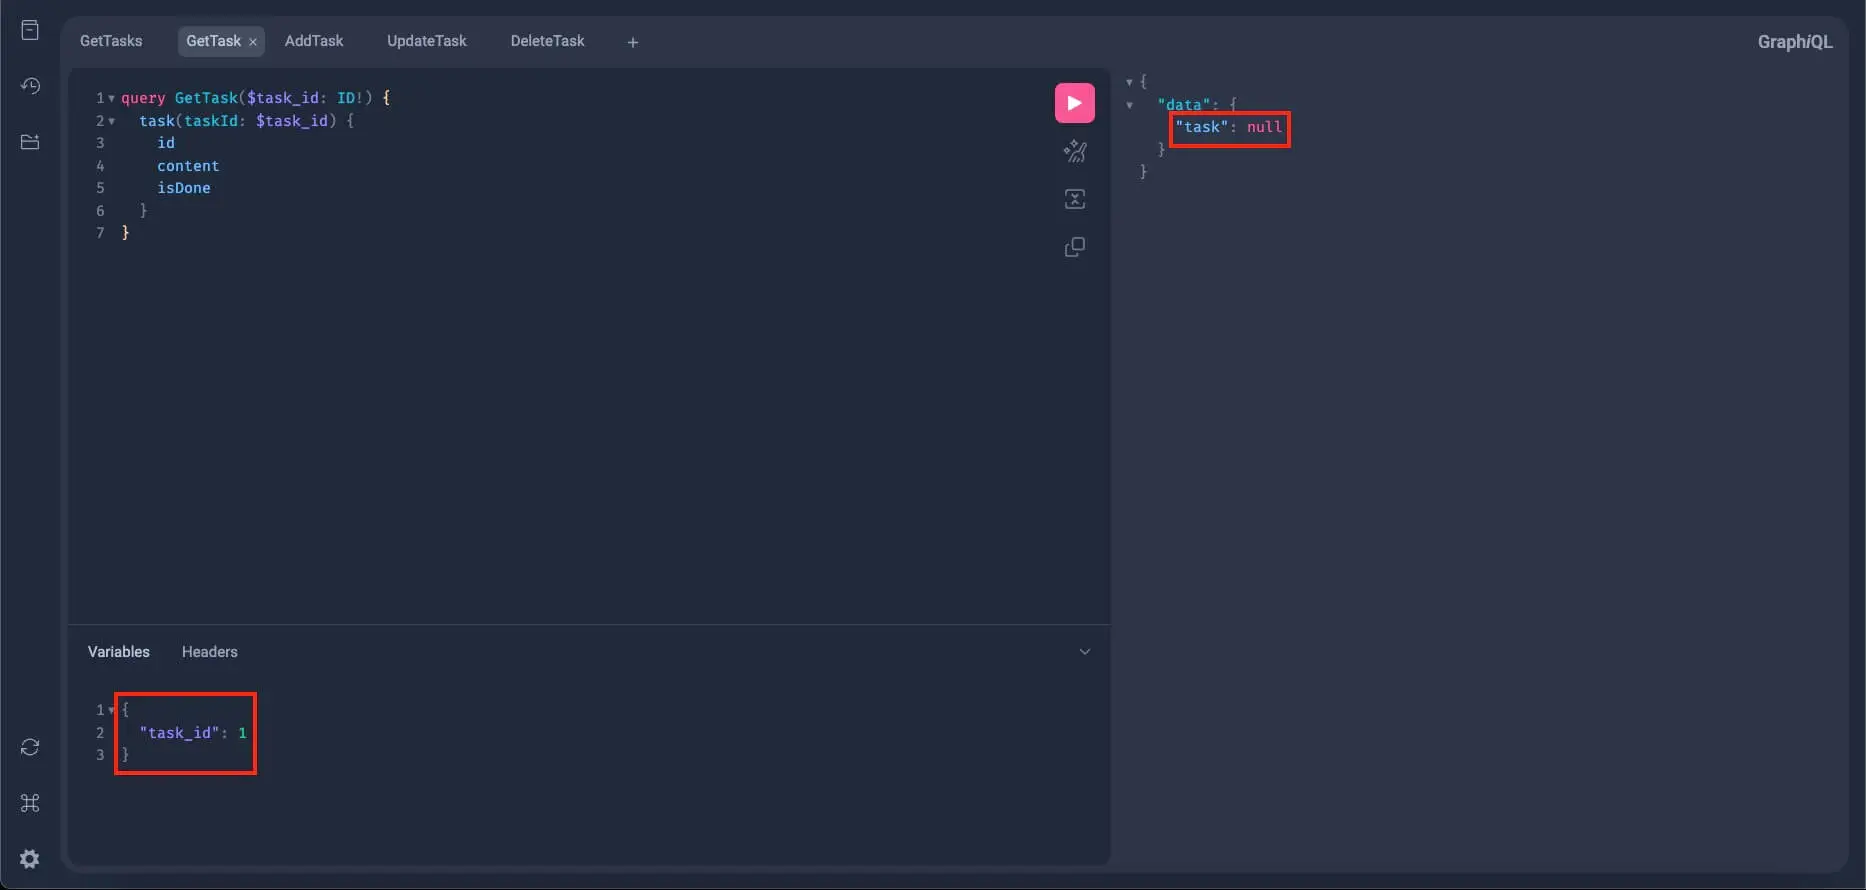
Since the task with an id of 1 can’t be found in the database, then surely it is deleted, thus, we got null here.
Alright! All our tests passed and our Python GraphQL API is properly working.
And to fully make sure that all our changes reflect in the Database, you can go to ElephantSQL’s database browser (or the db browser of your chosen database) and query the tasks table:
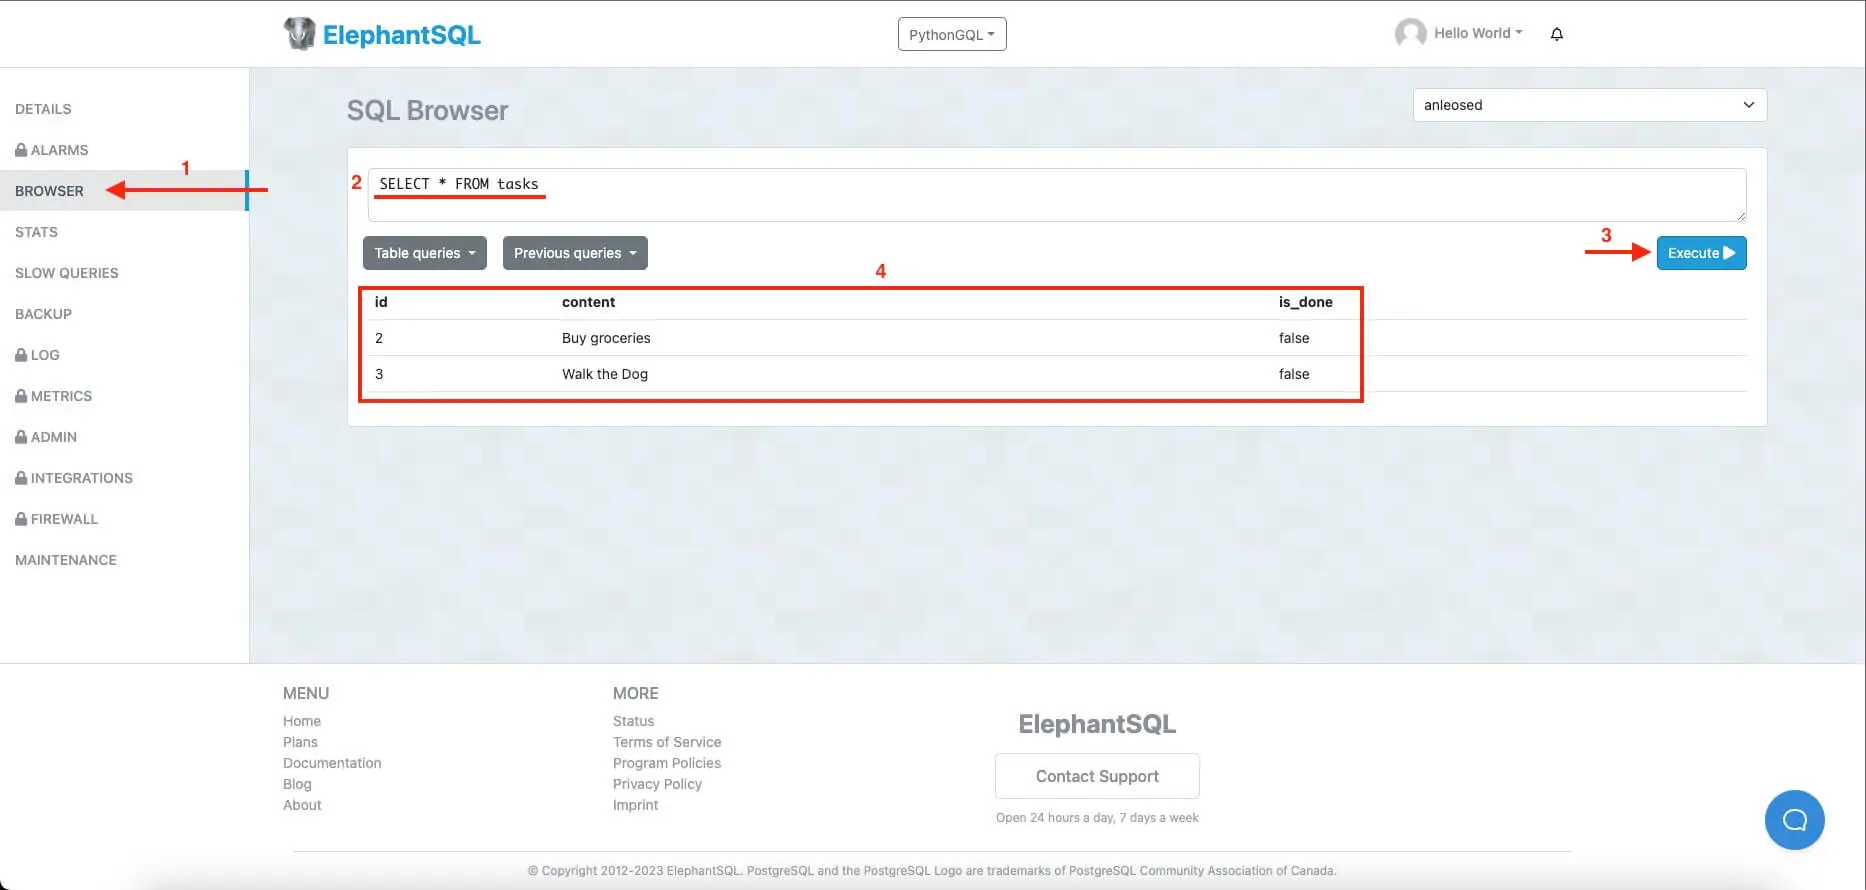
As you can see, the resulting query of the database content is the same as the returned value from our GraphQL query of all the tasks. That means our Python GraphQL is fully functional!
And that's how you build a simple GraphQL API with Python in a nutshell.
Conclusion
In this article, you learned how to build a GraphQL API with Python using Strawberry, FastAPI, and Postgres. We have seen how easy it is to define GraphQL schemas with Strawberry, how fast and powerful FastAPI is for creating web applications, and how Postgres can store and query our data efficiently.
GraphQL is a modern and flexible way of designing APIs that allows us to fetch exactly what we need from the server, reducing bandwidth and improving performance. We hope you enjoyed this tutorial and learned something new. As a suggestion for further reading, we recommend you check out Strawberry’s documentation.
Learn also: How to Build a CRUD App with Flask and SQLAlchemy in Python.
Happy coding ♥
Found the article interesting? You'll love our Python Code Generator! Give AI a chance to do the heavy lifting for you. Check it out!
View Full Code Build My Python Code


Got a coding query or need some guidance before you comment? Check out this Python Code Assistant for expert advice and handy tips. It's like having a coding tutor right in your fingertips!