Before we get started, have you tried our new Python Code Assistant? It's like having an expert coder at your fingertips. Check it out!
In this article, you will learn how to build a simple chat app in Python using Flask and Flask-SocketIO. Flask is a lightweight web framework that lets you create web applications easily and quickly.
Flask-SocketIO is an extension that enables bi-directional communication between the server and the client using WebSockets.
WebSockets are a protocol that allows fast and efficient data transfer between the browser and the server, without polling or refreshing.
To give you an idea, here’s the demo of the project that we will build in this article:
 You can also check out the source code for this project in this GitHub repo.
By the end of this article, you will have a basic understanding of how to use Flask and Flask-SocketIO to create a chat app that can handle multiple users and rooms. Let's get started!
Table of Contents:
Setup
First things first, create a new folder for this new project and set up a Python virtual environment in it:
$ mkdir FlaskChat
$ cd FlaskChat
$ python -m venv flask_chat_venv
Then, activate the virtual environment using this command for Linux/MacOS:
$ source flask_chat_venv/bin/activateOr this command for Windows users:
$ \flask_chat_venv\Scripts\activateNext, install the dependencies for this project — flask-socketio:
$ pip install flask-socketioAlright, you’re all set!
Initialize the App
The chat app that we will build uses flask-socketio which runs on top of the Flask framework and the SocketIO technology, so we will initialize the backend almost the same way as a regular Flask app, with some additional configurations (for the web socket connections).
First, create a new file on the root of your project and name it main.py. This file will be the entry point of our server. Then copy this code inside this file:
from flask import Flask, request, render_template, redirect, url_for, session
from flask_socketio import SocketIO, join_room, leave_room, send

app = Flask(__name__)
app.config["SECRET_KEY"] = "supersecretkey"
socketio = SocketIO(app)

# A mock database to persist data
rooms = {}

# TODO: Build the routes

# TODO: Build the SocketIO event handlers

if __name__ == "__main__":
    socketio.run(app, debug=True)
Notice that we run our app using the SocketIO instance with socketio.run(app, debug=True) instead of using the Flask instance.
I also left two TODOs here, which we will build in the next sections.
Routes
A route is a function that defines how the server responds to a request from a client which is usually associated with a URL path (i.e. /chat, /blogs, /about, etc.). A route can return a response to the client, such as an HTML page, a JSON object, or a status code.
In our chat app, we only have two routes:
- Home (
/) - The homepage and landing page of our chat app - Room (
/room) - Where the chat room is served where users can send and receive messages from other users present in the same room.
First, let’s define the Home route.
Home Route
For the homepage, we want users to enter their name and let them create a chat room or join a chat room using the room id. In the backend, we handle requests to this route using two HTTP methods: GET and POST. If the user is sending a POST request, we would take their input from the form on the homepage and either redirect them to the chat room (the one they created or joined) or send HTTP error status codes for the unqualifying requests:
# ...
def generate_room_code(length: int, existing_codes: list[str]) -> str:
    while True:
        code_chars = [random.choice(ascii_letters) for _ in range(length)]
        code = ''.join(code_chars)
        if code not in existing_codes:
            return code

@app.route('/', methods=["GET", "POST"])
def home():
    session.clear()
    if request.method == "POST":
        name = request.form.get('name')
        create = request.form.get('create', False)
        code = request.form.get('code')
        join = request.form.get('join', False)
        if not name:
            return render_template('home.html', error="Name is required", code=code)
        if create != False:
            room_code = generate_room_code(6, list(rooms.keys()))
            new_room = {
                'members': 0,
                'messages': []
            }
            rooms[room_code] = new_room
        if join != False:
            # no code
            if not code:
                return render_template('home.html', error="Please enter a room code to enter a chat room", name=name)
            # invalid code
            if code not in rooms:
                return render_template('home.html', error="Room code invalid", name=name)
            room_code = code
        session['room'] = room_code
        session['name'] = name
        return redirect(url_for('room'))
    else:
        return render_template('home.html')
# ...
This route serves the home.html template for GET requests (as well as the HTTP error status codes) to display the homepage, but haven’t defined it yet. So let’s first create the homepage as well as the base templates before defining the second route.
Create a new folder and name it exactly as templates (or else it won’t work) from the root of your project:
$ mkdir templatesThen create two new files inside this folder — base.html and home.html:
$ touch templates/base.html && touch templates/home.htmlWe will first define the base template base.html since all our templates will inherit from this and will also serve as the root template.
Open the templates/base.html file and copy this code into it:
<!DOCTYPE html>
<html lang="en">
  <head>
    <title>Flask Chat</title>
    <link rel="stylesheet" href="{{url_for('static', filename='styles/style.css')}}" />
    <script src="https://cdnjs.cloudflare.com/ajax/libs/socket.io/4.0.1/socket.io.js" integrity="sha512-q/dWJ3kcmjBLU4Qc47E4A9kTB4m3wuTY7vkFJDTZKjTs8jhyGQnaUrxa0Ytd0ssMZhbNua9hE+E7Qv1j+DyZwA==" crossorigin="anonymous"></script>
  </head>
  <body>
    <div id="root">{% block content %} {% endblock %}</div>
  </body>
</html>
This base template is where we put the script for the client-side SocketIO so that it’s available to every template.
We also defined the stylesheet in this base template. For that, create a new folder at the root of your project called static. Then, create another folder inside it called styles and a new file called styles.css inside this new static/styles folder:
$ mkdir -p static/styles
$ touch static/styles/styles.css
I won’t go over and explain the CSS in this article since it’s way out of the scope of our topic. So just copy the CSS code here and paste it into your style sheet.
Now for the homepage template, copy this code and paste it in your templates/home.html file:
{% extends 'base.html' %} {% block content %}
<div id="home-container">
  <h1 id="home-header">Flask Chat 💬</h1>
  {% if error %}
  <p id="error">{{error}}</p>
  {% endif %}
  <form method="post" id="chat-widget-home">
    <div id="name-input">
      <label for="name">Enter your name</label>
      <input type="text" id="name" name="name" placeholder="Enter name" value="{{name}}" />
    </div>
    <div>
      <label for="code" id="code-label">Enter chat room code</label>
      <input type="text" id="code" name="code" placeholder="Enter code" value="{{code}}" />
      <button type="submit" id="join" name="join">Join</button>
    </div>
    <hr />
    <button type="submit" id="create" name="create">Create Room</button>
  </form>
</div>
{% endblock %}
This template is mainly just the form in which users will input their name and either create a chat room or join an existing one using a chat room code.
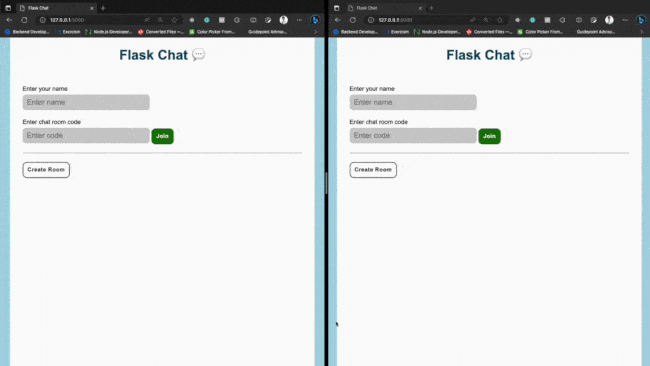
You can check out the look of the homepage by going to http://127.0.0.1:5000/ on your browser (make sure you run the server - python main.py):
 Flask Chat - Homepage
Room Route
Moving on to the next route, the chat room route. The /room route is where the chat room will be served and where the users can join to send and receive messages with each other.
In your main.py, build the /room route by pasting this code below the home route:
@app.route('/room')
def room():
    room = session.get('room')
    name = session.get('name')
    if name is None or room is None or room not in rooms:
        return redirect(url_for('home'))
    messages = rooms[room]['messages']
    return render_template('room.html', room=room, user=name, messages=messages)
This route only accepts GET requests where it parses the room id and user’s name in the session of the HTTP request. It also serves the chat room template along with the messages in this chat room.
We haven’t built the chat room template yet, so add a new file to your templates folder and name it room.html. Then, paste this code into this new file:
{% extends 'base.html' %} {% block content %}
<div id="room-container">
  <h1 id="home-header">Flask Chat 💬</h1>
  <div id="room-subsection">
    <h2 id="room-code-display">Room Code: <span>{{room}}</span></h2>
    <a href="/" id="leave-chat-btn">Leave the Chat</a>
  </div>
  <div id="chat-room-widget">
    <div id="msgs-container">
      <ul id="messages"></ul>
    </div>
    <div id="message-box">
      <input type="text" placeholder="Enter your message" id="message-input" name="message" />
      <button type="submit" id="send-btn" onclick="sendMessage()">Send</button>
    </div>
  </div>
  <script type="text/javascript">
    var socketio = io();
    socketio.on("message", function (message) { createChatItem(message.message, message.sender) });
    function createChatItem(message, sender) {
      var messages = document.getElementById("messages");
      if (sender === "") {
        content = `<p class="member-activity">${message}</p>`;
      } else {
        var senderIsUser = "{{user}}" === sender;
        var content = `
          <li class="message-item ${senderIsUser ? "self-message-item" : "peer-message-item"}">
              <p>${message}</p>
              <small class="${senderIsUser ? "muted-text" : "muted-text-white"}">${new Date().toLocaleString()}</small>
          </li>
      `;}
      messages.innerHTML += content;
    }
    function sendMessage() {
      var msgInput = document.getElementById("message-input");
      if (msgInput.value === "") return;
      var msg = msgInput.value;
      socketio.emit("message", { message: msg });
      msgInput.value = "";
    }
  </script>
  {% for message in messages %}
  <script type="text/javascript">
    createChatItem("{{message.message}}", "{{message.sender}}");
  </script>
  {% endfor %}
</div>
{% endblock %}
This template includes the SocketIO connection JavaScript code on the client side. We won’t discuss this in-depth, but in a high-level overview, it listens for message events emitted by the backend where it renders a chat bubble with the message data it receives. It also emits a message event to the server when the user sends a message.
The final view of the chat room page should look like this (you may not be able to see it yet since our code is not finished yet):
Flask Chat - Chat room view
Websocket Events
Alright, now for the final pieces of this chat app, we need to define the Web Socket event handlers in the backend. For our project, we have three SocketIO events to handle:
connect- when a client connects to the servermessage- when either the client or server sends a message to each otherdisconnect- when the user leaves the room
Connect
First, we will handle the connect event. Paste this code in main.py below the route definitions:
...
@socketio.on('connect')
def handle_connect():
    name = session.get('name')
    room = session.get('room')
    if name is None or room is None:
        return
    if room not in rooms:
        leave_room(room)
    join_room(room)
    send({
        "sender": "",
        "message": f"{name} has entered the chat"
    }, to=room)
    rooms[room]["members"] += 1
...
When the server receives a connect event from the client side, this function will be called. It uses the room id and user name passed by the client to let the user join the chat room, then redirects the user to the chat room page with the message "<user> has entered the chat".
Message
Next, we need to handle the message event. The server will receive a message event from the client when the user sends a chat message. Add this code to your main.py below the connect event handler:
...
@socketio.on('message')
def handle_message(payload):
    room = session.get('room')
    name = session.get('name')
    if room not in rooms:
        return
    message = {
        "sender": name,
        "message": payload["message"]
    }
    send(message, to=room)
    rooms[room]["messages"].append(message)
...
This event handler expects a data payload where it retrieves the user’s message. It will then send the message to the chat room for everyone to see and save it in the mock database rooms.
Disconnect
Finally, we need to handle the disconnect event, or when a user leaves a chat room. Add this code below your other SocketIO event handlers in main.py:
...
@socketio.on('disconnect')
def handle_disconnect():
    room = session.get("room")
    name = session.get("name")
    leave_room(room)
    if room in rooms:
        rooms[room]["members"] -= 1
        if rooms[room]["members"] <= 0:
            del rooms[room]
        send({
        "message": f"{name} has left the chat",
        "sender": ""
    }, to=room)
...
This event handler just removes the user from the chat room and lets everyone knows the user has left by sending a message event to the chat room. When there’s no one left in a chat room, it will be deleted from the mock database.
And that’s it!
That’s all there is to build a simple chat web app in Python using Flask and Flask-SocketIO.
Run the server (using python main.py) and play around with the chat app. Feel free to modify it as well.
Final Thoughts
In this article, you learned how to use SocketIO technology in Python using Flask and Flask-SocketIO. In here, you learned how to create SocketIO event handlers for the chat app, as well as the route handlers.
This simple chat app is just one simple example of what you can do with real-time bi-directional communication with SocketIO. You can use the knowledge you obtained here to apply it in your future projects (i.e. real-time dashboards, live notifications, etc.)
That’s all hope you learned something new today and enjoyed our fun little project.
If you want to build a console-based chat app using sockets, then check this tutorial in which we build a simple chat room application that accepts multiple connected clients using built-in sockets and threading libraries in Python.
Learn also: Webhooks in Python with Flask.
Happy coding ♥
Save time and energy with our Python Code Generator. Why start from scratch when you can generate? Give it a try!
View Full Code Analyze My Code


Got a coding query or need some guidance before you comment? Check out this Python Code Assistant for expert advice and handy tips. It's like having a coding tutor right in your fingertips!