Step up your coding game with AI-powered Code Explainer. Get insights like never before!
Slide puzzles, also known as 15 puzzles or sliding tile puzzles, have been a favorite pastime for generations. The challenge lies in rearranging a set of numbered tiles or images into a specific order by sliding them into an empty space.
By following this step-by-step guide, you will learn how to build a slide puzzle game from scratch, allowing you to exercise your problem-solving skills and create an engaging and interactive gaming experience. Pygame's intuitive interface and powerful functionality make it an ideal choice for developing such games, and Python's simplicity adds to the ease of implementation.
Throughout this article, we will cover various aspects of the game development process, including:
Whether you're a beginner seeking an introduction to game development or an experienced Python programmer looking to expand your skill set, this article will provide valuable insights and practical knowledge. Let's dive in and embark on this exciting journey of creating a Slide Puzzle game with Pygame!
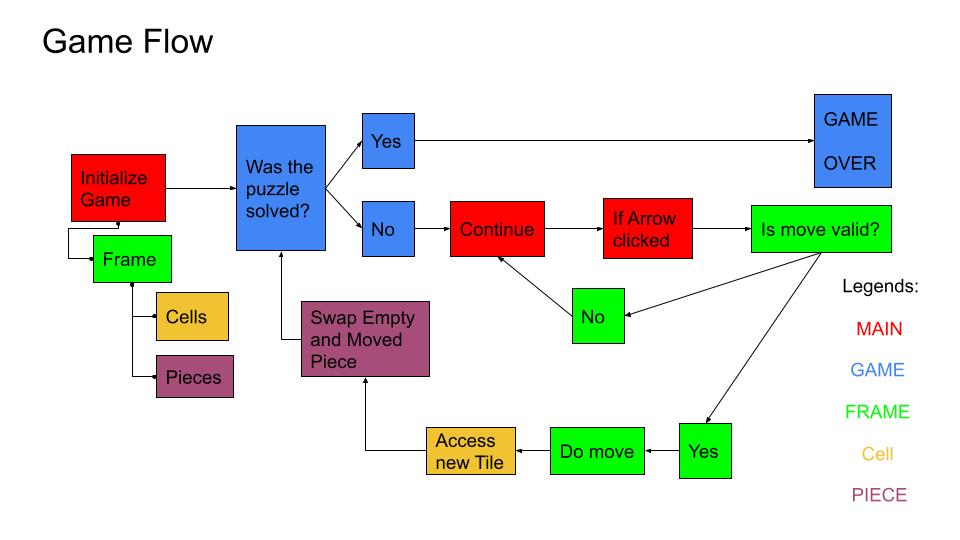
Starting the Game
In this section, we will create the main class that handles the game's main loop and events. We will also initialize the puzzle grid, setting it up with the desired configuration, whether it's a solved state or a randomized arrangement. Before we start, here is the game flow of our slide puzzle:
Installation and Set up
The first thing we need to do is to make sure we have Python installed. You can download Python from the official website.
Once Python is installed, we need to install the Pygame library:
$ pip install pygameNow that we have Python and Pygame installed, we can create the directory for our game. Create a new folder and name it Slide-Puzzle.
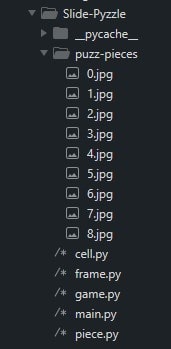
Inside our main directory, we need to create several Python files: main.py, game.py, frame.py, cell.py, and piece.py.
Finally, create a folder named puzz-pieces inside the Slide-Puzzle directory. This folder will contain the images for our puzzle pieces. Paste inside the puzz-pieces directory your puzzle pieces pictures. If you don't have piece pictures, you can access my piece pictures here.
The structure of our game should look like this:
The Main Class
The main class serves as the backbone of the slide puzzle game, handling the game's main loop and events. It provides the structure for initializing the game, capturing user input, and displaying the game graphics:
# /* main.py
import pygame

from frame import Frame

pygame.init()
pygame.font.init()

class Puzzle:
    def __init__(self, screen):
        self.screen = screen
        self.running = True
        self.FPS = pygame.time.Clock()
        self.is_arranged = False
        self.font = pygame.font.SysFont("Courier New", 33)
        self.background_color = (255, 174, 66)
        self.message_color = (17, 53, 165)

    def _draw(self, frame):
        frame.draw(self.screen)
        pygame.display.update()

    def _instruction(self):
        instructions = self.font.render('Use Arrow Keys to Move', True, self.message_color)
        screen.blit(instructions,(5,460))

    def main(self, frame_size):
        self.screen.fill("white")
        frame = Frame(frame_size)
        self._instruction()
        while self.running:
            for event in pygame.event.get():
                if event.type == pygame.QUIT:
                    self.running = False
            self._draw(frame)
            self.FPS.tick(30)
        pygame.quit()

if __name__ == "__main__":
    window_size = (450, 500)
    screen = pygame.display.set_mode(window_size)
    pygame.display.set_caption("Slide Puzzle")
    game = Puzzle(screen)
    game.main(window_size[0])
Let's start coding by importing the necessary modules, such as pygame and the Frame class from a module named frame. It then initializes the Pygame modules and the font module using pygame.init() and pygame.font.init().
Next, the code defines the Puzzle class, which serves as the main class for the slide puzzle game. In the __init__() method, various attributes are initialized, including the game screen, running status, clock for controlling the frame rate, arrangement status, font for rendering text, and colors for the background and messages.
The _draw() method takes a frame object as an argument and draws the frame on the game screen using the draw method of the frame object. It then updates the display using pygame.display.update().
The _instruction() method renders the instruction message using the specified font and color and displays it on the screen at the given position.
The main() method is the entry point for the game. It takes the size of the frame as an argument and sets up the game loop. Inside the loop, it handles events using pygame.event.get() and checks for the pygame.QUIT event to exit the game. It then calls the _draw() method to draw the frame on the screen and uses self.FPS.tick(30) to limit the frame rate to 30 frames per second.
Once the game loop ends, the pygame.quit() function is called to properly close the Pygame modules and release resources.
Finally, the code creates the window_size object and the game screen (screen) using pygame.display.set_mode(). It sets the window caption using pygame.display.set_caption() and creates an instance of the Puzzle class (game). The main() method of the Puzzle class is then called with the width of the window size to start the game.
This code sets up the basic structure for the slide puzzle game using Pygame. It initializes the necessary components, sets up the game loop, and handles basic event handling and screen updates. Further functionality can be added by implementing methods for user input, sliding logic, and puzzle completion checking.
Initializing the Puzzle
During the puzzle initialization, we set up the necessary attributes and configurations for the game. This includes defining the game screen, managing the game's running state, setting the frame rate, and preparing the puzzle's initial arrangement.
Let's first create the Piece class which encapsulates the functionality of an individual puzzle piece:
# /* piece.py
import pygame

class Piece:
    def __init__(self, piece_size, p_id):
        self.piece_size = piece_size
        self.p_id = p_id
        if self.p_id != 8:
            img_path = f'puzz-pieces/{self.p_id}.jpg'
            self.img = pygame.image.load(img_path)
            self.img = pygame.transform.scale(self.img, self.piece_size)
        else:
            self.img = None
Within the __init__() method, the constructor of the Piece class, two arguments are passed: piece_size and p_id.
The piece_size argument represents the size of the piece, and p_id represents the identifier or value of the piece.
Next, an if statement checks if p_id is not equal to 8, which indicates that the piece is not an empty space, the code proceeds to load the corresponding image file. To load the image, the code constructs the image path dynamically using the p_id value. For example, if p_id is 3, it will look for an image file named 3.jpg in the "puzz-pieces" directory. The image is loaded using pygame.image.load() and then scaled to the specified piece_size using pygame.transform.scale(). The resulting image is stored in the self.img attribute. If p_id is equal to 8, representing the empty space, the self.img attribute is set to None to indicate that there is no image associated with the empty space piece.
Next is the Cell class which defines the attributes and functionality of an individual cell in the puzzle grid:
# /* cell.py
import pygame

class Cell:
    def __init__(self, row, col, cell_size, c_id):
        self.row = row
        self.col = col
        self.cell_size = cell_size
        self.width = self.cell_size[0]
        self.height = self.cell_size[1]
        self.abs_x = row * self.width
        self.abs_y = col * self.height
        self.c_id = c_id
        self.rect = pygame.Rect(
            self.abs_x,
            self.abs_y,
            self.width,
            self.height
        )
        self.occupying_piece = None

    def draw(self, display):
        pygame.draw.rect(display, (0,0,0), self.rect)
        if self.occupying_piece != None and self.occupying_piece.p_id != 8:
            centering_rect = self.occupying_piece.img.get_rect()
            centering_rect.center = self.rect.center
            display.blit(self.occupying_piece.img, centering_rect.topleft)
Within the __init__() method, several attributes are initialized. These attributes include row and col, which represent the row and column indices of the cell in the puzzle grid, cell_size, which represents the size of the cell, and c_id, which represents the identifier or value associated with the cell.
The width and height attributes are assigned based on the values of cell_size, representing the dimensions of the cell. The abs_x and abs_y attributes are calculated by multiplying the row and column indices with the width and height of the cell, respectively. These attributes represent the absolute position of the cell on the game screen.
The rect attribute is created using pygame.Rect() with the parameters representing the position (self.abs_x and self.abs_y) and size (self.width and self.height) of the cell. It defines a rectangular area on the game screen that represents the cell. The occupying_piece attribute is initially set to None, indicating that the cell is initially empty and not occupied by any puzzle piece.
The draw() method takes a display object as an argument and is responsible for rendering the cell on the game screen. It uses pygame.draw.rect() to draw a filled rectangle with the specified dimensions and position (self.rect). Additionally, if the cell is occupied by a puzzle piece (not None) and the occupying piece is not the empty space (represented by p_id of 8), the piece's image is drawn onto the cell using display.blit().
Now let's create the Frame class that is responsible for managing the puzzle, including generating and arranging the puzzle cells and pieces:
# /* frame.py
import pygame
import random

from cell import Cell
from piece import Piece

class Frame:
	def __init__(self, frame_size):
		self.grid_size = 3
		self.cell_width = frame_size // self.grid_size
		self.cell_height = frame_size // self.grid_size
		self.cell_size = (self.cell_width, self.cell_height)

		self.grid = self._generate_cell()
		self.pieces = self._generate_piece()

		self._setup()
		self.randomize_puzzle()

	def _generate_cell(self):
		cells = []
		c_id = 0
		for col in range(self.grid_size):
			new_row = []
			for row in range(self.grid_size):
				new_row.append(Cell(row, col, self.cell_size, c_id))
				c_id += 1
			cells.append(new_row)
		return cells

	def _generate_piece(self):
		puzzle_pieces = []
		p_id = 0
		for col in range(self.grid_size):
			for row in range(self.grid_size):
				puzzle_pieces.append(Piece(self.cell_size, p_id))
				p_id += 1
		return puzzle_pieces

	def _setup(self):
		for row in self.grid:
			for cell in row:
				tile_piece = self.pieces[-1]
				cell.occupying_piece = tile_piece
				self.pieces.remove(tile_piece)

	def randomize_puzzle(self):
		moves = [(0, 1),(0, -1),(1, 0),(-1, 0)]
		for i in range(30):
			shuffle_move = random.choice(moves)
			for row in self.grid:
				for cell in row:
					tile_x = self.grid.index(row) + shuffle_move[0]
					tile_y = row.index(cell) + shuffle_move[1]
					if tile_x >= 0 and tile_x <= 2 and tile_y >= 0 and tile_y <= 2:
						new_cell = self.grid[tile_x][tile_y]
						if new_cell.occupying_piece.img == None:
							c = (cell, new_cell)
							try:
								c[0].occupying_piece, c[1].occupying_piece = c[1].occupying_piece, c[0].occupying_piece
							except:
								return False
					else:
						continue

	def draw(self, display):
		for cell in self.grid:
			cell.draw(display)
The __init__() method initializes attributes including grid_size, representing the size of the puzzle grid, and cell_width and cell_height, representing the width and height of each cell in the grid. The cell_size attribute is set as a tuple containing cell_width and cell_height.
The _generate_cell() method is responsible for generating the puzzle cells. It initializes an empty list called cells and assigns an incremental c_id value for each cell. The method iterates over the rows and columns of the grid and creates a Cell object for each position, passing the row, column, cell_size, and c_id as arguments. The generated cells are appended to the cells list and returned.
The _generate_piece() method is responsible for generating the puzzle pieces. It initializes an empty list called puzzle_pieces and assigns an incremental p_id value for each piece. The method iterates over the rows and columns of the grid and creates a Piece object for each position, passing the cell_size and p_id as arguments. The generated pieces are appended to the puzzle_pieces list and returned.
The _setup() method is responsible for assigning puzzle pieces to each cell in the grid. It iterates over each row in the grid and then iterates over each cell within that row. It assigns the last puzzle piece from the list of pieces to the occupying_piece attribute of the cell, ensuring that each cell has a unique puzzle piece. After assigning the piece, it removes it from the list of available pieces to avoid duplicate assignments.
The randomize_puzzle() method shuffles the puzzle pieces by performing a series of random moves. It uses a list of possible moves, defined as (x, y) coordinate offsets, such as (0, 1) for moving right, (0, -1) for moving left, (1, 0) for moving down, and (-1, 0) for moving up. The method iterates a fixed number of times (30 in this case) to perform the shuffling. Within each iteration, it selects a random move from the list of moves. Then, it iterates over each row in the grid, and within each row, iterates over each cell. It calculates the new coordinates of the target cell based on the current cell's position and the randomly selected move. If the target cell is within the grid boundaries and the occupying piece of the target cell is empty (represented by a None image), it performs a swap between the occupying pieces of the current cell and the target cell.
The draw() method takes a display object as an argument and is responsible for rendering the puzzle frame on the game screen. It iterates over each cell in the grid and calls the draw() method of the Cell class to render the cell.
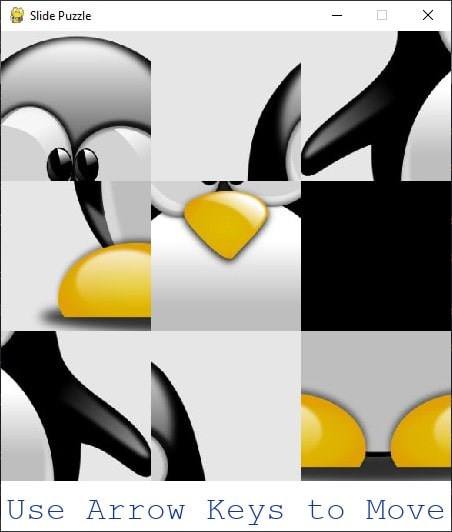
We can check our progress by opening the terminal and running python main.py inside our game directory:
Controlling the Puzzle
This section focuses on implementing the functionality to capture arrow moves from the player, checking the validity of moves, executing the moves, and incorporating a puzzle checker to determine the completion of the puzzle. By enabling player interaction and ensuring the puzzle logic, this part adds an engaging and challenging experience to the game.
Capturing Arrow Moves
Let's create another class inside game.py: the Game class that represents the core structure of the game and provides essential methods for controlling the gameplay:
# /* game.py
import pygame

class Game:
    def __init__(self):
        self.font = pygame.font.SysFont("Courier New", 35)
        self.background_color = (255, 174, 66)
        self.message_color = (17, 53, 165)

    def arrow_key_clicked(self, click):
        try:
            if click.key == pygame.K_LEFT or click.key == pygame.K_RIGHT or click.key == pygame.K_UP or click.key == pygame.K_DOWN:
                return(True)
        except:
            return(False)
The __init__() method serves as the constructor and is responsible for initializing certain attributes of the Game object. It assigns values for background_color and message_color, which represent the background color and message color used in the game interface, respectively.
The arrow_key_clicked() method takes an input parameter click, representing a keyboard event captured by the game and attempts to check if the click event corresponds to an arrow key press. By comparing the click.key value with the arrow key constants provided by the pygame module, namely pygame.K_LEFT, pygame.K_RIGHT, pygame.K_UP, and pygame.K_DOWN, it determines if the pressed key is an arrow key. If it is, the method returns True to indicate that an arrow key has been clicked. If there is an exception during the comparison, such as a click not having a key attribute or an unexpected value, the except block is executed, and the method returns False to indicate that the click event does not correspond to an arrow key press.
Let's modify the code from main() method in Puzzle class, we will make it capture keys pressed and apply our arrow_key_clicked() method to check if the key pressed was an arrow key:
# /* main.py
class Puzzle:
    ...

    def main(self, frame_size):
        ...
        game = Game()
        while self.running:
            for event in pygame.event.get():
                ...

                if event.type == pygame.KEYDOWN:
                    if not self.is_arranged:
                        if game.arrow_key_clicked(event):
                            frame.handle_click(event)
Within the main() method, after initializing the game screen and other necessary components, a Game object is created with the line game = Game(). This object is used to interact with the game logic and functionalities.
In the while loop, the code captures events using pygame.event.get() and iterates over them. For each event, it checks if the event type is pygame.KEYDOWN, which indicates a key press event. If the puzzle is not yet arranged (self.is_arranged is False), it further checks if the arrow key pressed by the player is detected using the game.arrow_key_clicked(event) call. If an arrow key is clicked, it proceeds to handle the click by calling the handle_click() method of the frame object.
Inside the Frame class from frame.py, let's also add handle_click() method which we'll use in handling arrow key clicks but for now, let's use it to print the arrow key clicked.
    def handle_click(self, click):
        print(click)
By running the game and clicking the arrow keys, it will print them in the terminal. In the picture below, I clicked the up arrow key:
![]()
Tip: By changing the print(click) to print(click.scancode) will print the scancode numbers only of the arrow keys pressed. If you run it and hit the arrow keys in this order [right, left, down, up], you'll get [79, 80, 81, 82]. The table below shows the direction of the following scancode:
79 = right
80 = left
81 = down
82 = up
And if you're confused about what's it for, we will use the scancodes to identify the arrow movement.
Checking Move Validity
We're adding another method for the Frame class, the _is_move_valid():
# /* frame.py
	def _is_move_valid(self, click):
		moves = {
			79: (0, 1),
			80: (0, -1),
			81: (1, 0),
			82: (-1, 0)
		}
		for row in self.grid:
			for cell in row:
				move = moves[click.scancode]
				tile_x = self.grid.index(row) + move[0]
				tile_y = row.index(cell) + move[1]
				if tile_x >= 0 and tile_x <= 2 and tile_y >= 0 and tile_y <= 2:
					new_cell = self.grid[tile_x][tile_y]
					if new_cell.occupying_piece.img == None:
						return (cell, new_cell)
				else:
					continue
The _is_move_valid() method checks if a move is valid in the puzzle game. It takes a click object as input, which contains information about the key that was pressed. It defines a dictionary moves that maps key scancodes to move values, where each move value is a tuple representing the change in coordinates (x, y) for a valid move.
The method iterates over each cell in the grid using nested loops. For each cell, it retrieves the move corresponding to the clicked key from the moves dictionary. It then calculates the new coordinates of the cell based on the current row index, column index, and move values. The new coordinates are stored in tile_x and tile_y. Next, it checks if the new coordinates (tile_x, tile_y) are within the valid range of 0 to 2, which represents the grid size. If the new coordinates are valid, it retrieves the cell at the new coordinates from the grid. It then checks if the occupying_piece of the new cell has a None image, indicating an empty cell. If the new cell is empty, it returns a tuple containing the current cell and the new cell. If the new coordinates are out of range, the method continues to the next iteration of the loop to check the next cell in the grid.
Executing the Move
Now let's get back to the handle_click() method in the Frame class and replace the existing code from that method:
# /* frame.py
    def handle_click(self, click):
        c = self._is_move_valid(click)
        try:
            # print(c[0].c_id, c[1].c_id)
            c[0].occupying_piece, c[1].occupying_piece = c[1].occupying_piece, c[0].occupying_piece
        except:
            return False
The handle_click() method takes a click event as a parameter. It first calls the _is_move_valid(click) method to check if the move initiated by the click event is valid within the game's grid.
The _is_move_valid() method returns a tuple c containing the current cell (c[0]) and the new cell (c[1]) involved in the move, or None if the move is invalid.
A try-except block is used to handle the case where the move is valid and the tuple c is not None. In this case, the code within the try block is executed.
The line inside the try block swaps the occupying_piece attribute between the current cell (c[0]) and the new cell (c[1]). This effectively moves the puzzle piece from the current cell to the new cell and vice versa. By swapping the occupying_piece attributes, the positions of the puzzle pieces are updated according to the player's valid move. If any exception occurs during the execution of the code within the try block, it means that the move was invalid or some error occurred. In such cases, the handle_click() method returns False, indicating that the move was not successful.
Checking the Game
In this section, we focus on implementing the functionality to check the game's state and determine if the puzzle has been successfully solved.
Adding Puzzle Checker and Message
And for the last part of coding, we're two more methods in the Game class, the is_game_over() and message() methods.
# /* game.py
def is_game_over(self, frame):
for row in frame.grid:
for cell in row:
piece_id = cell.occupying_piece.p_id
if cell.c_id == piece_id:
is_arranged = True
else:
is_arranged = False
break
return is_arranged
def message(self, screen):
screen.fill(self.background_color, (5, 460, 440, 35))
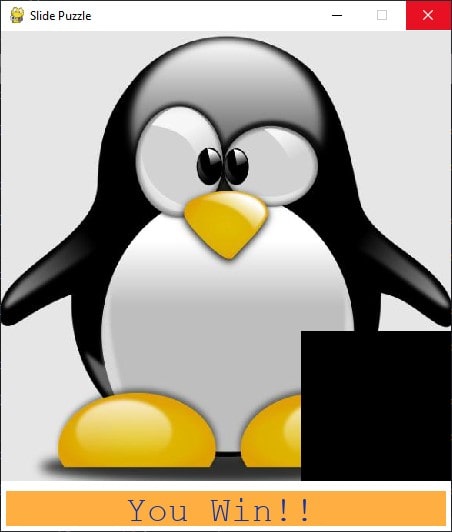
instructions = self.font.render('You Win!!', True, self.message_color)
screen.blit(instructions,(125,460))The is_game_over(self, frame) method in the Game class checks whether the puzzle has been successfully solved by iterating over each cell in the frame's grid. It compares the c_id (cell ID) of each cell with the p_id (piece ID) of the piece occupying that cell. If all cell IDs match their corresponding piece IDs, the puzzle is considered arranged, and the method returns True. Otherwise, it returns False.
The message(self, screen) method displays a victory message "You Win!!" on the screen upon successful puzzle completion, using the predefined font and color. It fills a screen section with a specified background color and places the message at set coordinates.
To apply the following code above, let's modify the main class (Puzzle class) once again:
# /* main.py
class Puzzle:
    ...

    def main(self, frame_size):
        ...

        while self.running:

            if game.is_game_over(frame):
                self.is_arranged = True
                game.message()
The main(self, frame_size) method in the Puzzle class checks game completion using is_game_over(frame) from the Game class. If true, it confirms the correct puzzle arrangement by setting the is_arranged attribute to True, blocking further key presses in the solved state. It then calls the message() method to display a victory message, enabling the game to recognize and respond appropriately to a solved puzzle.
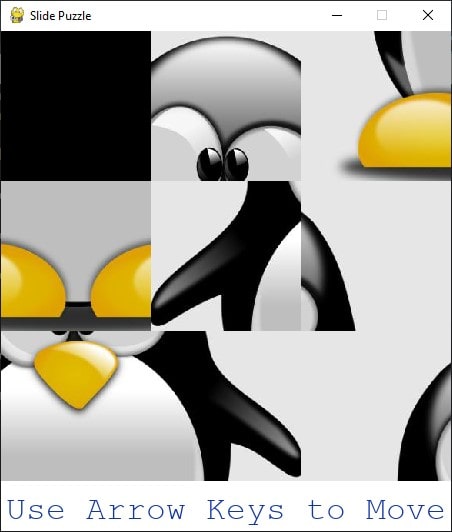
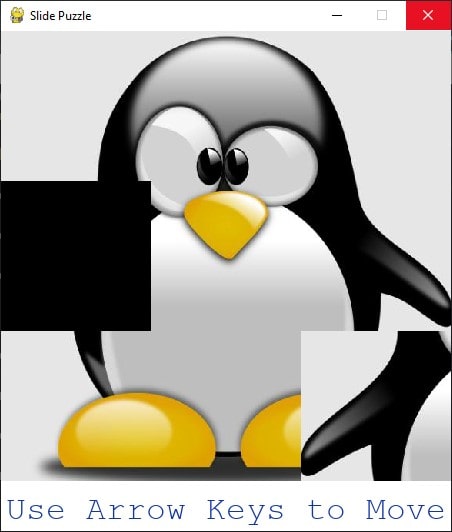
Let's run the main.py in the terminal and try the game. Here are some of the game snapshots:
Conclusion
In conclusion, we have explored the process of creating a slide puzzle game using the Pygame library in Python. We started by setting up the game, initializing the puzzle, and controlling the puzzle's movement.
We implemented features such as capturing arrow key moves, checking move validity, and executing moves. Additionally, we added functionality to check the game's state and display a victory message when the puzzle is successfully solved.
By following these steps and understanding the underlying logic, you can now hopefully create your own interactive and challenging slide puzzle game using Pygame.
Check the complete code here.
Here are some related games built with Python:
- How to Make a Chess Game with Pygame in Python
- How to Make a Checkers Game with Pygame in Python
- How to Build a Tic Tac Toe Game in Python
- How to Create a Hangman Game using PyGame in Python
- How to Make a Tetris Game using PyGame in Python
- How to Make a Planet Simulator with PyGame in Python
Happy coding ♥
Loved the article? You'll love our Code Converter even more! It's your secret weapon for effortless coding. Give it a whirl!
View Full Code Auto-Generate My Code


Got a coding query or need some guidance before you comment? Check out this Python Code Assistant for expert advice and handy tips. It's like having a coding tutor right in your fingertips!