Struggling with multiple programming languages? No worries. Our Code Converter has got you covered. Give it a go!
In a previous tutorial, we've seen how to build a backend of a CRUD app. In this tutorial, we will complete our full-stack application by creating the front end of that app.
At the end of this tutorial, you will learn how to use the Jinja2 template to render HTML templates and Bootstrap through the Flask-Bootstrap extension by building a CRUD app which is a common task in web development that allows you to create, read, update, and delete things. I've made it a useful RESTful API which is a bookshop app built by Flask. This tutorial is based on Flask and Flask-Bootstrap extensions.
I'll also offer something for free right at the bottom. Stay tuned!
Flask is a lightweight web framework that allows you to build web apps in Python. You can use extensions to extend your app's functionality like Bootstrap, which we will use in this tutorial.
Bootstrap is a powerful frontend toolkit that you can use to create stunning apps. We will be building this app:
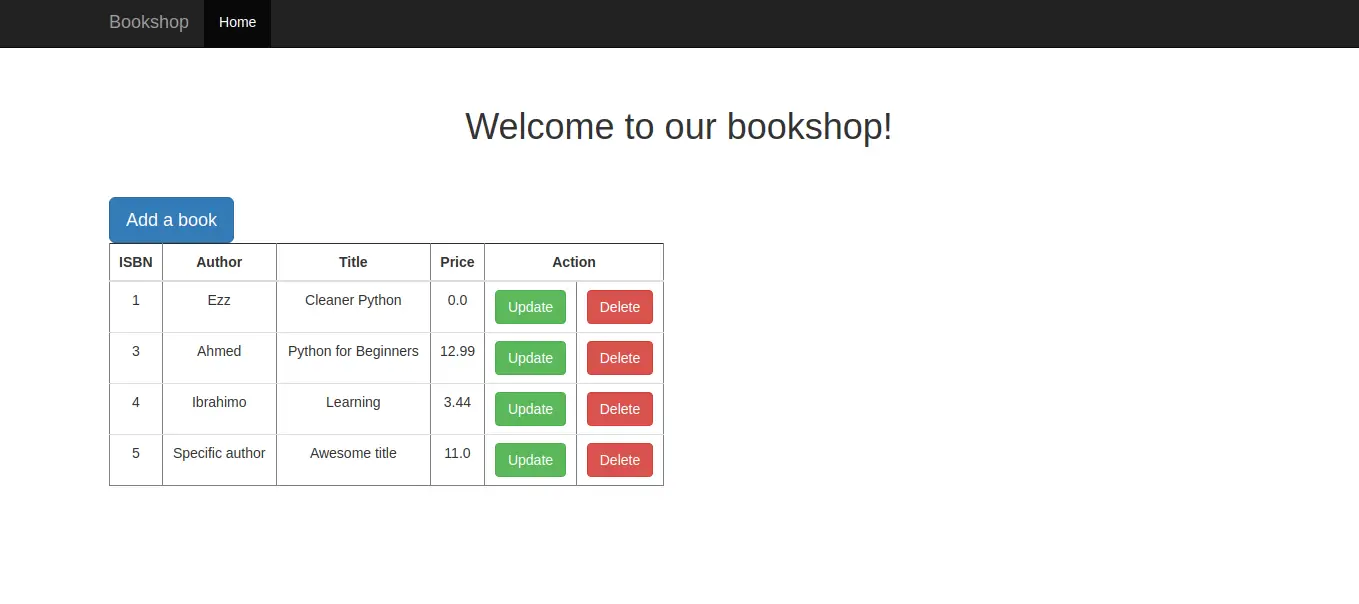 Table of content:
- Revisiting the Backend
- Creating the Navigation Bar
- Creating the Table
- Structuring the Jinja2 Templates and Setting the Title
- Creating a Popup Modal for Adding a Book
- Creating a Popup Modal for Updating a Book
- Creating a Popup Modal for Deleting a Book
- Running the Project
- Conclusion
Revisiting the Backend
Let's revisit the backend app introduced in the previous tutorial; Our Flask API has five functions that depend on the Book table. You'll see how these functions will invoke appropriate methods from SQLAlchemy.
Let's first see how we structure the API functions. Those functions will be invoked by the Flask API and will be decorated with the @app.route decorator.
The mappings for each are shown below:
get_books()to list all the books which map to/book/listURL using the GET request.get_book(isbn)to get the specified book defined by the URL parameterisbnthat we pass to the function. This function maps to/book/<isbn>URL using the GET request.create_book()to add a new book to the database. This function maps to/bookURL using the POST request.update_book(isbn)to update the specified book, which maps to/book/<isbn>URL using the PUT request.delete_book(isbn)to delete the specified book which maps to/book/<isbn>URL using the DELETE request.
Before getting started, below is the structure of the entire app we'll be building in this tutorial:
├── app
│   ├── __init__.py
│   ├── static
│       ├── main.css
│   ├── templates
│       ├── base.html
│       ├── book.html
│       ├── books.html
│       ├── index.html
│   ├── models.py
│   └── routes.py
├── bookshop.py
├── config.py
As mentioned, most of the backend code is explained well in the backend tutorial. If you want to get the project's complete code, check this GitHub page.
Creating the Navigation Bar
Let's start with the navigation bar, which we import from Bootstrap. To use Bootstrap in our HTML template, you need to import it into the Jinja2 template. Let's put the following in the index.html file:
{% extends "bootstrap/base.html" %}You can set the title of our app with the following command:
{% block title %}Bookshop{% endblock %}Add the following for the navbar block:
{% block navbar %}
<nav class="navbar navbar-inverse navbar-fixed-top">
    <div class="container">
        <div class="navbar-header">
            <button type="button" class="navbar-toggle collapsed" data-toggle="collapse" data-target="#navbar"
                aria-expanded="false" aria-controls="navbar">
                <span class="sr-only">Toggle navigation</span>
                <span class="icon-bar"></span>
                <span class="icon-bar"></span>
                <span class="icon-bar"></span>
            </button>
            <a class="navbar-brand" href="/">Bookshop</a>
        </div>
        <div id="navbar" class="collapse navbar-collapse">
            <ul class="nav navbar-nav">
                <li class="active"><a href="/">Home</a></li>
            </ul>
        </div>
    </div>
</nav>
{% endblock %}
Let's now set up the parent root to render the index.html template:
@app.route("/")
def index():
    return render_template("index.html")
Now, your navbar would look like the following:
Creating the Table
We want to create a table like this:
To make such a table, use the bootstrap version of table and wrap it inside the content Jinja2 block like the following:
{% block content %}
<div class="container">
    <div class="row">
        <div class="col-md-6">
            <table class="table" border="1">
                <thead>
                    <tr>
                        <th>ISBN</th>
                        <th>Author</th>
                        <th>Title</th>
                        <th>Price</th>
                        <th colspan="2">Action</th>
                    </tr>
                </thead>
                <tbody>
                    {% for book in books %}
                    <tr>
                        <td>{{ book.isbn }}</td>
                        <td>{{ book.author }}</td>
                        <td>{{ book.title }}</td>
                        <td>{{ book.price }}</td>
                        <td><button type="button" class="btn btn-success" data-toggle="modal"
                                data-target="#update_book_{{book['isbn']}}">Update</button></td>
                        <td><button type="button" class="btn btn-danger" data-toggle="modal"
                                data-target="#delete_book_{{book['isbn']}}">Delete</button></td>
                    </tr>
                    {% endfor %}
                </tbody>
            </table>
        </div>
    </div>
</div>
{% endblock %}
Note that the div HTML tag with the container class provides a responsive width to the application to be convenient with different screen sizes.
Let's make sure we understand the details of the previous HTML snippet. The table HTML tag wraps two HTML tags; thead and tbody. The thead includes the header cells; each one (th) is inside one row (tr). As you can see from the picture above, there are five columns with the headers: ISBN, Author, Title, Price, and Action. Each header spans one column except the Action column, which spans two columns.
The tbody wraps multiple rows depending on how many books you have in your database. As you can see, you can run Python code inside a Jinja2 template. The expression of a for loop is wrapped in the {% %} block while the variable definition is wrapped inside {{ }} (the ones inside the td tags).
Finally, the last two td tags have two buttons; one to update a book and another to delete a book. Bootstrap customizes each button to indicate success or danger CSS. Each has a data-toggle value of "modal" to indicate that they will open a pop-up modal, and we will decide accordingly.
The data-target attribute is a unique string that links to the ID in the modal tag. We then end the for loop block in the Jinja2 template with endfor in a Jinja2 expression.
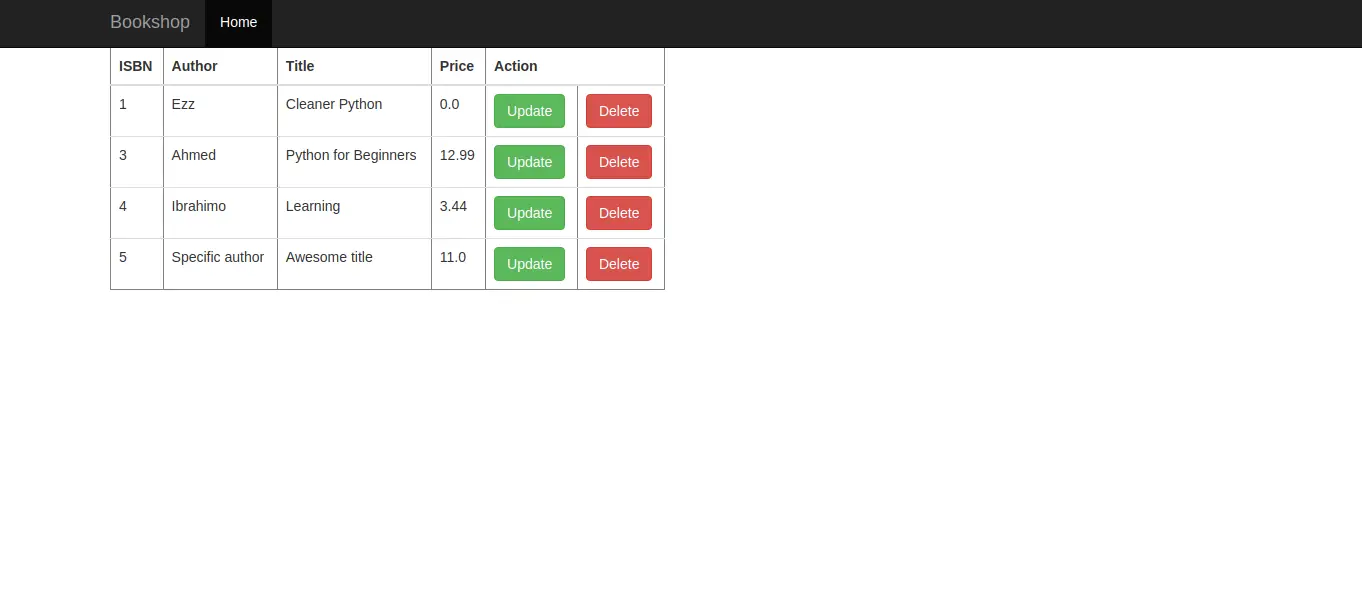
If you run this Flask app, you'll see that the table headers are hidden by the navbar and not aligned well on the screen. You'll also find that the text inside the table's cells is not centered. To edit that, we need to add some CSS styles here. But how do we import a CSS file in a Flask app?
Let's first make the CSS file and then learn how a Flask app would pick this CSS file. Let's name it main.css and put it in app/static directory.
Open the file and add the following:
body {
    padding-top: 50px;
}

td, th {
    text-align: center
}
These CSS styles make two changes:
- First, remember that when the Jinja2 template is rendered, the page is structured by HTML tags. So here we style the
bodytag with padding on the top. This will offset it from appearing under the navbar. Adjust it to the amount you want. I've made it50px. - The second style is customizing the two HTML tags (
tdandth) inside the table to have the text centered.
Now, it's time to link this CSS file to be rendered on the index.html page. Adding the following to the index.html file:
{% block head %}
{{ super() }}
<link rel="stylesheet" href="{{ url_for('static', filename='main.css') }}">
{% endblock %}
The head block, in this Jinja2 template, is appended to the head HTML tag with the super() method. This method represents the parent class and what's following is what we need to list after the sibling of the head tag.
The sibling is a link tag pointing to the main.css file inside the static directory. This is done by wrapping the directory and the filename as arguments to the url_for() method as an expression value to the href attribute.
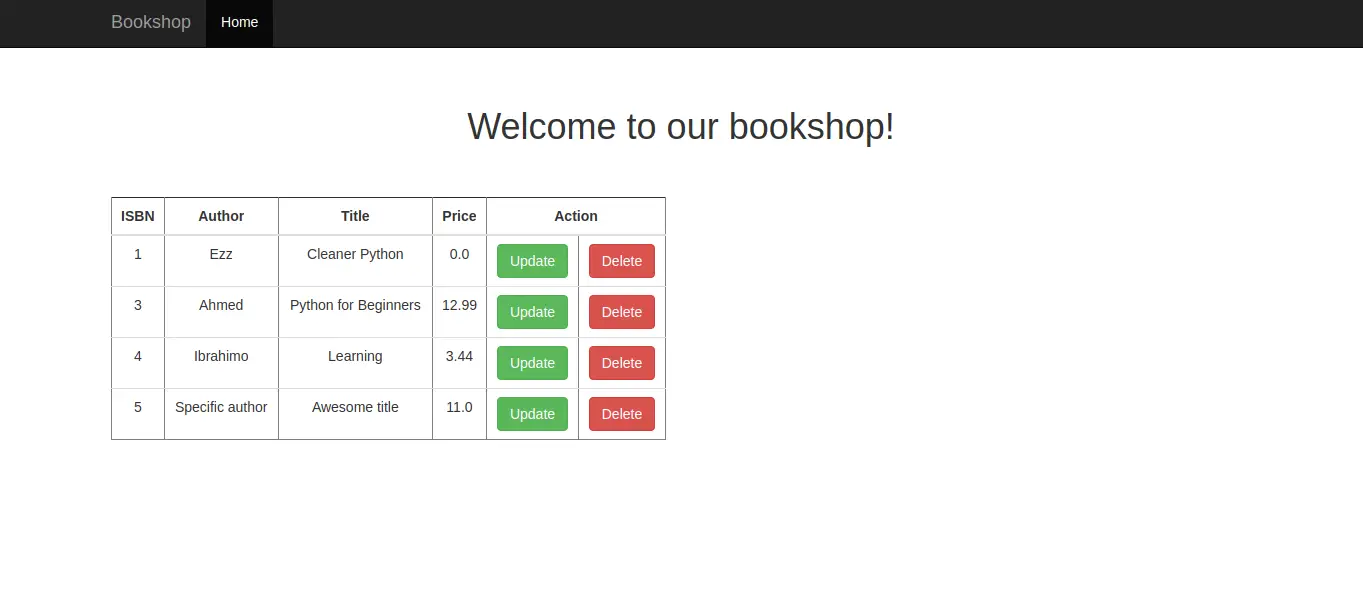
Now, if you rerun the app, you'll find that all td and th elements (texts and buttons) inside the table are centered, and the whole table is padded appropriately.
Let's add the title and structure our app's templates accordingly.
Structuring the Jinja2 Templates and Setting the Title
What we need to do is the following:
To set a title, go ahead to the index.html file and add the following to the beginning of the content block:
<div class="starter-template">
    <h1>
        Welcome to our bookshop!
    </h1>
</div>
Note that the div tag has a starter-template class because we want to style that element. If you run the app now, you'll find that the h1 tag is inclined to the left. To make it centered and to add some padding from all four sides, add the following to the main.css file:
.starter-template {
    padding: 40px 15px;
    text-align: center;
}
Now, The title has a top and bottom padding of 40px, and right and left padding of 15px. It's also centered.
In web apps, it's better to separate our presentation layers to do just one thing. You might observe that the navbar and the title are necessary components in almost all pages of the app we're building.
In this app, we demonstrate this separation to extend HTML templates from one template to another and to avoid duplicate code, especially if you want to make this app a bit more complex, not a single page.
So let's break down some components inside the index.html file and put them in a new file: base.html.
The base.html can now contain the head and navbar blocks.
Let's also move the following from index.html:
{% extends "bootstrap/base.html" %}

{% block title %}Bookshop{% endblock %}
Now, we need to make the index.html template extends from the base.html template using the following line at the beginning:
{% extends "base.html" %}To continue getting rid of DRY (Don't Repeat Yourself), we can customize the content block. So instead of wrapping our HTML elements with a div tag with a container class, we can make a specific block inside the base.html template and use that block in any template we extend base from.
So, append the following to what exists in the base.html:
{% block content %}
<div class="container">
    {% block page_content %} {% endblock %}
</div>
{% endblock %}
Now, we define a block called page_content. Use this block instead of the content block in the index template. Simply open the index.html file, replace content by page_content and remove the div tag with the container class.
Let's now create the pop-up window that will show when we add a new book.
Creating a Popup Modal for Adding a Book
The modal that we will build looks like the following:
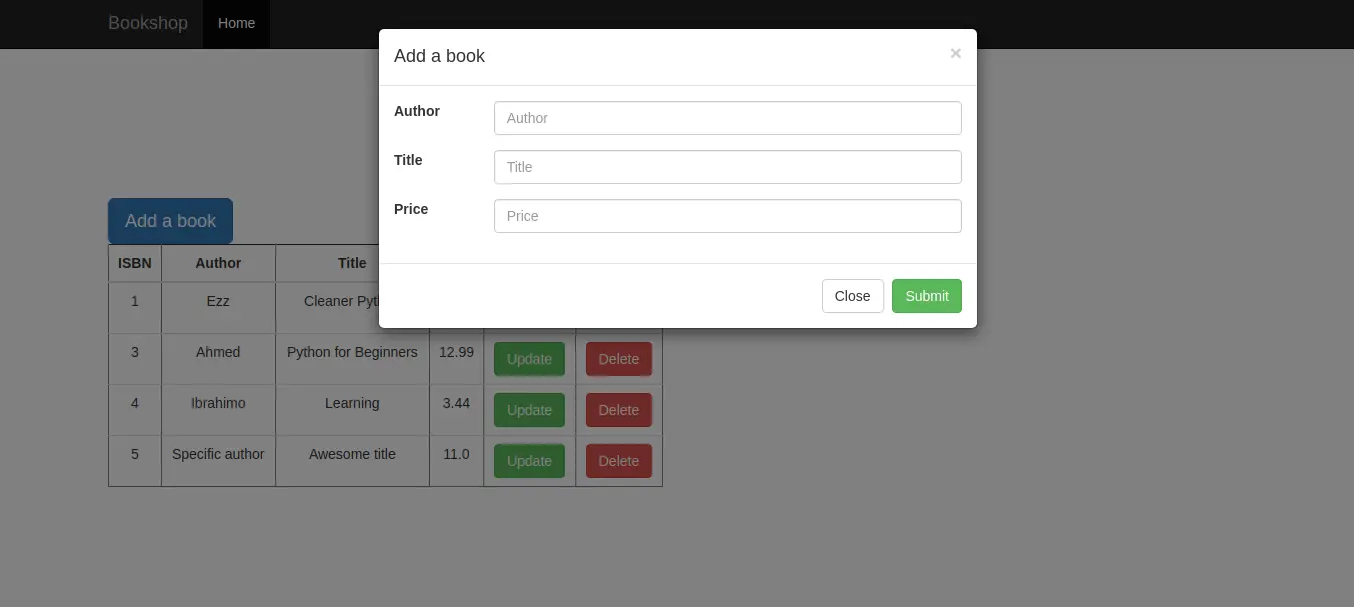
Before we create it, let's add the Add a book button. Add the following to the index.html right after the title:
<button type="button" data-toggle="modal" class="btn btn-lg btn-primary" data-target="#insert_book">Add a book</button>This modal references an id called insert_book which is the id of the modal that we're going to create. Add the following HTML snippet after that button:
<!-- Modal 1 for adding a book -->
<div class="modal fade" id="insert_book" tabindex="-1" role="dialog" aria-labelledby="basicModal" aria-hidden="true">
<div class="modal-dialog">
<div class="modal-content">
<div class="modal-header">
<button type="button" class="close" data-dismiss="modal" aria-hidden="true">×</button>
<h4 class="modal-title" id="myModalLabel">Add a book</h4>
</div>
<form action="{{url_for('add_book')}}" method="post">
<div class="modal-body">
<div class="form-group row">
<label for="author" class="col-xs-2 control-label">Author</label>
<div class="col-xs-10">
<input type="text" id="author" class="form-control" name="author" placeholder="Author" />
</div>
</div>
<div class="form-group row">
<label for="author" class="col-xs-2 control-label">Title</label>
<div class="col-xs-10">
<input type="text" class="form-control" name="title" placeholder="Title" />
</div>
</div>
<div class="form-group row">
<label for="author" class="col-xs-2 control-label">Price</label>
<div class="col-xs-10">
<input type="number" class="form-control" name="price" placeholder="Price" />
</div>
</div>
</div>
<div class="modal-footer">
<button type="button" class="btn btn-default" data-dismiss="modal">Close</button>
<button type="submit" class="btn btn-success">Submit</button>
</div>
</form>
</div>
</div>
</div>
<!-- End Modal 1 -->This is imported from Bootstrap. The div tag here has an id of "insert book" as we mentioned. This modal essentially consists of div tags with the modal-header, modal-body, and modal-footer classes. So how can we interact with that through the database? In other words, how can we input data and store it inside our MySQL engine?
In our case, we use a form. This form wraps the body and the footer of the modal. It has an action attribute pointing to the endpoint that we want to invoke, with a method of a post request. In this modal, we point to the add_book endpoint in the routes.py file.
Inside the body of the modal, we have three rows. Each has a label and an input tag inside a div. The input has a placeholder; the text appears in gray on the text box. The input has a name attribute, which is the column's name in our database (It's the variable name in the ORM, in our case).
To configure the endpoint of add_book, let's add the following to the app/routes.py:
@app.route('/add_book/', methods=['POST'])
def add_book():
    if not request.form:
        abort(400)
    book = Book(
        title=request.form.get('title'),
        author=request.form.get('author'),
        price=request.form.get('price')
    )
    db.session.add(book)
    db.session.commit()
    return redirect(url_for("index"))
Note that we get the request from the form, add it to the SQLAlchemy session, and then commit it to the database. We finally render the index.html template to trigger the change.
Try to add a new author name and a title priced at any number and see the recent change when you hit Submit.
Let's add the second modal to update a book.
Creating a Popup Modal for Updating a Book
We need to create a pop-up modal like this:
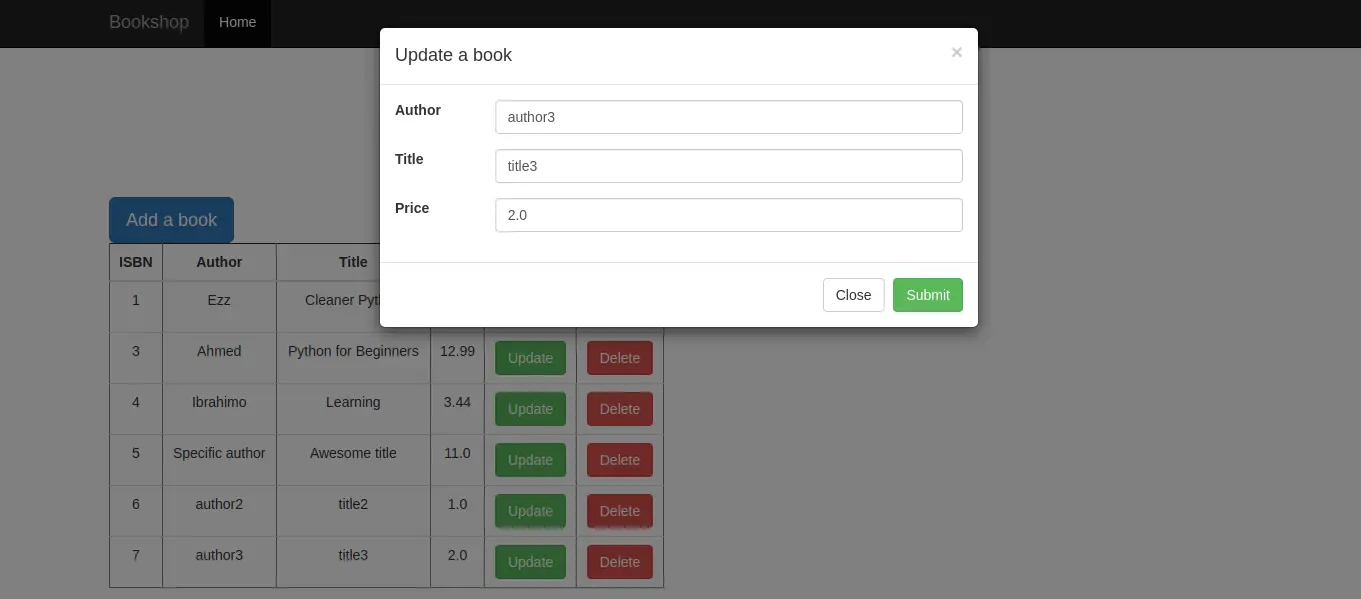
This modal is similar to the previous one. Let's add the following to the index.html file, after the Update button:
<!-- Modal 2 for updating a book -->
<div class="modal fade" id="update_book_{{book['isbn']}}" tabindex="-1" role="dialog"
aria-labelledby="basicModal" aria-hidden="true">
<div class="modal-dialog">
<div class="modal-content">
<div class="modal-header">
<button type="button" class="close" data-dismiss="modal"
aria-hidden="true">×</button>
<h4 class="modal-title" id="myModalLabel">Update a book</h4>
</div>
<form action="{{url_for('update_book', isbn=book['isbn'])}}" method="post">
<div class="modal-body">
<div class="form-group row">
<label for="author" class="col-xs-2 control-label">Author</label>
<div class="col-xs-10">
<input type="text" id="author" class="form-control" name="author"
value="{{book['author']}}" />
</div>
</div>
<div class="form-group row">
<label for="author" class="col-xs-2 control-label">Title</label>
<div class="col-xs-10">
<input type="text" class="form-control" name="title"
value="{{book['title']}}" />
</div>
</div>
<div class="form-group row">
<label for="author" class="col-xs-2 control-label">Price</label>
<div class="col-xs-10">
<input type="number" class="form-control" name="price"
value="{{book['price']}}" />
</div>
</div>
</div>
<div class="modal-footer">
<button type="button" class="btn btn-default"
data-dismiss="modal">Close</button>
<button type="submit" class="btn btn-success">Submit</button>
</div>
</form>
</div>
</div>
</div>
<!-- End Modal 2 -->Things to note here:
- The endpoint here is
update_book, so we need to configure that in the route. - In the form, there is an action of
url_for('update_book', isbn=book['isbn'])which indicates the endpoint as the first argument, while the second argument indicates the argument that would be passed to that endpoint. In this case, we need to give the ISBN value to theupdate_bookmethod to update that specific book. - The placeholder is the current value that you might need to change. That's why we configure it with the
book['price']in case of updating the price value.
To make it work, add the following route to the app/routes.py file:
@app.route('/update_book/<int:isbn>', methods=['POST'])
def update_book(isbn):
    if not request.form:
        abort(400)
    book = Book.query.get(isbn)
    if book is None:
        abort(404)
    book.title = request.form.get('title', book.title)
    book.author = request.form.get('author', book.author)
    book.price = request.form.get('price', book.price)
    db.session.commit()
    return redirect(url_for("index"))
Let's finalize this tutorial with the delete modal.
Creating a Popup Modal for Deleting a Book
We want to end up with the following:
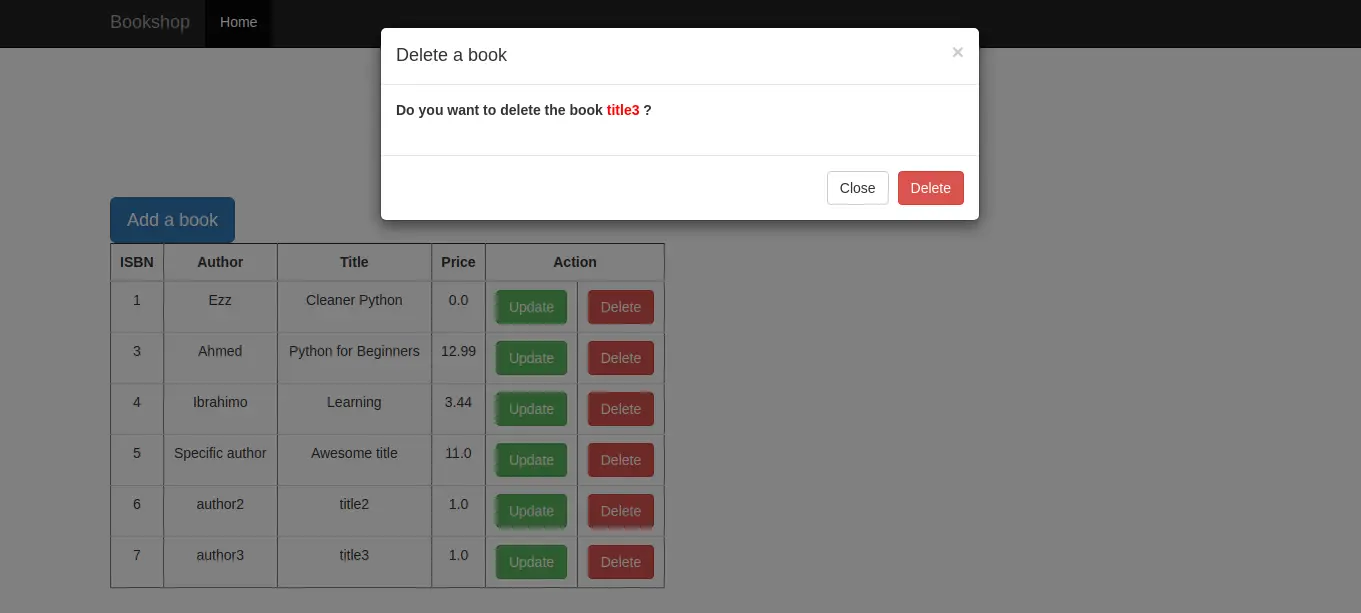
Let's add the following to the index.html template, after the Delete button:
<!-- Modal 3 for deleting a book -->
<div class="modal fade" id="delete_book_{{book['isbn']}}" tabindex="-1" role="dialog"
aria-labelledby="basicModal" aria-hidden="true">
<div class="modal-dialog">
<div class="modal-content">
<div class="modal-header">
<button type="button" class="close" data-dismiss="modal"
aria-hidden="true">×</button>
<h4 class="modal-title" id="myModalLabel">Delete a book</h4>
</div>
<form action="{{url_for('delete', isbn=book['isbn'])}}" method="post">
<div class="modal-body">
<div class="form-group row">
<label class="col-sm-12 col-form-label">Do you want to delete the book <span
style='font-weight:bold;color:red'>{{book['title']}}</span>
?</label>
</div>
</div>
<div class="modal-footer">
<button type="button" class="btn btn-default"
data-dismiss="modal">Close</button>
<button type="submit" class="btn btn-danger">Delete</button>
</div>
</form>
</div>
</div>
</div>
<!-- End Modal 3-->This modal has the same main components; a header, a body, and a footer. The body, in this case, is wrapped in a form with an action of delete and ISBN value passed to the delete endpoint.
Configure it with the following route at app/routes.py:
@app.route("/delete/<int:isbn>", methods=["POST"])
def delete(isbn):
    book = Book.query.get(isbn)
    if book is None:
        abort(404)
    db.session.delete(book)
    db.session.commit()
    return redirect(url_for("index"))
Once you hit Delete, that record will be deleted from the database.
Running the Project
To be able to run the project (get the complete code here), you have to have a MySQL development server installed on your machine, such as XAMPP on Windows, or mysqld on Linux.
Second, make a virtual environment and install the required dependencies:
$ python3 -m venv venv
$ . venv/bin/activate
$ pip install --upgrade pip
$ pip install -r requirements.txt
Third, set up the necessary environment variables:
$ cd fullstack_crud_flask_sqlalchemy
$ export FLASK_APP=bookshop.py
$ export DEV_DATABASE_URL=mysql+pymysql://<username>:<password>@localhost:3306/flaskapp
$ flask run
Note: If you're on Windows, simply replace the export command with the SET command.
Of course, you have to replace the username and password in your case. We called our database flaskapp, feel free to use any name.
Finally, before running the app, you have to create the database manually using CREATE DATABASE flaskapp; command, then we initialize the database using the Flask shell:
$ flask shell
>>> from app import db
>>> db
<SQLAlchemy engine=mysql+pymysql://root:***@localhost:3306/flaskapp?charset=utf8>
>>> from app.models import Book
>>> Book
<class 'app.models.Book'>
>>> db.create_all() # this creates the tables
>>> exit()
Let's run it:
$ flask run
 * Serving Flask app 'bookshop.py' (lazy loading)
 * Environment: production
   WARNING: This is a development server. Do not use it in a production deployment.
   Use a production WSGI server instead.
 * Debug mode: off
 * Running on http://127.0.0.1:5000/ (Press CTRL+C to quit)
Conclusion
This tutorial covered the basics of creating a frontend for your Flask app. We used Jinja2 templates to render HTML pages and Bootstrap for CSS to style our elements. We did so by creating an actual project, a bookshop.
We've seen how to use models and reference them in our app, using forms and mapping them to the database, creating routes, and how to iterate in our app and build each component in a step-by-step approach. Again, If you're unsure about the backend side of the tutorial, then check the backend tutorial.
To write clean code in Python like the above and beyond, download my free eBook, Cleaner Python.
Get the complete code of the project here.
Happy coding ♥
Take the stress out of learning Python. Meet our Python Code Assistant – your new coding buddy. Give it a whirl!
View Full Code Generate Python Code


Got a coding query or need some guidance before you comment? Check out this Python Code Assistant for expert advice and handy tips. It's like having a coding tutor right in your fingertips!