Confused by complex code? Let our AI-powered Code Explainer demystify it for you. Try it out!
If you have fancied the idea of building your own age calculator app using Python, then you are at the right place because this article is just for you.
Before we dive deeper into this article, let us first understand what an age calculator app is; this app calculates the user's age using their birth date (day, month, and year).
This article has been split into two sections. In the first section, we will build a command line version, and finally, in the second section, we will make a GUI version of the app. We will build all these from the ground up.
Here is the table of contents:
Setting up the Environment
First things first, let us set up the environment, create two new Python files and call them age_calculator_cli.py and age_calculator_ui.py:
![]()
You can call them anything per your preference; make sure the file names are meaningful.
Related: How to Make a Calculator with Tkinter in Python.
Building the Command Line Version
Now that the environment is all set, open the age_calculator_cli.py file, and do the following import:
from datetime import dateHere we are importing date from datetime, this module provides several functions and classes for handling dates and times.
We will now create a function for calculating the age; we will call it calculate_age(). Just below the import, paste these lines of code:
# defining the for calculating the age, the function takes day
def calculate_age(day, month, year):
    # we are getting the current date using the today()
    today = date.today()
    # convering year, month and day into birthdate
    birthdate = date(year, month, day)
    # calculating the age
    age = today.year - birthdate.year - ((today.month, today.day) < (birthdate.month, birthdate.day))
    # return the age value
    return age
In the above function, we are passing three arguments to the function, date, month, and year, we will get these arguments from the user.
Inside the function, we are getting the current date from datetime module using the today() function. After that, we create a birthdate variable using the date() function; it takes a year, month, and day as arguments. From there, we are now calculating the age by doing some subtractions, the code:
((today.month, today.day) < (birthdate.month, birthdate.day))Checks if the day or month of the variable today precedes the day or month of the birthdate variable, the return value is a boolean value, and finally, we return the calculated age.
Now we need to get the day, month, and year from the user, just after the function definition, paste these lines of code:
# the try/except block
# the try will execute if there are no exceptions
try:
    # we are getting day, month, and year using input() function
    day = input('Enter day:')
    month = input('Enter month:')
    year = input('Enter year:')
    # creating a variable called age_result and we are also calling the claculate_age function
    age_result = calculate_age(int(day), int(month), int(year))
    print(f'You are {age_result} years old')

# the except will catch all errors
except:
    print(f'Failed to calculate age, either day or month or year is invalid')
Here we have a try/except block, inside the try statement, we have code for getting data from the user; this is done using the input() function, and with that user data, we calculate the age via the function call. If the code execution encounters any errors, the except statement will come to the rescue.
To test the program, use the following:
$ python age_calculator_cli.pyThe output is as follows if you enter valid data:
Enter day:12
Enter month:10
Enter year:2000
You are 21 years old
The program is running as expected, rerun it, but this time, let's enter invalid data. The output will be as below:
Enter day:-1
Enter month:h
Enter year:0.5
Failed to calculate age, either day or month or year is invalid
We have successfully created the command line version of the age calculator!
Building the GUI Version
In this section, we will now focus on building the Tkinter version of our age calculator. Its functionality is not different from the command line version. The only difference is that the Tkinter version app has a user interface that allows users to enter data. This is what we are going to build at the end of this section:

So without further ado, let us start building the app.
Designing the User Interface
Before everything else, let us start by designing the user interface, do the following necessary imports as follows in the age_calculator_ui.py:
from tkinter import *
from tkinter import ttk
from tkinter.messagebox import showerror
from datetime import date
Here is what the imports mean; starting with the first one, we are importing everything from tkinter. To do this, we use an asterisk or a wildcard. After that, we import ttk from tkinter, ttk is for styling widgets (labels, buttons, entries, etc.).
We are also importing the showerror message box for displaying error messages to the user from tkinter.messagebox. Finally, we are importing the datetime module.
We will create the window just after the imports. Paste these lines of code:
# creating the main window
window = Tk()
# the title for the window
window.title('Age Calculator')
# the dimensions and position of the windodw
window.geometry('500x260+430+300')
# making the window nonresizabale
window.resizable(height=FALSE, width=FALSE)

# runs the window infinitely until uses closes it
window.mainloop()
For the sake of being on the same page, let us break the code a bit. Firstly, we are creating the main window using the Tk() function that comes with Tkinter, then we give the window the title using the title() function, we are then defining the dimensions (500x260) and the position (430+300) for the window using the geometry() function, to make the window non-resizable, we are using the resizable() function with height and width set to FALSE.
Running the program, you will get the following:
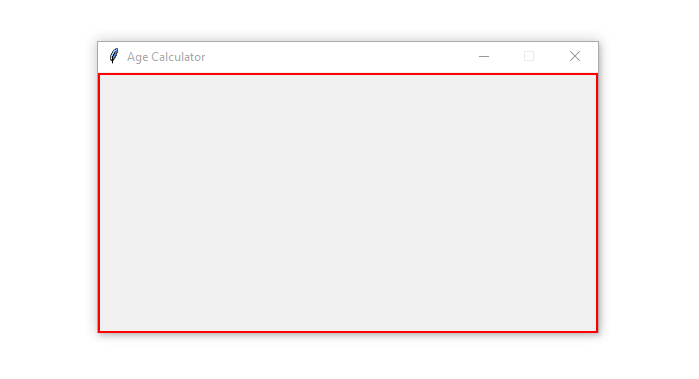
After creating the window, we now need to make the container for all the widgets; we will use a Canvas widget. This Canvas will be inside the main window, and it will take up the height and width like this:
So just after:
window.resizable(height=FALSE, width=FALSE)Paste this code:
# the canvas to contain all the widgets
canvas = Canvas(window, width=500, height=400)
canvas.pack()
We are creating a canvas using the Canvas() function, and placing it inside the main window. For the size of the canvas, we are using width and height.
Now we need to create widgets that will be placed inside the created canvas, but before making the widgets, let us create their styles; just below the canvas definition, add these lines of code:
# ttk styles for the labels
label_style = ttk.Style()
label_style.configure('TLabel', foreground='#000000', font=('OCR A Extended', 14))

# ttk styles for the button
button_style = ttk.Style()
button_style.configure('TButton', foreground='#000000', font=('DotumChe', 16))

# ttk styles for the entries
entry_style = ttk.Style()
entry_style.configure('TEntry', font=('Dotum', 15))
In the code above, we are creating styles for the widgets; we are using the ttk module for this.
We are building a style object using ttk.Style() function, so to add styles to the object, we will use the configure() function, this function takes the style name (TLabel, TButton, or TEntry), foreground, and font() as some of its arguments.
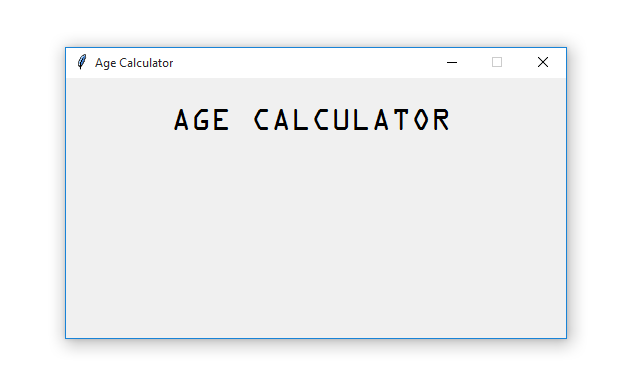
In our widgets, we will use the style names to refer to or point to the styles we want. Now that the styles are taken care of, we will create the widgets. Let’s start with the label for displaying the large text. Below the styles, add this code:
# the label for displaying the big text
big_label = Label(window, text='AGE CALCULATOR', font=('OCR A Extended', 25))

# placing the big label inside the canvas
canvas.create_window(245, 40, window=big_label)
The code creates a label using Label(), we are passing window, text, and font as arguments, something to note here, this label has independent styles; it is not using the styles we have created.
Below the label, we are adding it to the canvas using the create_window() function, this function takes two integers (245 and 40) and a window as arguments, the first integer positions the label horizontally, and the second integer positions it vertically.
Running the program, you will get this:
So far, so good. Our app is taking shape; now let us create the remaining widgets; add this code below the big_label:
# label and entry for the day
day_label = ttk.Label(window, text='Day:', style='TLabel')
day_entry = ttk.Entry(window, width=15, style='TEntry')
# label and entry for the month
month_label = ttk.Label(window, text='Month:', style='TLabel')
month_entry = ttk.Entry(window, width=15, style='TEntry')
# label and entry for the year
year_label = ttk.Label(window, text='Year:', style='TLabel')
year_entry = ttk.Entry(window, width=15, style='TEntry')
# the button
calculate_button = ttk.Button(window, text='Calculate Age', style='TButton', command=calculate_age)
# label for display the calculated age
age_result = ttk.Label(window, text='', style='TLabel')
# adding the day label and entry inside the canvas
canvas.create_window(114, 100, window=day_label)
canvas.create_window(130, 130, window=day_entry)
# adding the month label and entry inside the canvas
canvas.create_window(250, 100, window=month_label)
canvas.create_window(245, 130, window=month_entry)
# adding the year label and entry inside the canvas
canvas.create_window(350, 100, window=year_label)
canvas.create_window(360, 130, window=year_entry)
# adding the age_result and entry inside the canvas
canvas.create_window(245, 180, window=age_result)
# adding the calculate button inside the canvas
canvas.create_window(245, 220, window=calculate_button)
With this code snippet, we are creating the following widgets:
- Labels for displaying
Day,Month,Year, andage_resulttext:day_labelmonth_labelyear_labelage_result, this is empty for now.
- Entries for capturing
day,monthandyearvalues:day_entrymonth_entryyear_entry
- A button:
calculate_button
All these widgets are ttk widgets, so to style them, we are passing the style argument, for example, the button widget uses the TButton style that we created.
Testing the app, we get the following:
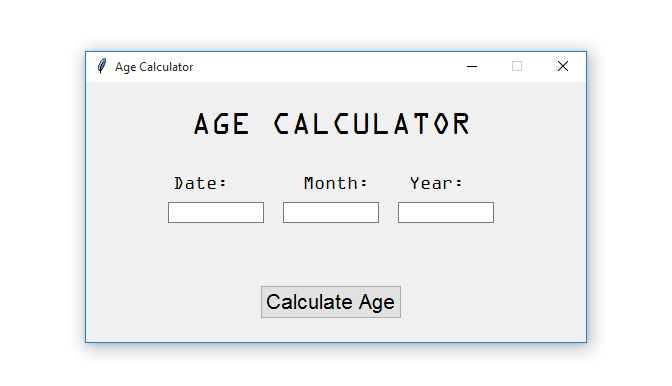
Congratulations on successfully designing the app’s user interface!
Implementing the Age Calculation Functionality
Now that the user interface is taken care of, let us make the app reactive. The app should be able to get data from the user and calculate the age. To do this, we will create a function just below the imports called calculate_age(), paste this code:
# the function for calculating the age
def calculate_age():
    # the try/except block
    try:
        # getting current date
        today = date.today()
        # getting day from the day entry
        day = int(day_entry.get())
        # # getting month from the month entry
        month = int(month_entry.get())
        # getting year from the year entry
        year = int(year_entry.get())
        # creating a date object
        birthdate = date(year, month, day)
        # calculating the age
        age = today.year - birthdate.year - ((today.month, today.day) < (birthdate.month, birthdate.day))
        # displaying the age using the age result label
        age_result.config(text='You are ' + str(age) + ' years old')
    # if an error occurs the showerror window will pop up
    except:
        showerror(title='Error', message='An error occurred while trying to ' \
                    'calculate age\nThe following could ' \
                    'be the causes:\n->Invalid input data\n->An empty field/fields\n'\
                     'Make sure you enter valid data and fill all the fields')
This function is all the same as the one we used in the command line version of the app; the only difference here is that in the try statement, we are getting the day, month, and year from the entries using the get() function and also in the except statement, all errors that the app will catch will be displayed on the showerror popup window.
Nothing happens if you run the app, enter valid data in the entries, and click the button. The reason is that we have not linked the calculate_age() function with the button. We want the function to be triggered once the user clicks the button. To do this, we will use the command argument that comes with the button widget, edit the calculate_age button code and make it look like this:
calculate_button = ttk.Button(window, text='Calculate Age', style='TButton', command=calculate_age)Rerun the app, re-enter the valid data, and you will get the following:
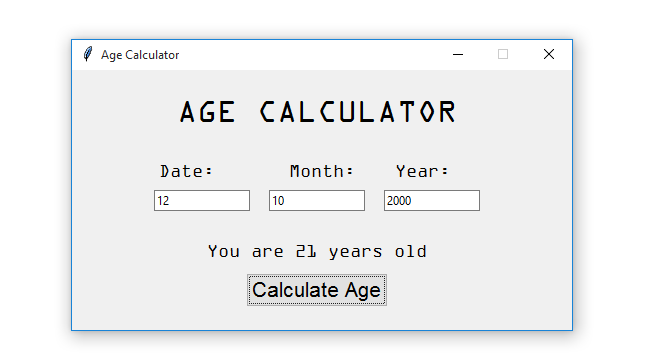
What if the user enters invalid data or leaves one or all the entries empty and clicks the button? The output will be this:
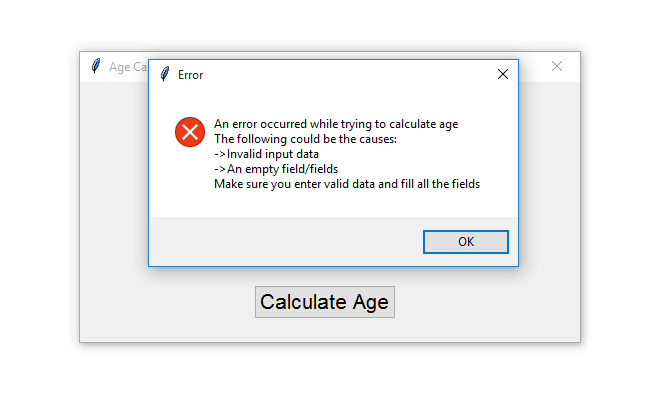
This means that the app is working perfectly!
Conclusion
This article showed you how to create an age calculator using Python. We walked you through building two versions of the age calculator app, the command line and the Tkinter version. We hope you will use the knowledge you acquired from this article in your future projects!
You can get the complete code here.
Here are some related apps we've built in other tutorials:
- How to Make a Calculator with Tkinter in Python
- How to Create an Alarm Clock App using Tkinter in Python
- How to Make a YouTube Video Downloader in Python
- How to Build a Dictionary App with Tkinter in Python
- How to Make a Typing Speed Tester with Tkinter in Python
Happy coding ♥
Why juggle between languages when you can convert? Check out our Code Converter. Try it out today!
View Full Code Transform My Code


Got a coding query or need some guidance before you comment? Check out this Python Code Assistant for expert advice and handy tips. It's like having a coding tutor right in your fingertips!