Unlock the secrets of your code with our AI-powered Code Explainer. Take a look!
A to-do app comes in handy for people who are used to taking notes on paper. If you are taking notes, you know that notes on paper have limitations. In this tutorial, you will learn how to build a todo app using the Django framework in Python.
Table of contents:
- What is Django
- Getting Started
- Installing Django
- Starting a Django Project
- Creating a Django App
- Configuring the App
- Creating the Models
- Creating a Superuser
- Creating Views
- Setting up the URLs
- Adding Templates
- Adding Tasks
- Updating Tasks
- Deleting Tasks
- Conclusion
What is Django
Django is a Python web framework promoting rapid development and clean, pragmatic design. Experienced developers created it to take care of the hassle of web development, allowing you to focus on writing your app instead of reinventing the wheel. Companies such as Pinterest and Instagram use it.
At the end of this tutorial, you will be able to:
- Create a new project and app
- Create a virtual environment
- Build database model
- Create Django-admin interface
- Design templates
- Create views and corresponding URL paths.
Getting Started
We will start by understanding what our app will look like. Our to-do app will be able to:
- Create a new task
- Update an existing task
- Delete tasks
We will first create a virtual environment. A virtual environment is a Python environment in which the Python interpreter, libraries, and scripts are isolated from those installed in other virtual environments and any libraries installed as part of your operating system.
Let’s create a new directory where we will store the app. In the terminal, run the following:
$ mkdir todo_app
$ cd todo_app
We first created a folder called todo_app, then changed our directory to the new folder.
We will use a Python installer pip to install virtualenv. Virtualenv is a tool for creating isolated virtual Python environments:
$ pip install virtualenv
We will use virtualenv to create a virtual environment. Let’s call it venv:
$ virtualenv venvWe have to activate the virtual environment before using it:
$ source venv/bin/activate
Activating the virtual environment will isolate anything we install here to this environment.
Installing Django
We will use the pip installer to install Django. It will take care of its dependencies too.
$ pip install django
To check the version that has been installed:
$ python -m django --version
This will show us the version of Django that is installed. The next step is to create a Django project since we have the necessary libraries installed.
Starting a Django Project
A Django project is a Python package representing the entire web application. The Django project contains all the settings and configurations for the whole website. A single project may also contain multiple apps that can be used to implement the functionality.
We will use the django-admin executable in Django to start a Django project. We're calling our project todo_project:
$ django-admin startproject todo_project
The project structure is as follows:
.
├── manage.py
└── todo_project
    ├── asgi.py
    ├── __init__.py
    ├── settings.py
    ├── urls.py
    └── wsgi.py

1 directory, 6 files
The files listed above are:
manage.py- is a command-line utility that provides us with several ways to interact with this Django project.settings.py- This file contains all the website’s configuration options. You can register applications, configure databases, and so on here.urls.py- This file contains all the project’s links. Simply put, this file tells Django that if a user enters this URL, they should be taken to the specified website or image.
These files are important as they directly affect how the project will behave.
Creating a Django App
A Django app is a small library representing a larger project subset. A project can contain several apps. We will create a to-do app in Django. We must ensure it is the same directory where the manage.py file is:
$ python manage.py startapp todoThe structure of the app is:
.
├── admin.py
├── apps.py
├── __init__.py
├── migrations
│   └── __init__.py
├── models.py
├── tests.py
└── views.py
The above files are:
- The
models.pyfile contains the most important data fields and behaviors. admin.pyis where you register your app’s models with the Django admin application.- The
views.pyfile contains Python functions that, like HTML documents, accept HTTP requests and return HTTP responses. - migrations folder contains information about changes to your future database.
Configuring the App
We have to let Django recognize our app. In settings.py, we add the name of the app under the INSTALLED_APPS.
INSTALLED_APPS = [
    'django.contrib.admin',
    'django.contrib.auth',
    'django.contrib.contenttypes',
    'django.contrib.sessions',
    'django.contrib.messages',
    'django.contrib.staticfiles',
    'todo', #here
]
Creating the Models
We will create a simple to-do app that contains a title, the details of the task, and the date created. Let’s define the model class. In models.py:
from django.db import models
from django.utils import timezone
# Create your models here.

class Todo(models.Model):
    title=models.CharField(max_length=100)
    details=models.TextField()
    date=models.DateTimeField(default=timezone.now)

    def __str__ (self):
        return self.title
The __str__() method created a readable representation of our data. The output will be the task’s title when we create a task.
timezone.now() returns the time when the task is created; we could also use auto_now=True. The maximum number of characters that the title takes is 100.
Let's migrate the models:
$ python manage.py makemigrations
$ python manage.py migrate
The makemigrations command looks through all of your available models and creates migrations for any tables that do not yet exist. The migrate command executes all unapplied migrations against your database, essentially synchronizing your model changes with the database schema:
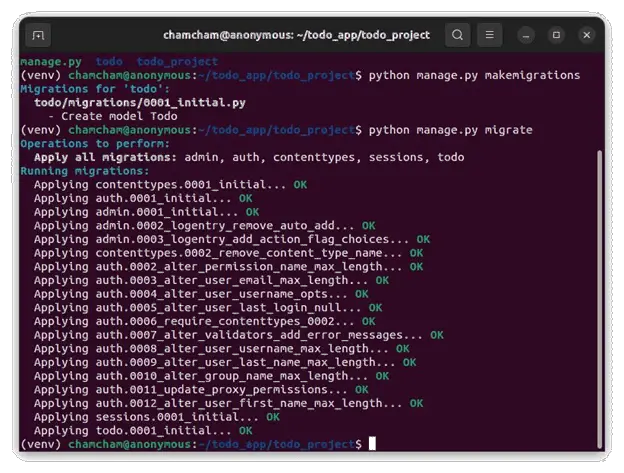
We have created the database for the model. We can start the Django development server to check our progress so far:
$ python manage.py runserver
The server is on and can be accessed via the browser:
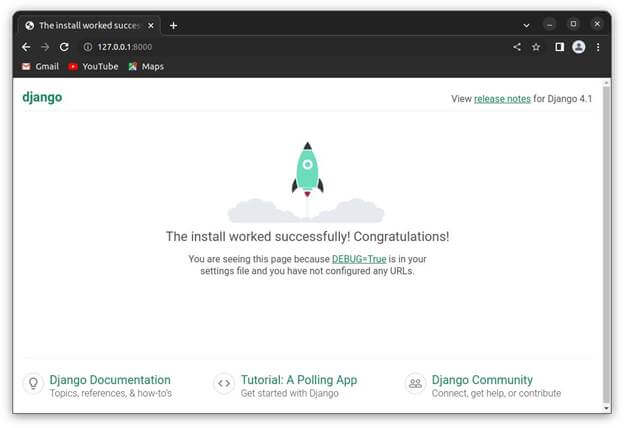
Congratulations, the server is live!
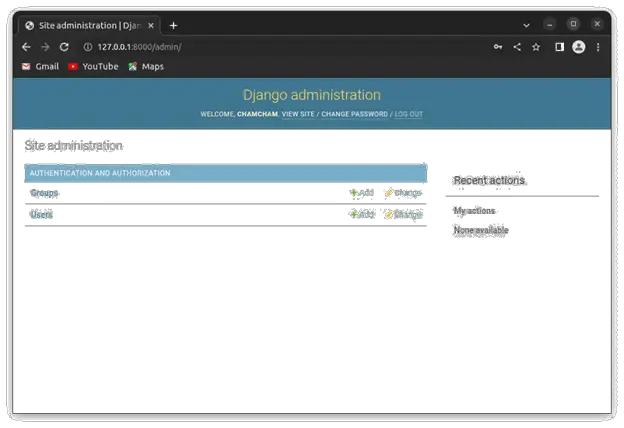
Creating a Superuser
Suppose we want to add training data to the app. Django's admin interface lets us directly create, read, update, and delete the models. We can access the admin interface by creating a superuser. This is a user who can log in to the admin interface.
Keep the server running, open up a new command prompt or terminal and write the below command, and you should create the superuser successfully:
$ python manage.py createsuperuserEnter the link with /admin at the end to access the admin interface:
We need to register the model within the admin app. In admin.py file, add:
from django.contrib import admin
from .models import Todo

# Register your models here.
admin.site.register(Todo)
In the admin interface, we can now add data to the app:
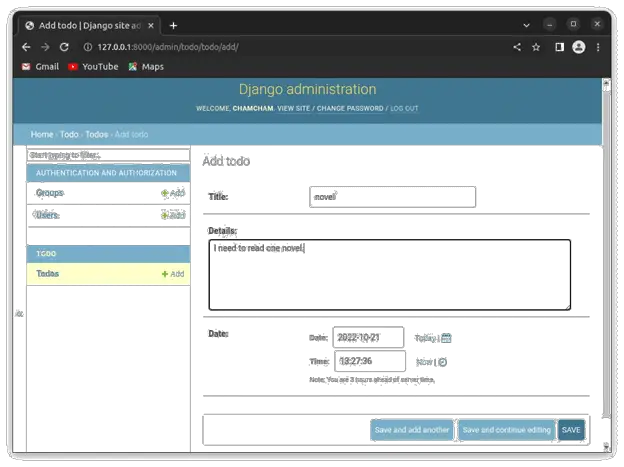
Clicking on the save button will save our data:
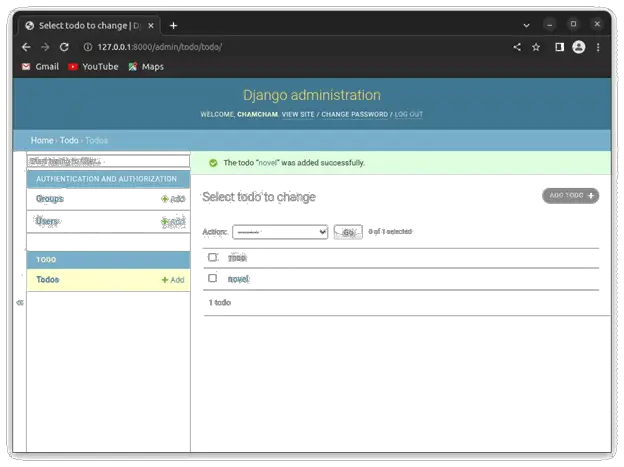
We can add as much testing data as we want here.
Creating Views
Views can be implemented as classed-based views or as function-based views in Django. We will be using function-based views for this tutorial. We will first create a simple view for the homepage. In views.py:
from django.shortcuts import render

# Create your views here.
def home(request):
    return render(request,'home.html')
Setting up the URLs
Every Internet page requires its own URL. This way, your application knows what to display to a user who visits that URL. URLconf is a concept used in Django (URL configuration). URLconf is a collection of patterns that Django will try to match with the requested URL to find the correct view.
We will add a link to the homepage view. In urls.py:
from django.contrib import admin
from django.urls import path
from todo import views #here

urlpatterns = [
    path('admin/', admin.site.urls),
    path('', views.home, name='home'), #here
]
Adding Templates
A template is a .html file that contains both HTML, CSS, and JavaScript. We need to create the templates folder in the root directory of the app, where the manage.py file is:
.
├── db.sqlite3
├── manage.py
├── todo
├── templates
└── todo_project
We need to configure the settings.py to include the templates folder in the TEMPLATES list:
TEMPLATES = [
    {
        'BACKEND': 'django.template.backends.django.DjangoTemplates',
        'DIRS': [BASE_DIR/'templates'], #here
        'APP_DIRS': True,
        'OPTIONS': {
            'context_processors': [
                'django.template.context_processors.debug',
                'django.template.context_processors.request',
                'django.contrib.auth.context_processors.auth',
                'django.contrib.messages.context_processors.messages',
            ],
        },
    },
]
We can now start creating template files. We will start with a base template containing code that we want to appear on other pages. We will use a popular CSS framework called Bootstrap.
Creating the Base Template
We will create a new file in the templates folder called base.html:
<!doctype html>
<html lang="en">
   <head>
     <!-- Required meta tags -->
     <meta charset="utf-8">
     <meta name="viewport" content="width=device-width, initial-scale=1">
     <!-- Bootstrap CSS -->
     <link href="https://cdn.jsdelivr.net/npm/bootstrap@5.0.2/dist/css/bootstrap.min.css" rel="stylesheet" integrity="sha384-EVSTQN3/azprG1Anm3QDgpJLIm9Nao0Yz1ztcQTwFspd3yD65VohhpuuCOmLASjC" crossorigin="anonymous">
   <title>{% block title %} Todo app{% endblock %}</title>
   </head>
   <body>
     {% block body %}
     <header class = "header fixed-top">
       <nav class="navbar navbar-expand-lg navbar-light bg-light">
           <div class="container-fluid">
             <a href="{% url 'home' %}" class=" navbar-brand">
               <span>Todo app</span>
             </a>
          <button class="navbar-toggler" type="button" data-bs-toggle="collapse" data-bs-target="#navbarNav" aria-controls="navbarNav" aria-expanded="true" aria-label="Toggle navigation">
             <span class="navbar-toggler-icon"></span>
           </button>
           <div class="collapse navbar-collapse" id="navbarResponsive">
             <ul class="navbar-nav ms-auto">
               <li class="nav-item ">
                  <a class="btn btn-primary ml-auto"href="#">Todo<span class="sr-only"></span></a>
                 </ul>
               </div>
             </div>
   </nav>
</header>
   <div class="container">
   {% block content %}{% endblock %}
   </div>
       {% endblock body %}
       <script src="https://cdn.jsdelivr.net/npm/chart.js@3.9.1/dist/chart.min.js"></script>
     <script src="https://cdn.jsdelivr.net/npm/bootstrap@5.0.2/dist/js/bootstrap.bundle.min.js" integrity="sha384-MrcW6ZMFYlzcLA8Nl+NtUVF0sA7MsXsP1UyJoMp4YLEuNSfAP+JcXn/tWtIaxVXM" crossorigin="anonymous"></script>
   </body>
</html>
A block is used to override specific parts of a template. The {% block %} tag is used to define a block that child templates can override. Defining a block in the base template indicates that this area will be populated with content from a different child template file.
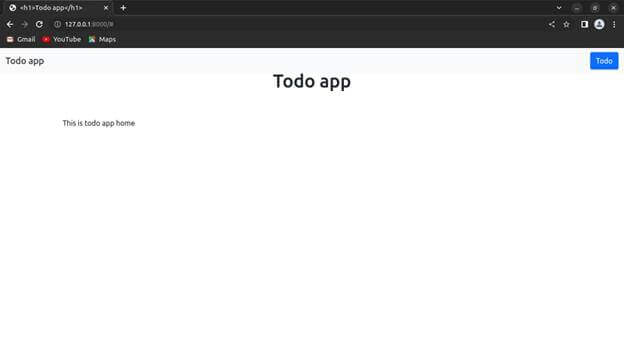
We will then create a new template file, home.html.
{% extends 'base.html' %}
{% block content %}
<div class="container mb-5">
</div>
<div class="container d-flex d-flex-column justify-content-center mb-5 ">
{% block title %} <h1>Todo app</h1> {% endblock%}
</div>
<div class="container mt-3">
  This is todo app home
</div>
{% endblock %}
We used {% extends 'base.html' %} to extend the base.html file. The generated HTML will include the base template’s code and structure and the default content we specified in the title block, but with the new content block in place of the default.
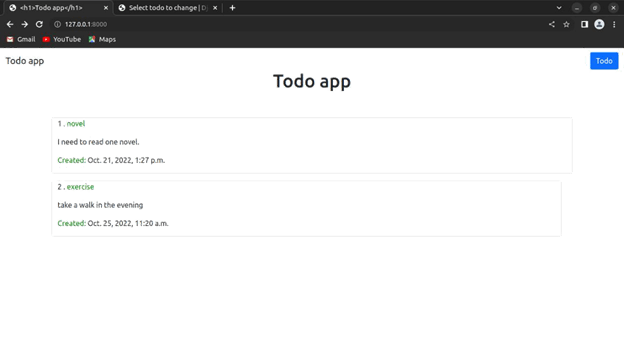
Let’s then create views that will enable us to list the tasks on the homepage. In views.py:
 from django.shortcuts import render

from .models import Todo
# Create your views here.

def home(request):
    list = Todo.objects.all()
    return render(request, 'home.html', { 'list': list })
We will replace the contents of home.html with this:
{% extends 'base.html' %}
{% block content %}
<div class="container mb-5">
</div>
<div class="container d-flex d-flex-column justify-content-center mb-5 ">
{% block title %} <h1>Todo app</h1> {% endblock%}
</div>
<div>
{% for todo in list %}
<div class="row">
<div class="container card mb-3" >
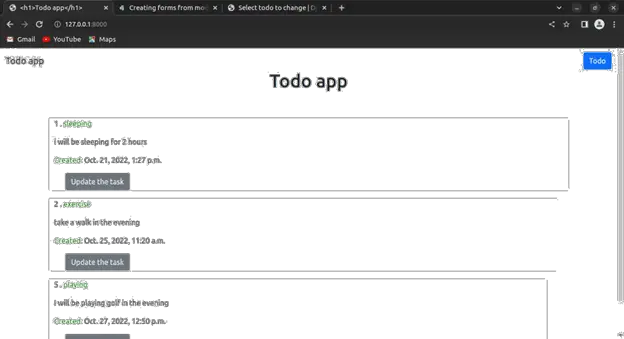
<p >{{ todo.id }} .<span style="color:green;"> {{ todo.title }}</span></p>
<p>{{todo.details}}</p>
<p> <span style="color:green;">Created:</span> {{todo.date}}</p>
</div>
{% empty %}
<h4>You have no lists!</h4
{% endfor %}
</div>
</div>
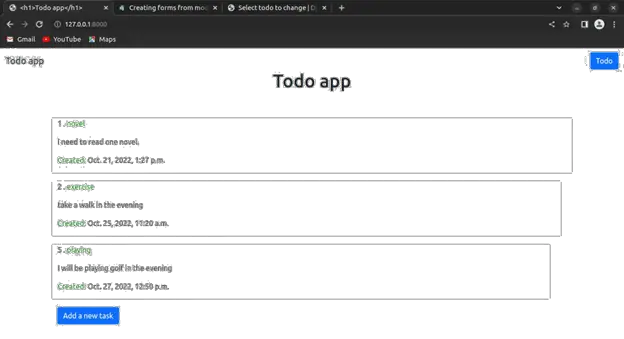
{% endblock %}We loop over the tasks in our to-do app. If there is no list, it gives us a message that there is no list. If there are tasks, it then displays the tasks.
Adding Tasks
We should be able to add tasks to our existing list. We will first create a form that lets us input data. In the todo directory, we create a new file, forms.py:
from django import forms
from .models import Todo

class TodoForm(forms.ModelForm):
    class Meta:
        model = Todo
        fields = ['title','details']
We will then import the new form into views.py:
from django.shortcuts import render, redirect #add redirect
from .forms import TodoForm

def add(request):
    list=Todo.objects.order_by("date")
    if request.method == "POST":
        form = TodoForm(request.POST)
        if form.is_valid():
            form.save()
            return redirect('home')
    form = TodoForm()
    return render(request, 'add.html',{"form":form,"list":list})
request.method returns the type of the request method. We are using the POST method because we are filling out the form. We use a request.POST request to find the filled answers. It redirected us to the homepage when we filled in the data. form = TodoForm() displays the form if it still needs to be filled.
We will add a path in urls.py:
path('add/', views.add, name='add'), #here
We will create a new template file, add.html. We will use crispy forms to control the rendering behavior of our forms. To install:
$ pip install django-crispy-formsWe need to include it in the list of installed apps. In settings.py:
INSTALLED_APPS = [
    'django.contrib.admin',
    'django.contrib.auth',
    'django.contrib.contenttypes',
    'django.contrib.sessions',
    'django.contrib.messages',
    'django.contrib.staticfiles',
    'todo',
    'crispy_forms',
]
Let's load it in the add.html template:
{% extends 'base.html'%}
{% load crispy_forms_tags %}
{% block content%}

<div class="container d-flex d-flex-column justify-content-center mt-5 ">
{% block title %} <h1>Add a new task</h1> {% endblock%}
</div>
<div class="container mb-3">
  <form class="" action="" method="post">
    {% csrf_token %}
    {{form|crispy}}
    <button type="submit" name="button">Add</button>
  </form>
</div>
{% endblock%}
{% load crispy_forms_tags %} loads crispy forms so we can use them in this template.
{{form|crispy}} renders the form, but with crispy forms to control how the form will look like. {% csrf_token %} prevents malicious attacks by generating a secure token.
Let’s now add a link from the homepage to where the form is. In home.html, right before the endblock tag:
<div class="container">
  <a class="btn btn-primary" href="{% url 'add'%}"> Add a new task</a>
</div>
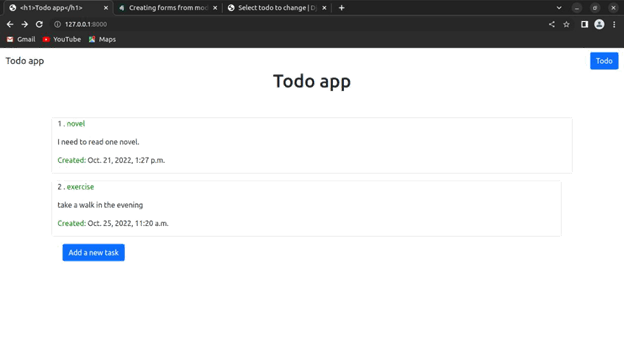
When we click on the Add a new task button, it'll direct us to fill out the form:
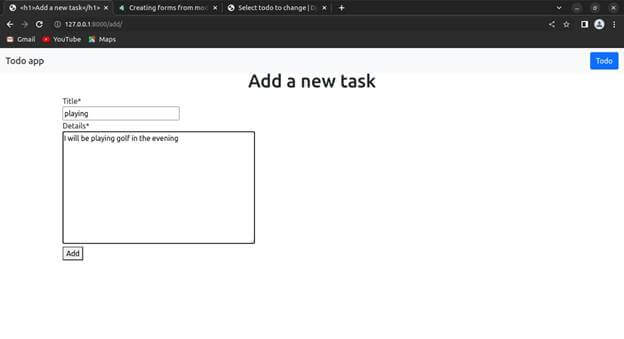
Clicking on the button will redirect us to the homepage, where it will have added our new task:
Updating Tasks
We should be able to update a task if there are changes to be made to it. In views.py, adding the update() view:
from django.shortcuts import render, redirect, get_object_or_404

def update(request, id):
    todo = get_object_or_404(Todo, id=id)
    form = TodoForm(instance=todo)
    if request.method == "POST":
        form = TodoForm(request.POST, instance=todo)
        if form.is_valid():
            form.save()
            return redirect ('home')
    form = TodoForm()
    return render(request, 'update.html', {"form":form,"todo":todo})
The get_object_or_404() function calls the model and returns an object from it; if the object or model does not exist, a 404 error is returned.
We will use TodoForm to update the data. We then get the instance of Todo. We will then fill out the form with the value of the instance, then redirect us to the homepage.
Let's add the update view as a path in urls.py:
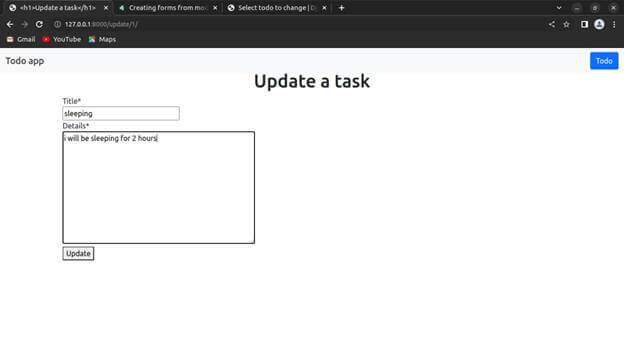
path('update/<int:id>/', views.update, name="update"),We will also create a new file in the templates folder, update.html:
{% extends 'base.html'%}
{% load crispy_forms_tags %}
{% block content%}
<div class="container d-flex d-flex-column justify-content-center mt-5 ">
{% block title %} <h1>Update a task</h1> {% endblock%}
</div>
<div class="container mb-3">
  <form class="" action="" method="post">
    {% csrf_token %}
    {{form|crispy}}
    <button type="submit" value="Update" name="button">Update</button>
  </form>
</div>
{% endblock%}
We will add a link to the page on the homepage:
<div class="container card mb-3" >
    <p >{{ todo.id }} .<span style="color:green;"> {{ todo.title }}</span></p>
    <p>{{todo.details}}</p>
    <p> <span style="color:green;">Created:</span> {{todo.date}}</p>
  <div class="container"> #here
    <a class="btn btn-secondary" href="{% url 'update' todo.id%}"> Update the
task</a>
    </div>
  </div>
It will add an update button for each task. That way, we can easily update individual tasks:
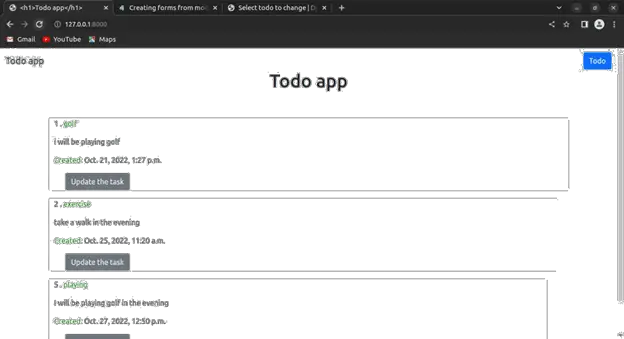
Let’s update the first task:
After clicking the update button, the task is updated:
Deleting Tasks
We should be able to delete a task. In views.py:
def delete(request, id):
    todo = get_object_or_404(Todo, id=id)
    todo.delete()
    return redirect("home")
Once we select an item, it will delete it and redirects us to the homepage.
We will then create its path in urls.py:
path('delete/<int:id>/', views.delete, name="delete"),Finally, we will add a delete button on the homepage:
    <div class="container">
        <a class="btn btn-secondary" href="{% url 'update' todo.id%}"> Update </a>
        <a class="btn btn-danger" href="{% url 'delete' todo.id%}"> Delete</a> #here
    </div>
</div>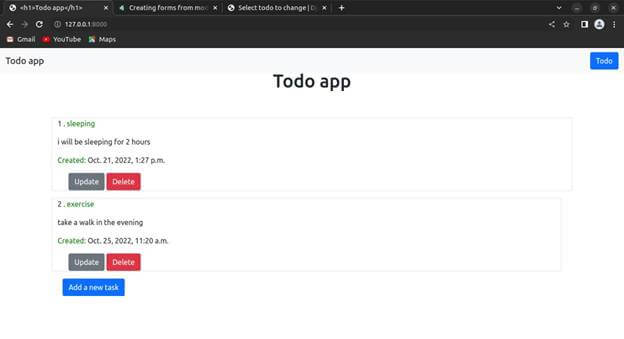
Clicking on the Delete button will delete the particular task.
Conclusion
We have successfully created a to-do application in Django to create, read, update, and delete tasks.
For convenience, I invite you to check out the project files here.
Here are some Django applications we've built:
- How to Make a Blog using Django in Python
- How to Build an Authentication System in Django
- How to Build a Weather App using Django in Python
- How to Build a CRUD Application using Django in Python
- How to Build an English Dictionary App with Django in Python
Happy coding ♥
Liked what you read? You'll love what you can learn from our AI-powered Code Explainer. Check it out!
View Full Code Analyze My Code


Got a coding query or need some guidance before you comment? Check out this Python Code Assistant for expert advice and handy tips. It's like having a coding tutor right in your fingertips!