Welcome! Meet our Python Code Assistant, your new coding buddy. Why wait? Start exploring now!
Object detection algorithms, especially those employing sliding window techniques, often generate multiple candidate bounding boxes for the same object. These overlapping detections can clutter the final output, making it difficult to discern individual objects and impacting the overall performance of the detection system.
This is where Non-Maximum Suppression (NMS) comes in. NMS is a critical post-processing step in object detection that addresses a common challenge: multiple detections of the same object. This technique is essential for refining the detection results, ensuring each detected object is represented by a single, most accurate bounding box.
NMS improves the accuracy and performance of object detection systems by eliminating multiple overlapping detections for the same object.
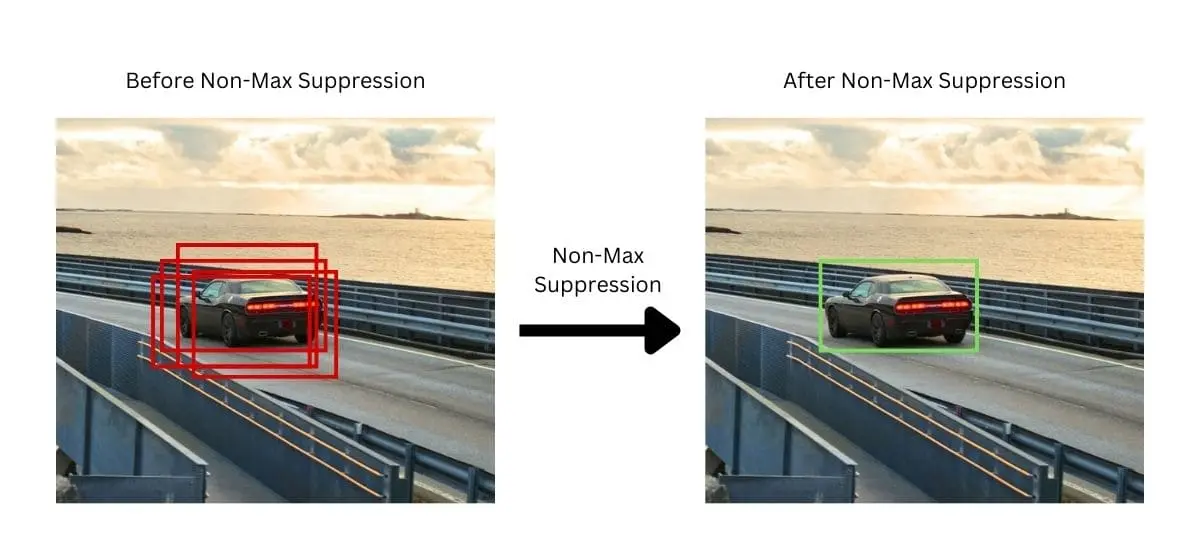
An example of how NMS removes overlapping detections and keeps only the detection with the highest confidence score.
Table of Contents
- How Non-Maxima Suppression Works
- Understanding Intersection-over-Union (IoU)
- Install the Required Libraries
- Implementing Non-Maximum Suppression with OpenCV
- Conclusion
How Non-Maxima Suppression Works
So, you might be wondering how NMS works. Well, the process of NMS can be broken down into the following steps:
- Ranking Bounding Boxes: All detected bounding boxes are initially ranked based on their confidence scores, indicating the likelihood of containing an object.
- Selecting the Top Box: The bounding box with the highest confidence score is selected and marked as a keeper.
- Eliminating Overlapping Boxes: After selecting the bounding box with the highest confidence score, NMS computes the Intersection-over-Union (IoU) for each remaining box relative to this selected box. Boxes with an IoU exceeding a predefined threshold are considered to overlap significantly with the selected box and are therefore discarded.
- Repeating the Process: The process is repeated with the next highest-scoring bounding box until all boxes have been processed.
You may have noticed the emphasis on Intersection-over-Union (IoU) in the third step of the NMS process. This highlights its importance and sets the stage for a deeper dive into IoU and its significance in computer vision.
Understanding Intersection-over-Union (IoU)
Intersection-over-Union (IoU) is a critical metric in computer vision, particularly within the realm of object detection. It measures how much two bounding boxes overlap with each other, offering a measure of the accuracy of an object detector in predicting the location of objects.
How IoU Works
The IoU between two bounding boxes is calculated by dividing the area of their intersection by the area of their union. The formula for IoU is shown in the figure below:
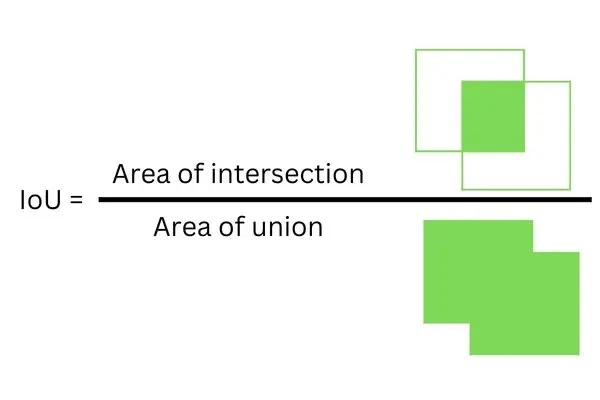
This metric ranges from 0 to 1, where 0 indicates no overlap and 1 signifies perfect overlap.
Importance of IoU in Object Detection
IoU is not only crucial for NMS but also (as discussed above) serves as a standard for evaluating object detection models. So it serves two primary functions:
- Model Evaluation: IoU is used to evaluate how well the predicted bounding boxes from an object detection model match the ground truth boxes. A higher IoU indicates a better match between the predicted and actual locations of objects.
- Non-Maxima Suppression (NMS): During the post-processing stage, IoU helps to filter out overlapping bounding boxes, ensuring that each detected object is represented only once. This is crucial for reducing false positives and improving the precision of detection results.
Below is an illustration of how Non-Maxima Suppression applies the IoU metric in different overlapping scenarios. These examples highlight when NMS would retain both boxes or choose to remove one, based on the IoU value:

IoU examples for NMS: low overlap (IoU = 0.2), high overlap (IoU = 0.8), and no overlap (IoU = 0), indicating when bounding boxes are kept or removed.
The image above illustrates three scenarios (suppose our IoU threshold is set to 0.5 and the green bounding box is the bounding box with the highest confidence score):
- IoU = 0.2: The two bounding boxes have minimal overlap, indicating they are likely to contain different objects. In this case, NMS will keep both bounding boxes.
- IoU = 0.8: Here, the significant overlap suggests that both bounding boxes are detecting the same object. NMS would remove the red bounding box, retaining only the green one to avoid redundant detections.
- IoU = 0: There's no overlap between the bounding boxes, clearly indicating separate objects. NMS will preserve both bounding boxes, ensuring each detected object is represented in the final output.
Related: Real-time Object Tracking with OpenCV and YOLOv8 in Python.
Install the Required Libraries
To follow this tutorial, you'll need to install the OpenCV and NumPy libraries. To do so, run the following command in your terminal:
$ pip install opencv-python
$ pip install numpy
Implementing Non-Maximum Suppression with OpenCV
Now that we know what NMS is and how it works, it's time to put theory into practice. In this section, we'll get our hands dirty and implement Non-Maximum Suppression using OpenCV.
Create a new file called nms.py and copy the code below:
import cv2
import numpy as np

image = cv2.imread("images/1.jpg")
# Take a copy of the original image to draw the bounding boxes after NMS
image_copy = image.copy()

# Dummy data: boxes in format (xmin, ymin, xmax, ymax), scores, and threshold
boxes = np.array([[245, 305, 575, 490],   # Box 1 coordinates
                  [235, 300, 485, 515],   # Box 2 coordinates, overlaps with Box 1
                  [305, 270, 540, 500],]) # Box 3 coordinates, overlaps with Box 1
confidence_scores = np.array([0.9, 0.8, 0.6])
threshold = 0.5
First, we import the necessary libraries, then load an image from the disk and copy the original image to draw the bounding boxes on it after applying NMS.
Next, we define a set of bounding boxes. These are intended to mimic the potential outputs of an object detection model. You can check this tutorial, where we actually applied NMS to object detection.
Alongside these boxes, we define their corresponding confidence_scores, quantifying the model's confidence that each bounding box accurately identifies an object.
Finally, we define the threshold variable, which is used to define the IoU threshold for NMS. This threshold determines the minimum level of overlap (measured by the IoU) at which two boxes are considered for suppression. Essentially, if the IoU of two boxes exceeds this threshold, the one with the lower confidence score will be suppressed.
Next, let's draw the bounding boxes on the image:
# Draw the bounding boxes on the image
for xmin, ymin, xmax, ymax in boxes:
    cv2.rectangle(image, (xmin, ymin), (xmax, ymax), (0, 0, 255), 3)

cv2.imshow("Before NMS", image)
cv2.waitKey(0)
Overlapping bounding boxes before Non-Maximum Suppression.
The image shows the manually drawn bounding boxes (which simulate what an object detection model might produce before the NMS process).
The next step is to apply NMS to filter out the overlapping boxes and retain the one with the highest confidence score. For this, we'll use the cv2.dnn.NMSBoxes() function provided by OpenCV:
# Apply non-maximum suppression
indices = cv2.dnn.NMSBoxes(bboxes=boxes, scores=confidence_scores, score_threshold=0.7, nms_threshold=threshold)
# Filter out the boxes based on the NMS result
filtered_boxes = [boxes[i] for i in indices.flatten()]
# Draw the filtered boxes on the image
for xmin, ymin, xmax, ymax in filtered_boxes:
    cv2.rectangle(image_copy, (xmin, ymin), (xmax, ymax), (0, 255, 0), 3)

cv2.imshow("After NMS", image_copy)
cv2.waitKey(0)
print("Filtered Boxes:", filtered_boxes)
The cv2.dnn.NMSBoxes() function takes 4 parameters:
bboxes: This parameter contains the coordinates of each bounding box that potentially encloses an object.scores: For each bounding box provided in thebboxesparameter, there is a corresponding confidence score in thescoresparameter.score_threshold: This parameter filters out detections based on their confidence scores before applying NMS. Only detections with a confidence score higher than thescore_thresholdare considered for NMS.nms_threshold: This is the threshold for the Intersection over Union (IoU) metric. If the IoU between two boxes is higher than thenms_threshold, the box with the lower confidence score is discarded.
The score_threshold and nms_threshold parameters play distinct roles in the NMS process, and their differences can sometimes be confusing:
- Before NMS: All bounding boxes and their scores are considered. Boxes with scores below the
score_thresholdare immediately filtered out and not processed further. - During NMS: Among the remaining boxes, if multiple boxes overlap significantly (as determined by the
nms_threshold), only the box with the highest score is kept. The rest are suppressed.
The function then returns the indices of the boxes to keep. We then filter out the boxes using these indices to get the final list of detections after applying NMS. Finally, we draw the filtered boxes on the image, show the image, and print the filtered boxes on the terminal.
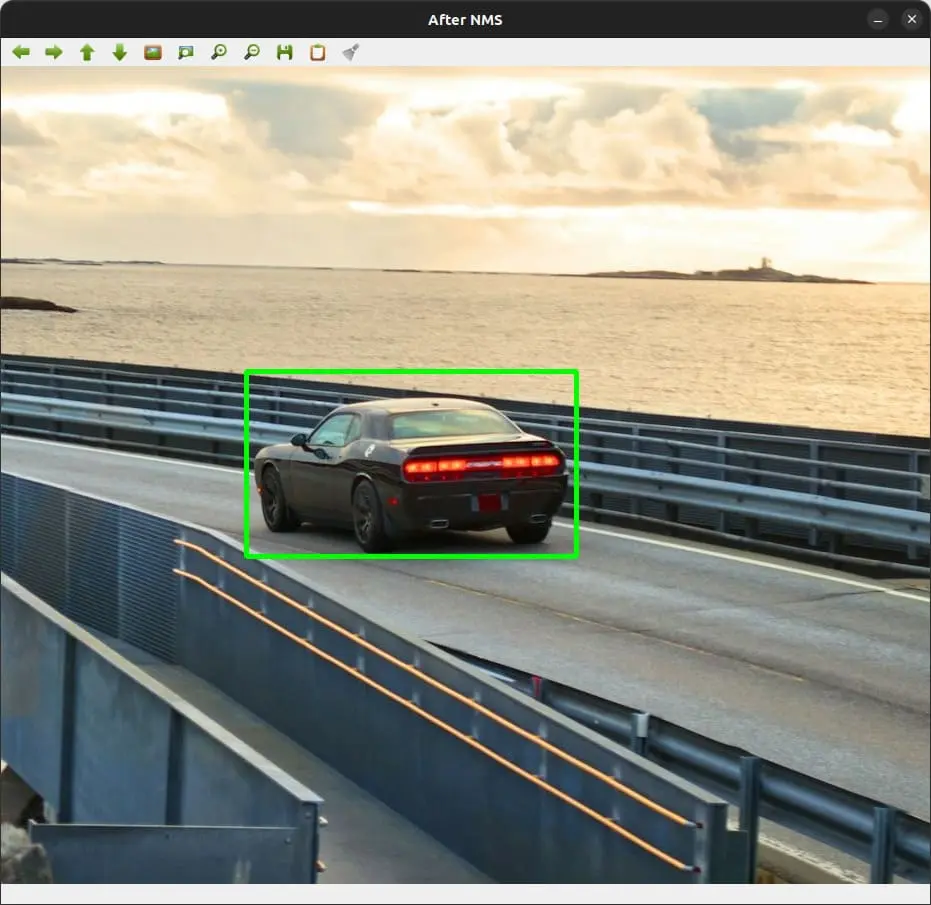
Final bounding box after Non-Maximum Suppression.
As you can see, the NMS process removed the overlapping bounding boxes, and now we have a single, well-defined box (the one with the highest confidence score) around the car.
If you check the terminal, you can see that the filtered box is printed as follows:
Filtered Boxes: [array([245, 305, 575, 490])]The implementation using OpenCV's cv2.dnn.NMSBoxes() function is straightforward. After feeding it our list of bounding boxes and their corresponding confidence scores, along with the thresholds, it returns the indices of the boxes that have made the cut (in our case, we have only one box).
Conclusion
In this tutorial, we've looked closer at Non-Maxima Suppression (NMS), a key technique that helps clean up our object detection results. By walking through the implementation with OpenCV and Python, I've shown you how NMS effectively eliminates redundant bounding boxes, leaving us with the most accurate representation of our target object.
Choosing the right score_threshold and nms_threshold is important. It's about striking the perfect balance to ensure we're capturing true positives without being overwhelmed by false positives. Again, I recommend you check this tutorial if you want to apply NMS to object detection.
The code for this tutorial is available here. Hope you enjoyed the article.
Learn also: Real-time Object Tracking with OpenCV and YOLOv8 in Python.
Happy coding ♥
Just finished the article? Why not take your Python skills a notch higher with our Python Code Assistant? Check it out!
View Full Code Understand My Code


Got a coding query or need some guidance before you comment? Check out this Python Code Assistant for expert advice and handy tips. It's like having a coding tutor right in your fingertips!