Unlock the secrets of your code with our AI-powered Code Explainer. Take a look!
By combining the power of YOLOv8 and DeepSORT, in this tutorial, I will show you how to build a real-time vehicle tracking and counting system with Python and OpenCV.
YOLOv8 serves as an exceptional starting point for our journey. With YOLOv8 as our object detection backbone, we will be equipped to detect vehicles precisely, making it the perfect foundation for building a real-time vehicle tracking system.
However, detecting vehicles in individual frames is only the beginning. The real challenge lies in seamlessly associating vehicles across consecutive frames to maintain their identity throughout a video sequence. This is where DeepSORT comes into play, bringing advanced deep learning techniques to multi-object tracking.
By integrating DeepSORT with YOLOv8, we can build a robust vehicle tracking system that can accurately track and count vehicles in real time.
The ability to accurately detect, track, and count vehicles in dynamic environments can lead to more efficient traffic flow, enhanced safety measures, and informed decision-making for transportation authorities.
By the end of this journey, you will have a working prototype of a real-time vehicle tracking and counting system that you can use as a starting point for your own projects.
Table of Contents
- Installing the Python Packages
- Project Structure
- Real-Time Object Detection with YOLOv8 and OpenCV
- Real-Time Object Tracking with DeepSORT and OpenCV
- Vehicle Counting with YOLOv8 and DeepSORT
- Summary
Installing the Python Packages
In order to use YOLOv8 and DeepSORT, we need to install the Ultralytics and DeepSORT Python packages.
There are some issues with the original DeepSORT implementation at the time of writing this, so I forked the repository and made some adjustments to make it work with the latest version of TensorFlow and can get the class names of the detected objects.
To install the Ultralytics and my forked version of the DeepSORT packages, run the following commands in your terminal (make sure you are inside the project directory):
$ pip install ultralytics
$ git clone git@github.com:python-dontrepeatyourself/deep_sort.git
Let's now review our project structure for this tutorial.
Project Structure
Here is how I structured this project:
$ tree --filelimit 8
.
├── 1.mp4
├── config
│   ├── coco.names
│   └── mars-small128.pb
├── deep_sort  [9 entries exceeds filelimit, not opening dir]
├── helper.py
├── object_detection_tracking.py
├── output.mp4
├── ultralytics  [16 entries exceeds filelimit, not opening dir]
└── yolov8n.pt
Here is a brief description of the files and folders:
1.mp4: The input video file.config: The configuration folder that contains the COCO class names and the DeepSORT model.deep_sort: The DeepSORT package (my forked version).helper.py: A helper Python file that contains a function to create a video writer object.object_detection_tracking.py: The main Python file that contains the code for object detection and tracking with YOLOv8 and DeepSORT.output.mp4: The output video file when running theobject_detection_tracking.pyfile.ultralytics: The Ultralytics package.yolov8n.pt: The YOLOv8 weights.
Things can get a little bit confusing when it comes to object detection and tracking. So to make things easier, we will first see how to detect vehicles in a video using YOLOv8 and then we will see how we can integrate the DeepSORT tracker with our YOLOv8 object detector to track those vehicles and count them.
Let's start with object detection.
Real-Time Object Detection with YOLOv8 and OpenCV
Creating an object detector with YOLOv8 is very easy. All we need to do is import the YOLOv8 class from the Ultralytics package and apply it to an image or a video.
Let's first create a new Python file called object_detection_tracking.py and import the necessary packages:
import numpy as np
import datetime
import cv2
from ultralytics import YOLO

from helper import create_video_writer

conf_threshold = 0.5

# Initialize the video capture and the video writer objects
video_cap = cv2.VideoCapture("1.mp4")
writer = create_video_writer(video_cap, "output.mp4")
# Initialize the YOLOv8 model using the default weights
model = YOLO("yolov8s.pt")
We will use the conf_threshold variable to set the confidence threshold for object detection. This means that we will only detect objects with a confidence score greater than the confidence threshold.
The create_video_writer() function is a helper function that we will use to create a video writer object. We will use this object to write the output video.
The model variable is a YOLOv8 object that we will use to detect objects in the video.
Here we are using the default YOLOv8 weights that are provided by Ultralytics (yolov8n.pt), which are trained on the COCO dataset. The weights will be downloaded automatically when you first run the code.
You can also use your own custom weights, but you will need to train the model on your own dataset first (which is outside the scope of this tutorial).
Let's now loop over the frames of the video and detect objects in each frame:
# loop over the frames
while True:
    # starter time to computer the fps
    start = datetime.datetime.now()
    ret, frame = video_cap.read()
    # if there is no frame, we have reached the end of the video
    if not ret:
        print("End of the video file...")
        break
    ############################################################
    ### Detect the objects in the frame using the YOLO model ###
    ############################################################
    # run the YOLO model on the frame
    results = model(frame)
Inside the loop, we first read the next frame from the video capture object.
The ret variable is a boolean that indicates whether the frame was successfully read. If the frame was successfully read, the frame variable will contain the frame. Otherwise, the frame variable will be None.
So if the ret variable is False, we have reached the end of the video and we break out of the loop.
Then we run the YOLOv8 model on the frame. This will return a ultralytics.yolo.engine.results.Results object with the following attributes:
boxes: ultralytics.yolo.engine.results.Boxes object
keypoints: None
keys: ['boxes']
masks: None
names: {0: 'person', 1: 'bicycle', 2: 'car', 3: 'motorcycle', 4: 'airplane', 5: 'bus', 6: 'train', 7: 'truck', 8: 'boat', 9: 'traffic light', 10: 'fire hydrant', 11: 'stop sign', 12: 'parking meter', 13: 'bench', 14: 'bird', 15: 'cat', 16: 'dog', 17: 'horse', 18: 'sheep', 19: 'cow', 20: 'elephant', 21: 'bear', 22: 'zebra', 23: 'giraffe', 24: 'backpack', 25: 'umbrella', 26: 'handbag', 27: 'tie', 28: 'suitcase', 29: 'frisbee', 30: 'skis', 31: 'snowboard', 32: 'sports ball', 33: 'kite', 34: 'baseball bat', 35: 'baseball glove', 36: 'skateboard', 37: 'surfboard', 38: 'tennis racket', 39: 'bottle', 40: 'wine glass', 41: 'cup', 42: 'fork', 43: 'knife', 44: 'spoon', 45: 'bowl', 46: 'banana', 47: 'apple', 48: 'sandwich', 49: 'orange', 50: 'broccoli', 51: 'carrot', 52: 'hot dog', 53: 'pizza', 54: 'donut', 55: 'cake', 56: 'chair', 57: 'couch', 58: 'potted plant', 59: 'bed', 60: 'dining table', 61: 'toilet', 62: 'tv', 63: 'laptop', 64: 'mouse', 65: 'remote', 66: 'keyboard', 67: 'cell phone', 68: 'microwave', 69: 'oven', 70: 'toaster', 71: 'sink', 72: 'refrigerator', 73: 'book', 74: 'clock', 75: 'vase', 76: 'scissors', 77: 'teddy bear', 78: 'hair drier', 79: 'toothbrush'}
orig_img: array([[[ 99, 145, 138],
                  [103, 149, 142],
                  [107, 153, 146],
                  ...,
                  [132, 150, 138],
                  [132, 150, 138],
                  [125, 143, 131]],

                ...,

                [[111, 164, 156],
                  [105, 158, 150],
                  [105, 158, 150],
                  ...,
                  [133, 138, 144],
                  [133, 138, 144],
                  [133, 138, 144]]], dtype=uint8)
orig_shape: (720, 1280)
path: 'image0.jpg'
probs: None
speed: {'preprocess': 0.5915164947509766, 'inference': 34.77835655212402, 'postprocess': 0.5271434783935547}
The boxes attribute is a ultralytics.yolo.engine.results.Boxes object that contains the bounding boxes of the detected objects and some other information:
print(results[0].boxes)
# output:
boxes: tensor([[7.8548e+02, 5.1154e-01, 1.0214e+03, 6.2262e+02, 9.2543e-01, 0.0000e+00],
        [5.0879e+02, 2.5563e+02, 6.3798e+02, 6.2519e+02, 8.5625e-01, 0.0000e+00],
        [3.0231e+02, 3.6799e+02, 7.0716e+02, 6.3381e+02, 5.6319e-01, 1.3000e+01],
        [3.0361e+02, 3.6963e+02, 5.5384e+02, 6.3172e+02, 3.0199e-01, 1.3000e+01]])
cls: tensor([ 0.,  0., 13., 13.])
conf: tensor([0.9254, 0.8562, 0.5632, 0.3020])
data: tensor([[7.8548e+02, 5.1154e-01, 1.0214e+03, 6.2262e+02, 9.2543e-01, 0.0000e+00],
        [5.0879e+02, 2.5563e+02, 6.3798e+02, 6.2519e+02, 8.5625e-01, 0.0000e+00],
        [3.0231e+02, 3.6799e+02, 7.0716e+02, 6.3381e+02, 5.6319e-01, 1.3000e+01],
        [3.0361e+02, 3.6963e+02, 5.5384e+02, 6.3172e+02, 3.0199e-01, 1.3000e+01]])
id: None
is_track: False
orig_shape: tensor([ 720, 1280])
shape: torch.Size([4, 6])
xywh: tensor([[903.4377, 311.5681, 235.9163, 622.1130],
              [573.3878, 440.4119, 129.1873, 369.5559],
              [504.7360, 500.8981, 404.8489, 265.8228],
              [428.7267, 500.6769, 250.2260, 262.0896]])
xywhn: tensor([[0.7058, 0.4327, 0.1843, 0.8640],
               [0.4480, 0.6117, 0.1009, 0.5133],
               [0.3943, 0.6957, 0.3163, 0.3692],
               [0.3349, 0.6954, 0.1955, 0.3640]])
xyxy: tensor([[7.8548e+02, 5.1154e-01, 1.0214e+03, 6.2262e+02],
              [5.0879e+02, 2.5563e+02, 6.3798e+02, 6.2519e+02],
              [3.0231e+02, 3.6799e+02, 7.0716e+02, 6.3381e+02],
              [3.0361e+02, 3.6963e+02, 5.5384e+02, 6.3172e+02]])
xyxyn: tensor([[6.1366e-01, 7.1047e-04, 7.9797e-01, 8.6476e-01],
               [3.9750e-01, 3.5505e-01, 4.9842e-01, 8.6832e-01],
               [2.3618e-01, 5.1109e-01, 5.5247e-01, 8.8029e-01],
               [2.3720e-01, 5.1338e-01, 4.3269e-01, 8.7739e-01]])
As you can see, there is quite a lot of information in the boxes attribute and they are quite easy to understand.
The one that we are interested in is the data attribute. It contains the bounding boxes in the format [x1, y1, x2, y2, confidence, class_id].
The x1, y1, x2, y2 are the coordinates of the bounding box. The confidence is the confidence of the bounding box and the class_id is the id of the class that the bounding box belongs to.
Let's see how we can use this information to draw the bounding boxes on the image:
    # loop over the results
    for result in results:
        # initialize the list of bounding boxes, confidences, and class IDs
        bboxes = []
        confidences = []
        class_ids = []
        # loop over the detections
        for data in result.boxes.data.tolist():
            x1, y1, x2, y2, confidence, class_id = data
            x = int(x1)
            y = int(y1)
            w = int(x2) - int(x1)
            h = int(y2) - int(y1)
            class_id = int(class_id)
            # filter out weak predictions by ensuring the confidence is
            # greater than the minimum confidence
            if confidence > conf_threshold:
                bboxes.append([x, y, w, h])
                confidences.append(confidence)
                class_ids.append(class_id)
                cv2.rectangle(frame, (x, y), (x + w, y + h), (0, 255, 0), 2)
Here, we are using result.boxes.data.tolist() to get the detections in the format [x1, y1, x2, y2, confidence, class_id].
Next, we check if the confidence of the bounding box is greater than the conf_threshold. If it is, we add the bounding box, confidence, and class_id to their respective lists.
Finally, we draw the bounding boxes on the image using cv2.rectangle().
Let's finish our code by writing the fps on the frame and displaying the frame.
    ############################################################
    ### Some post-processing to display the results          ###
    ############################################################
    # end time to compute the fps
    end = datetime.datetime.now()
    # calculate the frame per second and draw it on the frame
    fps = f"FPS: {1 / (end - start).total_seconds():.2f}"
    cv2.putText(frame, fps, (50, 50),
                cv2.FONT_HERSHEY_SIMPLEX, 2, (0, 0, 255), 8)
    # show the output frame
    cv2.imshow("Output", frame)
    # write the frame to disk
    writer.write(frame)
    if cv2.waitKey(1) == ord("q"):
        break

# release the video capture, video writer, and close all windows
video_cap.release()
writer.release()
cv2.destroyAllWindows()
The video below shows the output of the code:
Object Detection with YOLOv8
As you can see, the code is working fine. It's easy to use the YOLOv8 for object detection.
Let's move now to the interesting part of the tutorial. We will see how we can track the objects detected by YOLOv8.
Real-Time Object Tracking with DeepSORT and OpenCV
Please note that a lot of the code of this section is grabbed from this tutorial.
We first need to import some classes and functions from the deep_sort package:
# ...
from deep_sort.deep_sort.tracker import Tracker
from deep_sort.deep_sort import nn_matching
from deep_sort.deep_sort.detection import Detection
from deep_sort.tools import generate_detections as gdet

# define some parameters
conf_threshold = 0.5
max_cosine_distance = 0.4
nn_budget = None

# ...

# Initialize the deep sort tracker
model_filename = "config/mars-small128.pb"
encoder = gdet.create_box_encoder(model_filename, batch_size=1)
metric = nn_matching.NearestNeighborDistanceMetric(
    "cosine", max_cosine_distance, nn_budget)
tracker = Tracker(metric)
# load the COCO class labels the YOLO model was trained on
classes_path = "config/coco.names"
with open(classes_path, "r") as f:
    class_names = f.read().strip().split("\n")
# create a list of random colors to represent each class
np.random.seed(42)  # to get the same colors
colors = np.random.randint(0, 255, size=(len(class_names), 3))  # (80, 3)
We first need to load the mars-small128.pb model. This model is used to extract the features of the bounding boxes.
Next, we create a NearestNeighborDistanceMetric object. This object is used to compute the distance between the features extracted by the mars-small128.pb model.
Finally, we create a Tracker object. This object is used to track the objects detected by YOLOv8.
We also need to load the coco.names file. This file contains the names of the classes the YOLOv8 model was trained on. We will use this file to get the name of the class the bounding box belongs to.
We also create a list of random colors to represent each class. We will draw the bounding boxes of each class with a different color. This will help us to distinguish between the different classes (cars, trucks, motorbikes, etc.)
Let's continue our code, we will see how we can use the Tracker object to track the objects detected by YOLOv8:
# loop over the frames
while True:
    # ...
    ############################################################
    ### Detect the objects in the frame using the YOLO model ###
    ############################################################
    results = model(frame)
    for result in results:
        # ...
        for data in result.boxes.data.tolist():
            # ...
            if confidence > conf_threshold:
                bboxes.append([x, y, w, h])
                confidences.append(confidence)
                class_ids.append(class_id)
                # cv2.rectangle(frame, (x, y), (x + w, y + h), (0, 255, 0), 2) # comment this line
    ############################################################
    ### Track the objects in the frame using DeepSort        ###
    ############################################################
    # get the names of the detected objects
    names = [class_names[class_id] for class_id in class_ids]
    # get the features of the detected objects
    features = encoder(frame, bboxes)
    # convert the detections to deep sort format
    dets = []
    for bbox, conf, class_name, feature in zip(bboxes, confidences, names, features):
        dets.append(Detection(bbox, conf, class_name, feature))
    # run the tracker on the detections
    tracker.predict()
    tracker.update(dets)
Let's understand the code above. After detecting the objects in the frame using the YOLOv8 model, we filter the detections to keep only those with a confidence greater than conf_threshold and we add the bounding box, confidence, and class_id of each detection to their respective lists.
Next, we get the names of the detected objects using the class_names and the class_ids lists.
After that, we get the features of the detected objects using the encoder object.
Finally, we convert the detections to the deep_sort format and we run the tracker on the detections.
Now we can loop over the tracked objects and draw the bounding boxes on the frame:
    # loop over the tracked objects
    for track in tracker.tracks:
        if not track.is_confirmed() or track.time_since_update > 1:
            continue
        # get the bounding box of the object, the name
        # of the object, and the track id
        bbox = track.to_tlbr()
        track_id = track.track_id
        class_name = track.get_class()
        # convert the bounding box to integers
        x1, y1, x2, y2 = int(bbox[0]), int(bbox[1]), int(bbox[2]), int(bbox[3])
        # get the color associated with the class name
        class_id = class_names.index(class_name)
        color = colors[class_id]
        B, G, R = int(color[0]), int(color[1]), int(color[2])
        # draw the bounding box of the object, the name
        # of the predicted object, and the track id
        text = str(track_id) + " - " + class_name
        cv2.rectangle(frame, (x1, y1), (x2, y2), (B, G, R), 3)
        cv2.rectangle(frame, (x1 - 1, y1 - 20),
                      (x1 + len(text) * 12, y1), (B, G, R), -1)
        cv2.putText(frame, text, (x1 + 5, y1 - 8),
                    cv2.FONT_HERSHEY_SIMPLEX, 0.5, (255, 255, 255), 2)
After tracking the objects in the frame, we loop over the tracked objects and check if the track is confirmed. If not, we skip it. Otherwise, we get the bounding box of the object, its name, and the track id.
We also get the color associated with the class name and use it to draw the bounding box of the object.
Finally, we can reuse the same code as in the object detection part to draw the fps, save and show the frame.
    ############################################################
    ### Some post-processing to display the results          ###
    ############################################################
    # end time to compute the fps
    end = datetime.datetime.now()
    # calculate the frame per second and draw it on the frame
    fps = f"FPS: {1 / (end - start).total_seconds():.2f}"
    cv2.putText(frame, fps, (50, 50),
                cv2.FONT_HERSHEY_SIMPLEX, 2, (0, 0, 255), 8)
    # show the output frame
    cv2.imshow("Output", frame)
    # write the frame to disk
    writer.write(frame)
    if cv2.waitKey(1) == ord("q"):
        break
# release the video capture, video writer, and close all windows
video_cap.release()
writer.release()
cv2.destroyAllWindows()
The video below is the same video used in the previous section for object detection:
Object Tracking with DeepSORT
You can see that the tracker is able to re-identify some of the cars after losing the bounding box for a few frames. This is because the tracker is able to assign a unique ID to each object and maintain its identity across frames.
Ok, great! We now know how to detect and track objects in a video. Let's see how we can use this to count the number of cars in a video.
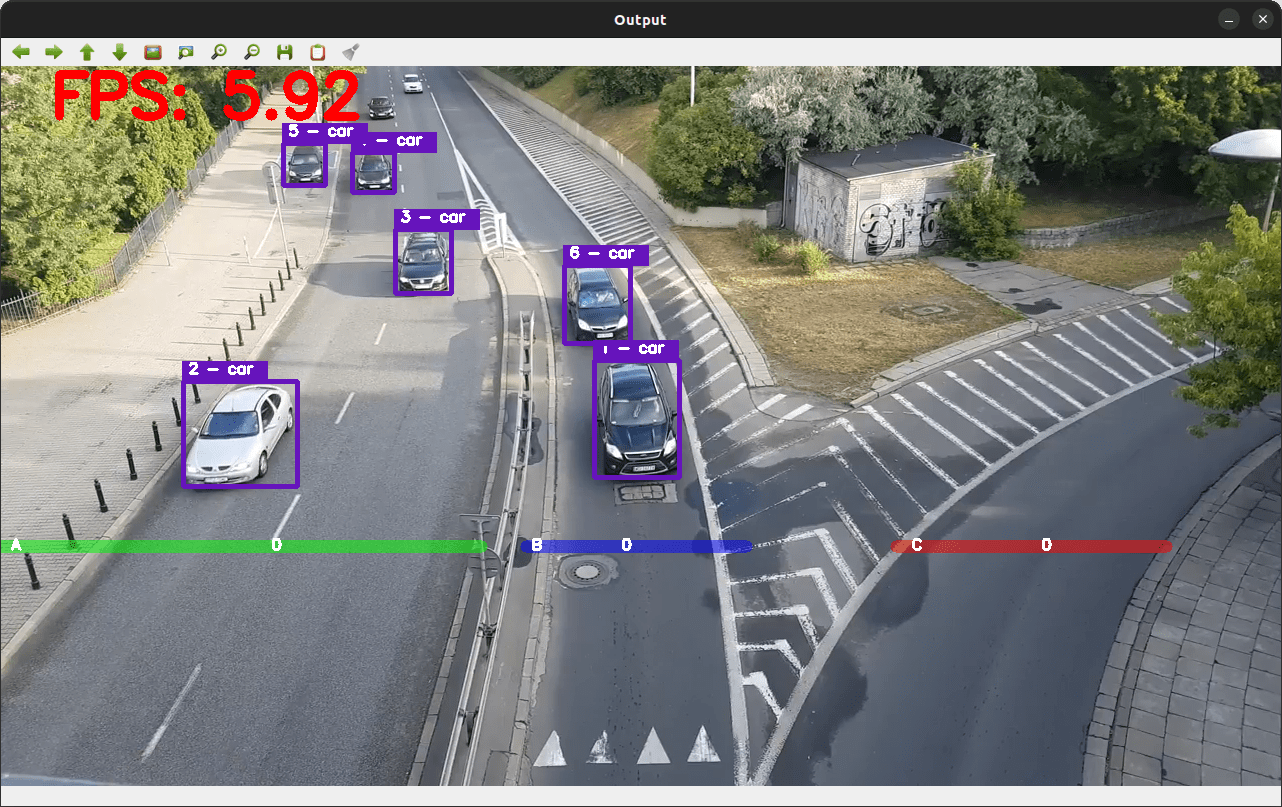
Vehicle Counting with YOLOv8 and DeepSORT
Counting the number of cars in a video is straightforward. All we need to do is count the number of unique IDs assigned to the cars by the tracker.
First, we need to draw 3 lines (hardcoding) on the frame (one for each lane in the video). These lines will be used to count the number of cars:
from collections import deque

# ...
# define some parameters
conf_threshold = 0.5
max_cosine_distance = 0.4
nn_budget = None
points = [deque(maxlen=32) for _ in range(1000)] # list of deques to store the points
counter_A = 0
counter_B = 0
counter_C = 0
start_line_A = (0, 480)
end_line_A = (480, 480)
start_line_B = (525, 480)
end_line_B = (745, 480)
start_line_C = (895, 480)
end_line_C = (1165, 480)

# ...

# loop over the frames
while True:
    # starter time to computer the fps
    start = datetime.datetime.now()
    ret, frame = video_cap.read()
    overlay = frame.copy()
    # draw the lines
    cv2.line(frame, start_line_A, end_line_A, (0, 255, 0), 12)
    cv2.line(frame, start_line_B, end_line_B, (255, 0, 0), 12)
    cv2.line(frame, start_line_C, end_line_C, (0, 0, 255), 12)

    frame = cv2.addWeighted(overlay, 0.5, frame, 0.5, 0)

    # ...
    ############################################################
    ### Some post-processing to display the results          ###
    ############################################################
    # end time to compute the fps
    end = datetime.datetime.now()
    # calculate the frame per second and draw it on the frame
    fps = f"FPS: {1 / (end - start).total_seconds():.2f}"
    cv2.putText(frame, fps, (50, 50),
                cv2.FONT_HERSHEY_SIMPLEX, 2, (0, 0, 255), 8)
    # draw the total number of vehicles passing the lines
    cv2.putText(frame, "A", (10, 483), cv2.FONT_HERSHEY_SIMPLEX, 0.5, (255, 255, 255), 2)
    cv2.putText(frame, "B", (530, 483), cv2.FONT_HERSHEY_SIMPLEX, 0.5, (255, 255, 255), 2)
    cv2.putText(frame, "C", (910, 483), cv2.FONT_HERSHEY_SIMPLEX, 0.5, (255, 255, 255), 2)
    cv2.putText(frame, f"{counter_A}", (270, 483), cv2.FONT_HERSHEY_SIMPLEX, 0.5, (255, 255, 255), 2)
    cv2.putText(frame, f"{counter_B}", (620, 483), cv2.FONT_HERSHEY_SIMPLEX, 0.5, (255, 255, 255), 2)
    cv2.putText(frame, f"{counter_C}", (1040, 483), cv2.FONT_HERSHEY_SIMPLEX, 0.5, (255, 255, 255), 2)
    # ...
Here we are importing the deque class from the collections module. We will use this class to store the center points of the bounding boxes of the cars.
We will later use them to draw the trajectories of the cars and to count the number of cars.
As you can see, we are creating 1000 deques which is the maximum number of objects that we can track at the same time. You can change this number if you have more or fewer objects to track.
We are also defining 3 lines (one for each lane) and drawing them on the frame. I have chosen the coordinates of the lines manually by looking at the video, so make sure to change those whenever you change the video.
To make the lines more transparent, we are using the cv2.addWeighted() function to add the frame and the overlay.
Finally, we display the total number of cars passing each line on the frame. We will update these numbers later when we count the number of cars.
Let's see the output of the code:
So far so good! Now we can start implementing the counting part of the project:
# loop over the frames
while True:
    # ...
    for result in results:
        # ...
        for data in result.boxes.data.tolist():
            # ...
    ############################################################
    ### Track the objects in the frame using DeepSort        ###
    ############################################################
    # ...
    # loop over the tracked objects
    for track in tracker.tracks:
        # ...
        # draw the bounding box of the object, the name
        # of the predicted object, and the track id
        text = str(track_id) + " - " + class_name
        cv2.rectangle(frame, (x1, y1), (x2, y2), (B, G, R), 3)
        cv2.rectangle(frame, (x1 - 1, y1 - 20),
                      (x1 + len(text) * 12, y1), (B, G, R), -1)
        cv2.putText(frame, text, (x1 + 5, y1 - 8),
                    cv2.FONT_HERSHEY_SIMPLEX, 0.5, (255, 255, 255), 2)
        ############################################################
        ### Count the number of vehicles passing the lines       ###
        ############################################################
        center_x = int((x1 + x2) / 2)
        center_y = int((y1 + y2) / 2)
        # append the center point of the current object to the points list
        points[track_id].append((center_x, center_y))
        cv2.circle(frame, (center_x, center_y), 4, (0, 255, 0), -1)
        # loop over the set of tracked points and draw them
        for i in range(1, len(points[track_id])):
            point1 = points[track_id][i - 1]
            point2 = points[track_id][i]
            # if the previous point or the current point is None, do nothing
            if point1 is None or point2 is None:
                continue
            cv2.line(frame, (point1), (point2), (0, 255, 0), 2)
After tracking the objects in the frame, we loop over the tracked objects and get the center point of the bounding box of each object.
We then append the center point of the current tracked object to the points list and draw it on the frame.
Finally, we loop over the points list and draw the trajectories of the tracked objects.
Here is what the output looks like:
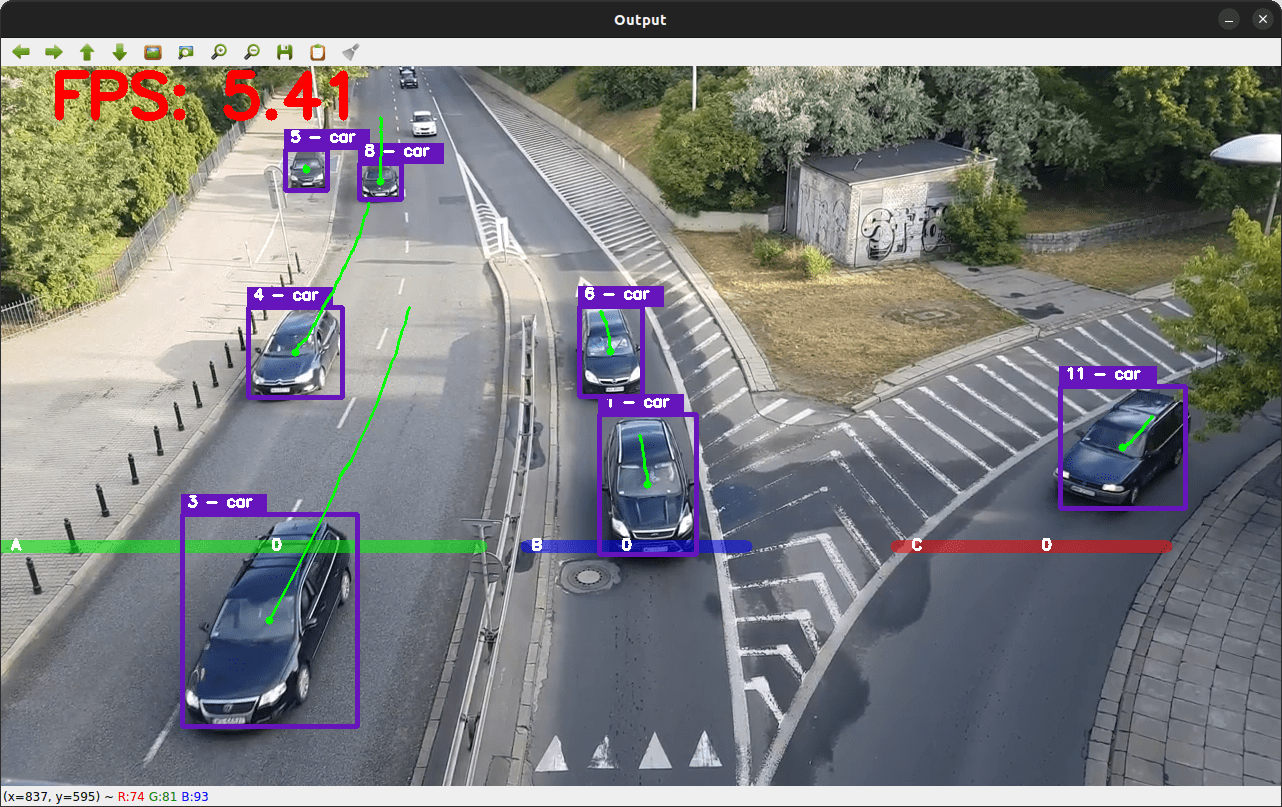
As you can see, each car has now its own trajectory. We can use these trajectories to count the number of cars passing the lines.
Below the previous code, add the following code:
        # get the last point from the points list and draw it
        last_point_x = points[track_id][0][0]
        last_point_y = points[track_id][0][1]
        cv2.circle(frame, (int(last_point_x), int(last_point_y)), 4, (255, 0, 255), -1)
        # if the y coordinate of the center point is below the line, and the x coordinate is
        # between the start and end points of the line, and the the last point is above the line,
        # increment the total number of cars crossing the line and remove the center points from the list
        if center_y > start_line_A[1] and start_line_A[0] < center_x < end_line_A[0] and last_point_y < start_line_A[1]:
            counter_A += 1
            points[track_id].clear()
        elif center_y > start_line_B[1] and start_line_B[0] < center_x < end_line_B[0] and last_point_y < start_line_A[1]:
            counter_B += 1
            points[track_id].clear()
        elif center_y > start_line_C[1] and start_line_C[0] < center_x < end_line_C[0] and last_point_y < start_line_A[1]:
            counter_C += 1
            points[track_id].clear()
In the code above, we are getting the last point from the points list and draw it on the frame.
Then we check if the y coordinate of the center point is below the line, the x coordinate is between the start and end points of the line and the last point in the points list is above the line.
If this is the case, we can confidently say that a car has crossed the line. So we increment the counter (A, B, or C depending on the line) and remove the center points of the car from the points list.
The video below shows the final output of the code:
Vehicle Counting with YOLOv8 and DeepSORT
Summary
In this hands-on tutorial, you learned how to use the DeepSORT algorithm and the YOLOv8 model to detect, track, and count objects in a video.
You learned how to assign a unique ID to each object and how to re-identify the object after losing the bounding box for a few frames.
You now have all the tools you need to build your own object-tracking and counting system. I hope you enjoyed this tutorial and that you learned something new.
You can get the complete project code here.
Related tutorial: How to Perform YOLO Object Detection using OpenCV in Python.
Happy coding ♥
Save time and energy with our Python Code Generator. Why start from scratch when you can generate? Give it a try!
View Full Code Create Code for Me
Got a coding query or need some guidance before you comment? Check out this Python Code Assistant for expert advice and handy tips. It's like having a coding tutor right in your fingertips!