Juggling between coding languages? Let our Code Converter help. Your one-stop solution for language conversion. Start now!
Image segmentation is the process of partitioning an image into multiple different regions (or segments). The goal is to change the representation of the image into an easier and more meaningful image.
It is an important step in image processing, as real-world images don't always contain only one object that we wanna classify. For instance, for self-driving cars, the image would contain the road, cars, pedestrians, etc. So, we may need to use segmentation here to separate objects and analyze each object individually (i.e., image classification) to check what it is.
RELATED: Mastering YOLO: Build an Automatic Number Plate Recognition System with OpenCV in Python.
In this tutorial, we will examine one image segmentation method, K-Means Clustering.
K-Means clustering is an unsupervised machine learning algorithm that aims to partition N observations into K clusters in which each observation belongs to the cluster with the nearest mean. A cluster is a collection of data points aggregated together because of certain similarities. For image segmentation, clusters here are different image colors.
It's important to note, however, that there is a more accurate approach to image segmentation, and that's using the state-of-the-art transformer models, such as SegFormer. Check this tutorial if you want to do that.
The following video should make you familiar with the K-Means clustering algorithm:
Before we dive into the code, we need to install the required libraries:
$ pip3 install opencv-python numpy matplotlibLet's import them:
import cv2
import numpy as np
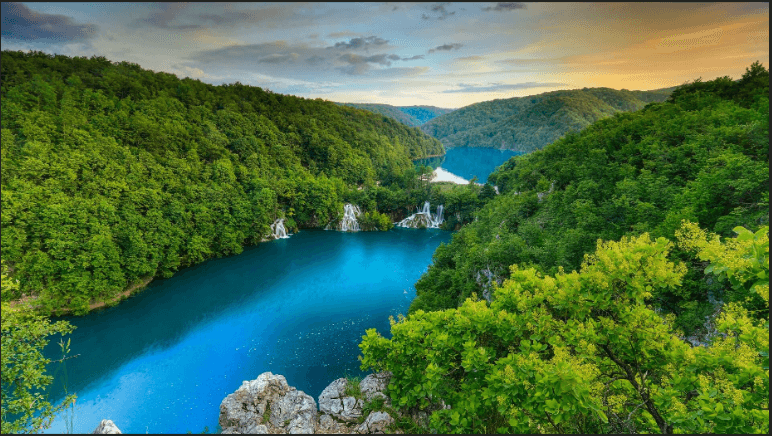
import matplotlib.pyplot as pltI'm going to use this image for demonstration purposes. Feel free to use any:
Loading the image:
# read the image
image = cv2.imread("image.jpg")
Before we do anything, let's convert the image into RGB format:
# convert to RGB
image = cv2.cvtColor(image, cv2.COLOR_BGR2RGB)
We are going to use the cv2.kmeans() function, which takes a 2D array as input, and since our original image is 3D (width, height, and depth of 3 RGB values), we need to flatten the height and width into a single vector of pixels (3 RGB values):
# reshape the image to a 2D array of pixels and 3 color values (RGB)
pixel_values = image.reshape((-1, 3))
# convert to float
pixel_values = np.float32(pixel_values)
Let's try to print the shape of the resulting pixel values:
print(pixel_values.shape)Output:
(2073600, 3)As expected, this results from flattening a high-resolution (1920, 1050) image.
If you watched the video that explains the algorithm, you'd see he says around minute 3 that the algorithm stops when none of the cluster assignments change. Well, we are going to cheat a little bit here since this is a large number of data points, so it'll take a lot of time to process; we are going to stop either when some number of iterations is exceeded (say 100), or if the clusters move less than some epsilon value (let's pick 0.2 here), the below code defines the stopping criteria in OpenCV:
# define stopping criteria
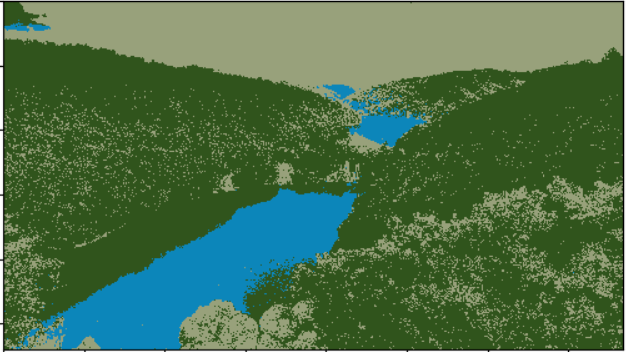
criteria = (cv2.TERM_CRITERIA_EPS + cv2.TERM_CRITERIA_MAX_ITER, 100, 0.2)If you look at the image, there are three primary colors (green for trees, blue for the sea/lake, and white to orange for the sky). As a result, we are going to use three clusters for this image:
# number of clusters (K)
k = 3
_, labels, (centers) = cv2.kmeans(pixel_values, k, None, criteria, 10, cv2.KMEANS_RANDOM_CENTERS)
The labels array is the cluster label for each pixel, which is either 0, 1, or 2 (since k = 3), and centers refer to the center points (each centroid's value).
cv2.KMEANS_RANDOM_CENTERS just indicates that OpenCV will randomly assign the values of the clusters initially.
If you look back at the code, we didn't mention that we converted the flattened image pixel values to floats; we did that because cv2.kmeans() expects that, let's convert them back to 8-bit pixel values:
# convert back to 8 bit values
centers = np.uint8(centers)

# flatten the labels array
labels = labels.flatten()
Now, let's construct the segmented image:
# convert all pixels to the color of the centroids
segmented_image = centers[labels.flatten()]
Converting back to the original image shape and showing it:
# reshape back to the original image dimension
segmented_image = segmented_image.reshape(image.shape)
# show the image
plt.imshow(segmented_image)
plt.show()
Learn also: How to Perform Image Segmentation using Transformers in Python.
Here is the resulting image:
Awesome, we can also disable some clusters in the image. For instance, let's disable cluster number 2 and show the original image:
# disable only the cluster number 2 (turn the pixel into black)
masked_image = np.copy(image)
# convert to the shape of a vector of pixel values
masked_image = masked_image.reshape((-1, 3))
# color (i.e cluster) to disable
cluster = 2
masked_image[labels == cluster] = [0, 0, 0]
# convert back to original shape
masked_image = masked_image.reshape(image.shape)
# show the image
plt.imshow(masked_image)
plt.show()
Here is the resulting image:

Wow, it turns out that cluster 2 is the trees. Feel free to:
- Disable other clusters and see which is segmented accurately.
- Tweak the parameters for better results (such as k).
- Use other images that clearly contain different objects with different colors.
Wrapping up the Code
In this section, I will wrap the code into functions to make it more readable, extendable, and easy to use. First, I'm going to create a new Python file named refactored_kmeans_segmentation.py. Let's make a function to read a given image from the path:
import cv2
import numpy as np
import matplotlib.pyplot as plt
import sys

def read_image(file_path):
    """Read the image and convert it to RGB."""
    image = cv2.imread(file_path)
    return cv2.cvtColor(image, cv2.COLOR_BGR2RGB)
Next, write the function responsible for processing the image, as discussed earlier:
def preprocess_image(image):
    """Reshape the image to a 2D array of pixels and 3 color values (RGB) and convert to float."""
    pixel_values = image.reshape((-1, 3))
    return np.float32(pixel_values)
Let's make the responsible functions for performing K-means clustering and creating segmented and masked images:
def perform_kmeans_clustering(pixel_values, k=3):
    """Perform k-means clustering on the pixel values."""
    criteria = (cv2.TERM_CRITERIA_EPS + cv2.TERM_CRITERIA_MAX_ITER, 100, 0.2)
    compactness, labels, centers = cv2.kmeans(pixel_values, k, None, criteria, 10, cv2.KMEANS_RANDOM_CENTERS)
    return compactness, labels, np.uint8(centers)

def create_segmented_image(pixel_values, labels, centers):
    """Create a segmented image using the cluster centroids."""
    segmented_image = centers[labels.flatten()]
    return segmented_image.reshape(image.shape)

def create_masked_image(image, labels, cluster_to_disable):
    """Create a masked image by disabling a specific cluster."""
    masked_image = np.copy(image).reshape((-1, 3))
    masked_image[labels.flatten() == cluster_to_disable] = [0, 0, 0]
    return masked_image.reshape(image.shape)
It's exactly the same as the above code but just wrapped in readable functions. Adding the function to display a given image:
def display_image(image):
    """Display the image using matplotlib."""
    plt.imshow(image)
    plt.show()
Finally, add the main code:
if __name__ == "__main__":
    image_path = sys.argv[1]
    k = int(sys.argv[2])
    # read the image
    image = read_image(image_path)
    # preprocess the image
    pixel_values = preprocess_image(image)
    # compactness is the sum of squared distance from each point to their corresponding centers
    compactness, labels, centers = perform_kmeans_clustering(pixel_values, k)
    # create the segmented image
    segmented_image = create_segmented_image(pixel_values, labels, centers)
    # display the image
    display_image(segmented_image)
    # disable only the cluster number 2 (turn the pixel into black)
    cluster_to_disable = 2
    # create the masked image
    masked_image = create_masked_image(image, labels, cluster_to_disable)
    display_image(masked_image)
This time, we're getting the image_path and k from the command-line arguments. We read the image, process it to get the pixel values, perform K-means clustering, create and display the segmented image, and finally disable a given cluster (we're picking cluster number 2, but you're free to play around with that number, from 0 to k-1), and display the new masked image as we did earlier.
You can run the code like this:
$ python refactored_kmeans_segmentation.py image.jpg 3And you'll get the exact same results as above.
Conclusion
Awesome! In this tutorial, you've performed K-means clustering for image segmentation using OpenCV. I hope it was beneficial!
Note that there are other segmentation techniques, such as the Hough transform, contour detection, and the current state-of-the-art semantic segmentation using deep learning models.
Related: Satellite Image Classification using TensorFlow in Python.
Want to Learn More?
Mastering YOLO: Build an Automatic Number Plate Recognition System
Building a real-time automatic number plate recognition system using YOLO and OpenCV library in Python
Download EBookHere are some useful resources you can read:
Happy coding ♥
Liked what you read? You'll love what you can learn from our AI-powered Code Explainer. Check it out!
View Full Code Explain My Code


Got a coding query or need some guidance before you comment? Check out this Python Code Assistant for expert advice and handy tips. It's like having a coding tutor right in your fingertips!