Before we get started, have you tried our new Python Code Assistant? It's like having an expert coder at your fingertips. Check it out!
In a previous tutorial, we have seen how you can detect edges in an image. However, that's not usually enough in the image processing phase. In this tutorial, you will learn how you can detect shapes (mainly lines and circles) in images using Hough Transform technique in Python using OpenCV library.
The Hough Transform is a popular feature extraction technique to detect any shape within an image. It is mainly used in image analysis, computer vision, and image recognition.
It is important to differentiate between hough transform and image segmentation. The Hough transform is a feature extraction technique that identifies geometric shapes within an image, while image segmentation using transformers is a machine learning approach that partitions an image into different regions based on semantic or visual characteristics. Check this tutorial if you want to perform image segmentation using deep learning.
RELATED: How to Apply HOG Feature Extraction in Python.
Let's get started, installing the requirements:
pip3 install opencv-python numpy matplotlibImporting the modules:
import numpy as np
import matplotlib.pyplot as plt
import cv2
Detecting Lines
I'm gonna use a photo of a computer monitor; make sure you have the photo monitor.jpg in your current directory (you're free to use any):
# read the image
image = cv2.imread("monitor.jpg")
We need to convert this image to grayscale for edge detection:
# convert to grayscale
grayscale = cv2.cvtColor(image, cv2.COLOR_BGR2GRAY)
Let's detect the edges of the image:
# perform edge detection
edges = cv2.Canny(grayscale, 30, 100)
If you're not sure what cv2.Canny() is doing, refer to this tutorial.
Now we have detected the edges in the image; it is suited for us to use hough transform to detect the lines:
# detect lines in the image using hough lines technique
lines = cv2.HoughLinesP(edges, 1, np.pi/180, 60, np.array([]), 50, 5)
cv2.HoughLinesP() function finds line segments in a binary image using the probabilistic Hough transform. For more information about its parameters, check this tutorial.
Let's draw the lines:
# iterate over the output lines and draw them
for line in lines:
    for x1, y1, x2, y2 in line:
        cv2.line(image, (x1, y1), (x2, y2), (20, 220, 20), 3)
Showing the image:
# show the image
plt.imshow(image)
plt.show()
Here is my output:
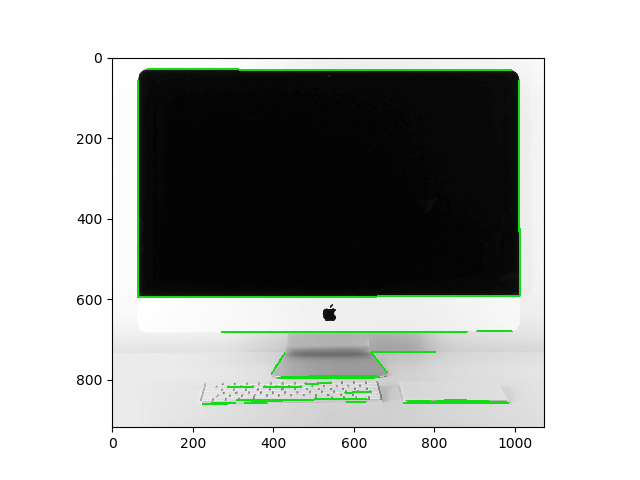
The green lines are the lines we just drew, as you can see, most of the monitor is surrounded by green lines, feel free to tweak the parameters to get better results.
Here is the full code for detecting lines in your live camera:
import numpy as np
import matplotlib.pyplot as plt
import cv2

cap = cv2.VideoCapture(0)

while True:
    _, image = cap.read()
    # convert to grayscale
    grayscale = cv2.cvtColor(image, cv2.COLOR_BGR2GRAY)
    # perform edge detection
    edges = cv2.Canny(grayscale, 30, 100)
    # detect lines in the image using hough lines technique
    lines = cv2.HoughLinesP(edges, 1, np.pi/180, 60, np.array([]), 50, 5)
    # iterate over the output lines and draw them
    for line in lines:
        for x1, y1, x2, y2 in line:
            cv2.line(image, (x1, y1), (x2, y2), (255, 0, 0), 3)
            cv2.line(edges, (x1, y1), (x2, y2), (255, 0, 0), 3)
    # show images
    cv2.imshow("image", image)
    cv2.imshow("edges", edges)
    if cv2.waitKey(1) == ord("q"):
        break
cap.release()
cv2.destroyAllWindows()
Learn Also: Image Transformations using OpenCV in Python.
Detecting Circles
In order to detect circles, we gonna need to use cv2.HoughCircles() method instead; I have coins.jpg image (which contains several coins) in the current directory. Let's load it:
# load the image
img = cv2.imread("coins.jpg")
Next, we gonna create a new copy of this image, in which we're going to draw the detected circles:
# convert BGR to RGB to be suitable for showing using matplotlib library
img = cv2.cvtColor(img, cv2.COLOR_BGR2RGB)
# make a copy of the original image
cimg = img.copy()
In order to pass the image to that method, we need to convert it to grayscale and blur the image, cv2.medianBlur() does the job:
# convert image to grayscale
img = cv2.cvtColor(img, cv2.COLOR_BGR2GRAY)
# apply a blur using the median filter
img = cv2.medianBlur(img, 5)
After that, let's detect the circles:
# finds the circles in the grayscale image using the Hough transform
circles = cv2.HoughCircles(image=img, method=cv2.HOUGH_GRADIENT, dp=0.9,
                            minDist=80, param1=110, param2=39, maxRadius=70)
In case you're wondering what these parameters refer to, type help(cv2.HoughCircles) and you'll find a good explanation.
Finally, let's draw and show the circles we just detected:
for co, i in enumerate(circles[0, :], start=1):
    # draw the outer circle in green
    cv2.circle(cimg,(i[0],i[1]),i[2],(0,255,0),2)
    # draw the center of the circle in red
    cv2.circle(cimg,(i[0],i[1]),2,(0,0,255),3)

# print the number of circles detected
print("Number of circles detected:", co)
# save the image, convert to BGR to save with proper colors
# cv2.imwrite("coins_circles_detected.png", cimg)
# show the image
plt.imshow(cimg)
plt.show()
Here is my result:
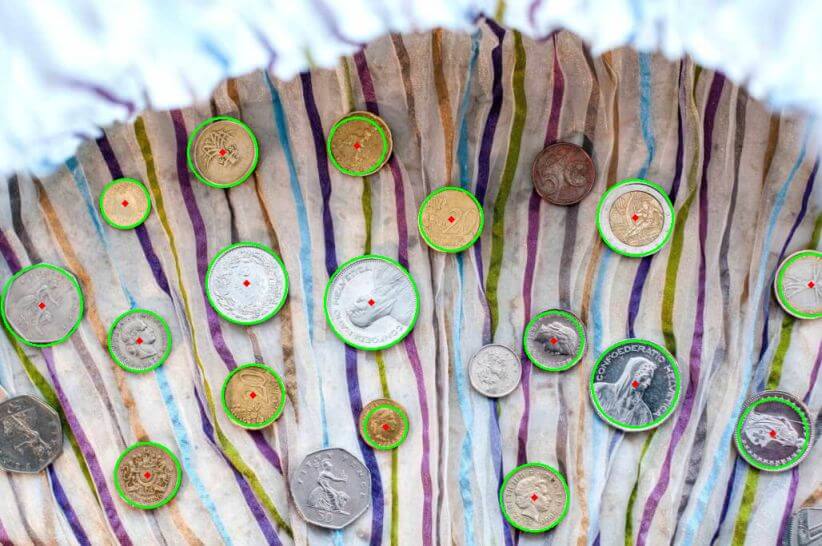
As you can see, it isn't perfect, as it doesn't detect all circles in the image. Try to tune the parameters passed to cv2.HoughCircles() method and see if you achieve better results.
Alright, that's it for now, here are the references for this tutorial:
Check the full code here.
Related: How to Perform YOLO Object Detection using OpenCV and PyTorch in Python.
Happy Coding ♥
Take the stress out of learning Python. Meet our Python Code Assistant – your new coding buddy. Give it a whirl!
View Full Code Convert My Code


Got a coding query or need some guidance before you comment? Check out this Python Code Assistant for expert advice and handy tips. It's like having a coding tutor right in your fingertips!