Before we get started, have you tried our new Python Code Assistant? It's like having an expert coder at your fingertips. Check it out!
As artificial intelligence is gaining popularity every second of the day so are artificial intelligent systems at an alarming rate as well. Web applications since their breakthrough have improved a lot, now they can be integrated with different machine learning models to make them sophisticated and handle difficult tasks with ease. For example, an intelligent web application can now take customer orders online, attend to customers’ inquiries, give recommendations to customers, and so on.
If you ever fancied the idea of building your intelligent web application then this tutorial is for you, it will show you how to build a web assistance application using the Django web framework and the OpenAI ChatGPT API. Django is a powerful web framework that allows you to build complex, data-driven websites while the OpenAI API is a machine-learning platform that enables you to use, deploy and fine-tune AI models.
This web assistant will be able to answer questions about education, sports, and other topics. You will start by setting up a development environment and then you will create a Django app. Next, you will integrate the Django framework with the OpenAI ChatGPT API. Finally, you will test your web assistant to see it in action.
We also have a tutorial on building AI Chatbot with DialoGPT, which is similar to this, if you are a chatbot person, make sure to check it out.
At the end of this tutorial, we are going to build a fully-fledged application that looks like this:

Yay! ChatGPT knows about us!
We will build every piece of the application from scratch to finish so that you grasp every concept being covered.
Here is the table of contents:
- Getting Started
- Creating the Main Project and the Application
- Registering the Application in the settings.py File
- Creating the Views for the Application in the views.py File
- Configuring the URLs for the Application
- Creating and Rendering Templates
- Getting the OpenAI API Key
- Implementing the Send Prompt Functionality
- Conclusion
Getting Started
We will kick start the tutorial by setting up the project’s environment, the main tasks in this section are to create the virtual environment, and install the required modules for the project. To create the virtual environment, enter this command in your terminal:
$ python -m venv project
All the modules for the project will be installed inside this environment, so to start using it, we need to activate it.
On Windows use:
$ .\project\Scripts\activateAnd on macOS or Linux, use:
$ source project/bin/activateNow we are set to install the modules, the command for that is:
$ pip install django openaiCreating the Main Project and the Application
Having taken care of the project’s environment, let us now create the main project, in your terminal run this command:
$ django-admin startproject webassistantAccording to the Django docs, django-admin is a command-line utility for administrative tasks. To navigate to the project’s folder use:
$ cd webassistantAnd to create the application, run the command:
$ python manage.py startapp assistantReaching this far you should now have a folder structure that looks like this:

The manage.py file is a Python script that is created in every Django project, just like the django-admin command it is also used for running administrate commands. Some of these are startapp, runserver, makemigrations, migrate, etc.
Let us wrap up this section by testing if Django was installed successfully, in your terminal run this command:
python manage.py runserverThe above command is for firing up the Django local server, if the server is running successfully, copy the URL http://127.0.0.1:8000/ and paste it into your web browser. Make sure you get this result in your browser:
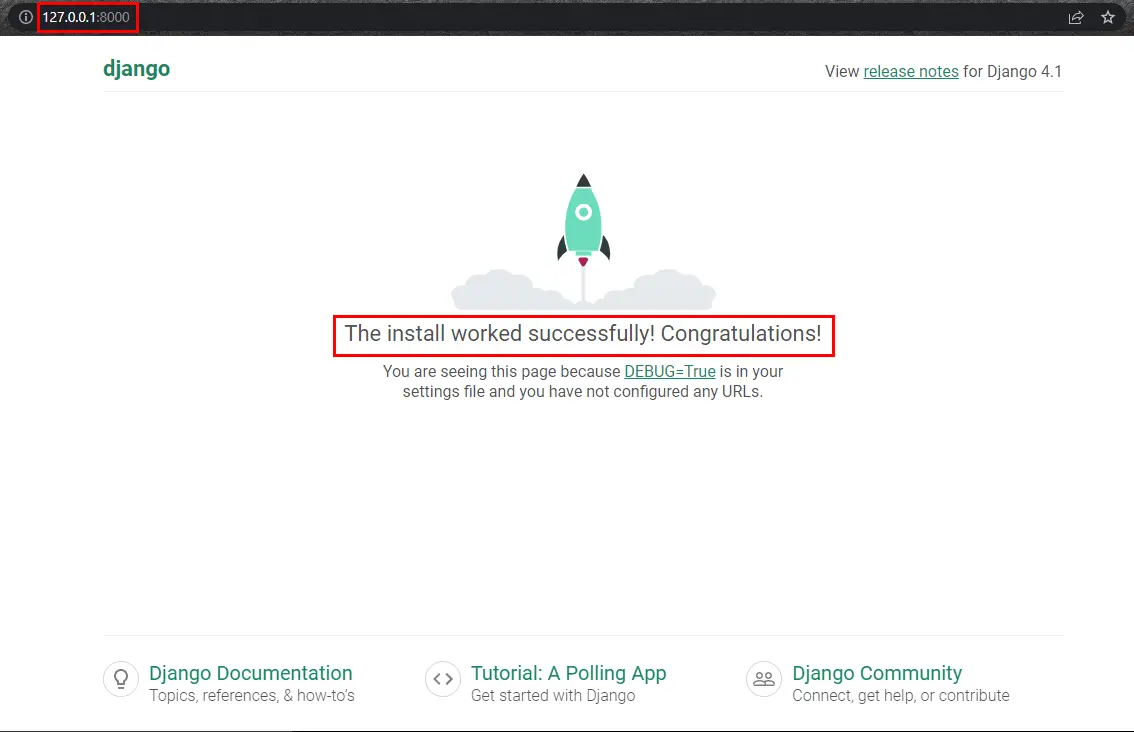
Congratulations on successfully installing Django!
Registering the Application in the settings.py File
With Django, you can create as many applications as you want within a project, but each project must be registered so that the project knows about it. In Django all the applications are registered in a file called settings.py, you can find this file inside the project’s folder:
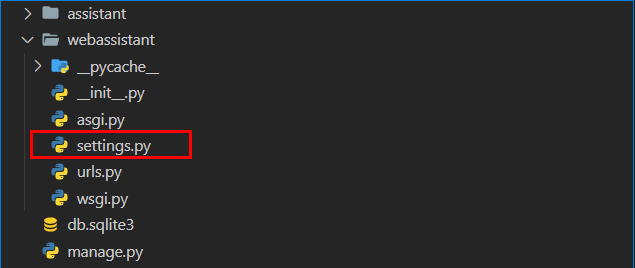
This file is responsible for all the configurations of the project, be careful when editing it because one messed-up line of code could break your whole project. Open it and scroll down to the INSTALLED_APPS list, add the assistant application like this:
INSTALLED_APPS = [
    'django.contrib.admin',
    'django.contrib.auth',
    'django.contrib.contenttypes',
    'django.contrib.sessions',
    'django.contrib.messages',
    'django.contrib.staticfiles',
    # registering the new app
    'assistant',
]
Creating the Views for the Application in the views.py File
In Django the views.py file plays an important role, it handles all the business logic of the application like capturing and validating form data, authenticating users, sending requests to an API, etc. The views.py file is located inside the application’s folder:
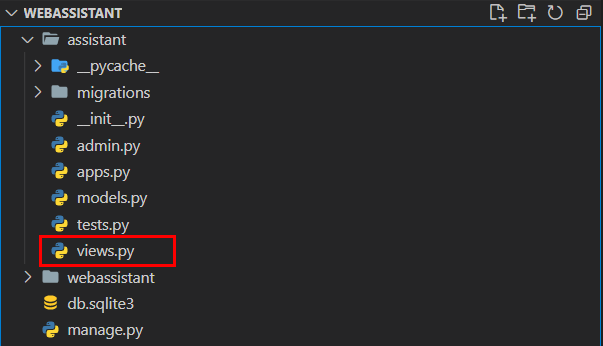
Our application will have two views, the home() and error_handler(), open the views.py file and make it look like this:
from django.shortcuts import render
# import HttpResponse from django.urls
from django.http import HttpResponse


# this is the home view for handling home page logic
def home(request):
    return HttpResponse('The Home Page')


# this is the view for handling errors
def error_handler(request):
    return HttpResponse('404 Page')
In the code snippet, we have two functions both returning a string as a response, this is done with the help of the HttpResponse() function which takes a string as input.
Configuring the URLs for the Application
Now that we have our views ready, let us register the URLs. Create a file named urls.py inside the assistant folder, do not name it otherwise because this is Django’s way of doing things:

The main purpose of the urls.py file is to register the views in the views.py file, open it and paste this code:
# here we are import path from in-built django-urls
from django.urls import path
# here we are importing all the Views from the views.py file
from . import views

# a list of all the urls
urlpatterns = [
    path('', views.home, name='home'),
    path('new_chat/', views.new_chat, name='new_chat'),
    path('error-handler/', views.error_handler, name='error_handler'),
]
In the code, we are importing all the views from the views.py file, thereafter we have a urlpatterns list, which contains all the URL paths. To create a URL we are using the path() function which takes three notable arguments, the actual path as a string, the view, and the name of the URL.
Now, these newly created URLs must be registered so that they are known by the project. Inside the webassistant folder, there is another urls.py file:
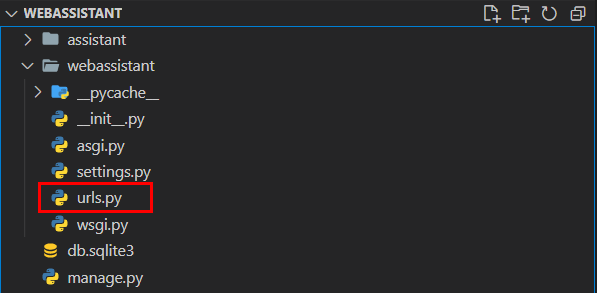
Now something worth your attention here, the application’s urls.py file is not the same as the project’s urls.py file. The urls.py file inside the assistant folder is for registering all the application’s views and the urls.py file inside the webassistant folder is for registering all the applications' URLs. Open it, and make it look like this:
from django.contrib import admin
from django.urls import path, include

# a list of all the projects urls
urlpatterns = [
    # the url to the admin site
    path('admin/', admin.site.urls),
    # registering all the assistant application urls
    path('', include('assistant.urls')),
]
In the code, we have a urlpatterns list containing the two paths, one for the admin site and the other for the application. To register the application’s URLs, we use the path() function which takes a string as a path name, and an include() function which takes all the application’s URLs as input.
After doing so many configurations in the project, let us now test and see if the application is working fine. First of all, check if the server is still running, if not fire it up and paste this URL into your browser http://127.0.0.1:8000/ and you'll see the home page.
Creating and Rendering Templates
In this section, we will create and render our templates. We will be working with HTML and for styling, we will use the Bootstrap 5.3 framework. Inside the assistant folder, create a new folder called templates, do not misspell it for this is Django’s way of doing things otherwise you will get errors. Inside the templates folder, create another folder called assistant, in this folder that is where all the templates will be.
Our application will have three templates, home.html, 404.html, and base.html like this:

Let us start with the base.html template, open it, and paste the following code:
<!DOCTYPE html>
<html lang="en">
<head>
    <meta charset="UTF-8">
    <meta http-equiv="X-UA-Compatible" content="IE=edge">
    <meta name="viewport" content="width=device-width, initial-scale=1.0">
    <title>Web Assistant | {% block title %}  {% endblock %}</title>
    <link href="https://cdn.jsdelivr.net/npm/bootstrap@5.3.0-alpha1/dist/css/bootstrap.min.css" rel="stylesheet">
</head>
<body>
    {% block content %}
    {% endblock %}
</body>
</html>
This is an HTML boilerplate file, with Bootstrap5.3 CSS added to it via the link.
The home.html and 404.html templates will inherit everything from the base.html template, this is handy as it saves us time because we will not repeat the code, thus making it clean. Open the home.html template and paste this code:
{% extends 'assistant/base.html' %}
{% block title %} Home {% endblock %}
{% block content %}
<div class="row justify-content-center my-4">
    <div class="col-md-7 mt-4">
        <div class="card">
            <h1 class="card-header text-center">A.I WEB ASSISTANT</h1>
            <div class="card-body">
              <div class="d-flex justify-content-end">
                <button type="button" class="btn btn-primary mb-3" onclick="location.href='{% url 'new_chat' %}'">New Chat +</button>
              </div>
              <div class="chat-history mb-3">
                {% for message in messages %}
                  <div class="card mb-2 {% if message.role == 'assistant' %}bg-success text-white{% endif %}">
                    <div class="card-body p-2">
                      <strong>{{ message.role|title }}:</strong> {{ message.content|linebreaksbr }}
                    </div>
                  </div>
                {% endfor %}
              </div>
              <form action="." method="POST">
                <!-- this secures the form from malicious attacks during submission -->
                {% csrf_token %}
                <input class="form-control mb-2" required type="text" autofocus="autofocus" name="prompt" value="{{ prompt }}" id="">
                <label for="temperature" class="form-label">Temperature:</label>
                <input class="form-control mb-2" type="number" step="0.01" min="0" max="2" name="temperature" value="{{ temperature }}" id="temperature">
                <button class="btn btn-success fw-bold" type="submit">
                     GENERATE
                </button>
              </form>
            </div>
        </div>
    </div>
</div>
{% endblock %}
Here's the explanation for the template:
{% extends 'assistant/base.html' %}: This line tells Django to extend thebase.htmltemplate, inheriting its structure and elements.{% block title %}and{% block content %}: These blocks define areas in thebase.htmltemplate that can be overridden with new content specific to this page.- The
rowandcol-md-7divs create a responsive layout, positioning the chat interface at the center of the page. - The
carddiv holds the main chat interface, including a title, a chat history display, and a form for submitting new messages. - The chat history display iterates through messages using a
forloop. Each message is displayed in a card, with the assistant messages having a green background. - The form includes an input for the user message (prompt), an input for the temperature setting, and a button to submit the form. The form uses the POST method and sends the data to the current URL.
- The
{% csrf_token %}tag is used for security purposes, protecting the form from cross-site request forgery attacks. - The "New Chat+" button redirects to the
new_chat()view that we'll create, which empties the chat history from the session data to start a new conversation.
The template relies on the context provided by the corresponding Django view that we will write soon. The view receives user input, sends it to the OpenAI API, and retrieves the AI-generated response. The view also manages chat history and temperature settings. The context passed to the template includes the user's prompt, the AI response, the chat history, and the temperature setting.
Now let us build our last template, open the 404.html template and paste this code:
{% extends 'assistant/base.html' %}
{% block title %} 404 {% endblock %}
{% block content %}
<div class="row justify-content-center my-4">
    <div class="col-md-7 mt-4">
        <h1>Page Not Found</h1>
        <p>Make sure you are connected to the internet or your query is correct</p>
        <a href="{% url 'home' %}" class="btn btn-secondary">Go Home</a>
    </div>
</div>
{% endblock %}
This is a basic template, it displays a Page Not Found message and it has a link for returning to the home page via the:
{% url 'home' %}Having created all the templates, it Is now time we render them in the browser, open the views.py file and edit the home() and error_handler() functions so that they look like this:
from django.shortcuts import render

# this is the home view for handling home page logic
def home(request):
    return render(request, 'assistant/home.html')

# this is the view for handling errors
def error_handler(request):
    return render(request, 'assistant/404.html')
In both functions, we have replaced the HttpResponse() with the render() function, this function is for rendering templates and it takes a request and the actual template as arguments.
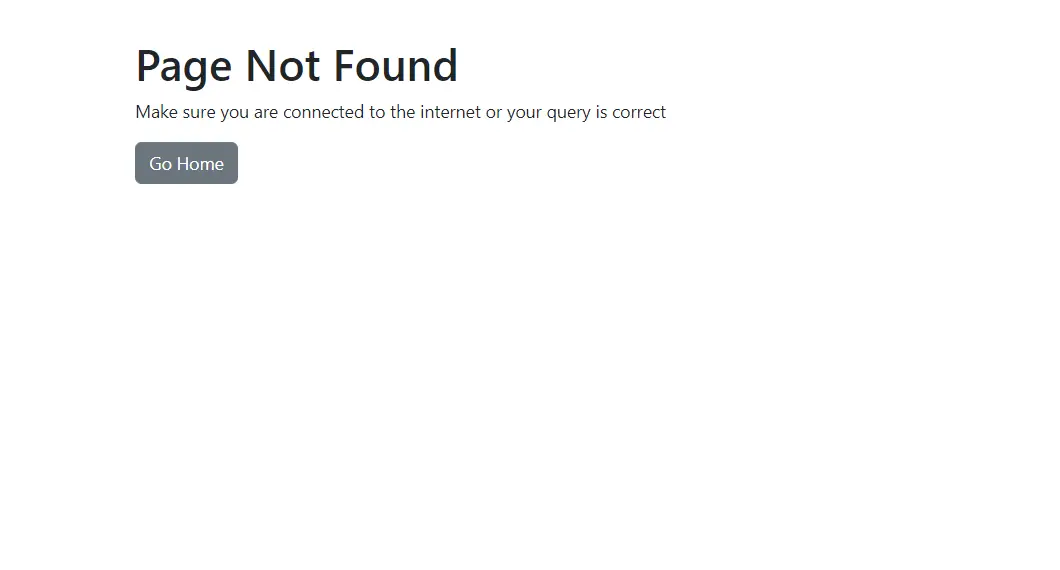
For the 404.html template visit http://127.0.0.1:8000/error-handler/ and you will get this:

Getting the OpenAI API Key
To use the API, we will need an API key, so to obtain this API key head over to the OpenAI official website for signup, this is the page for signup:
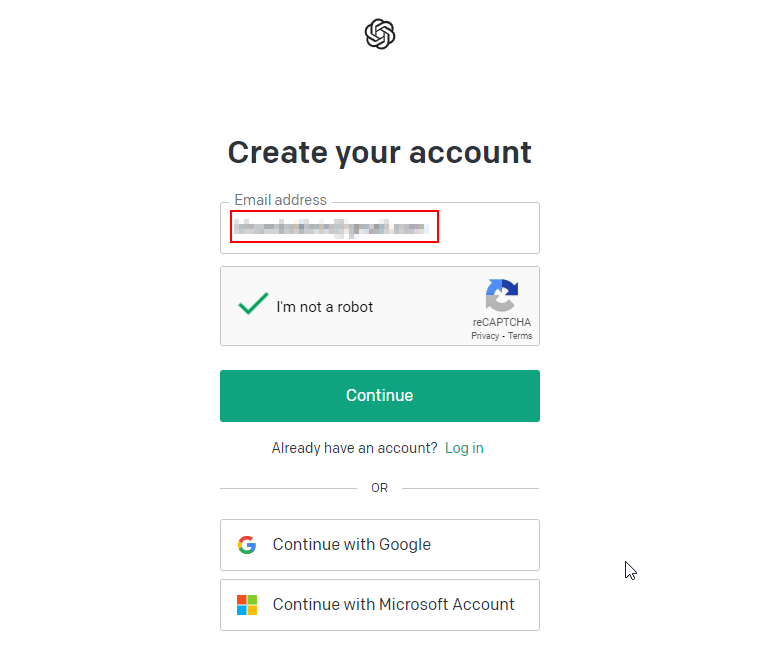
Provide your working email, and verify using ReCaptcha, if you click continue you will be taken to this page:
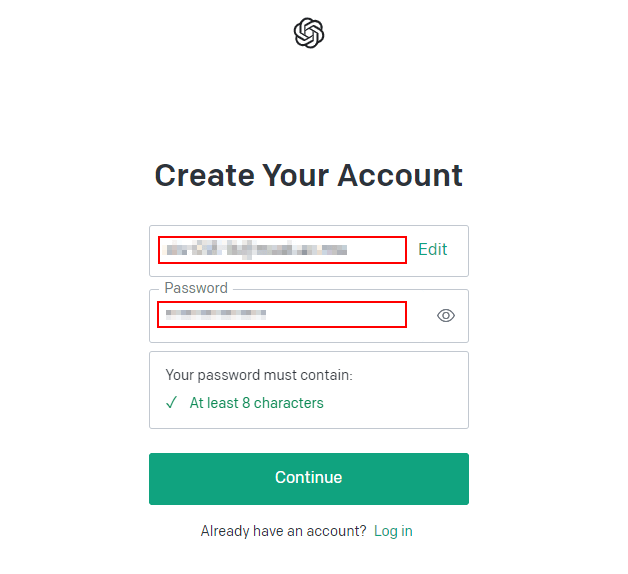
After you provide your password, click on the Continue button in which you will be asked to verify your email, check your mailbox for the OpenAI email, and verify it, if you do not find the email, check your spam folder.
After verifying your email, you will go through some pages, the first is for you to provide your full name and organization, and the second page is for you to provide your phone number.
Here make sure you provide a valid phone number because OpenAI will send you an API verification code as a text message.
If you enter this code, you will be taken to this page:
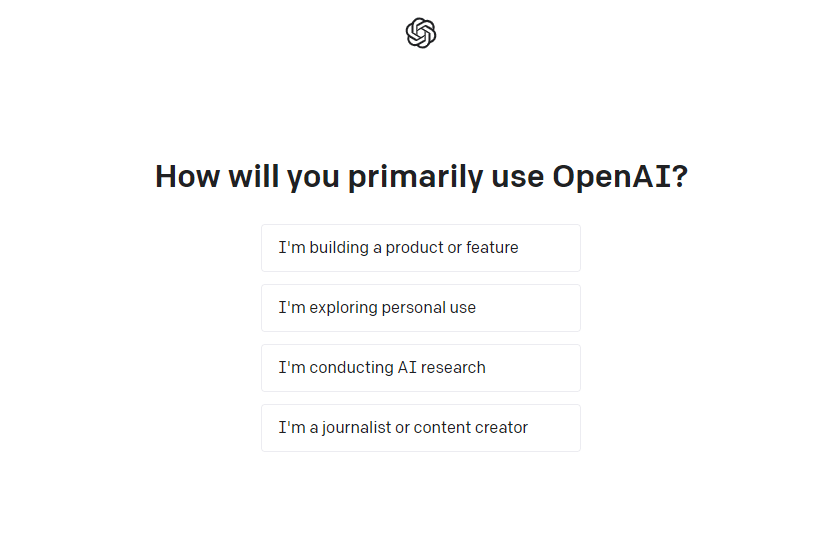
Choose an option that suits you, then you will be taken to your dashboard. While you are still logged in, visit the OpenAI API reference, you will be taken to a page where you will generate your API key:
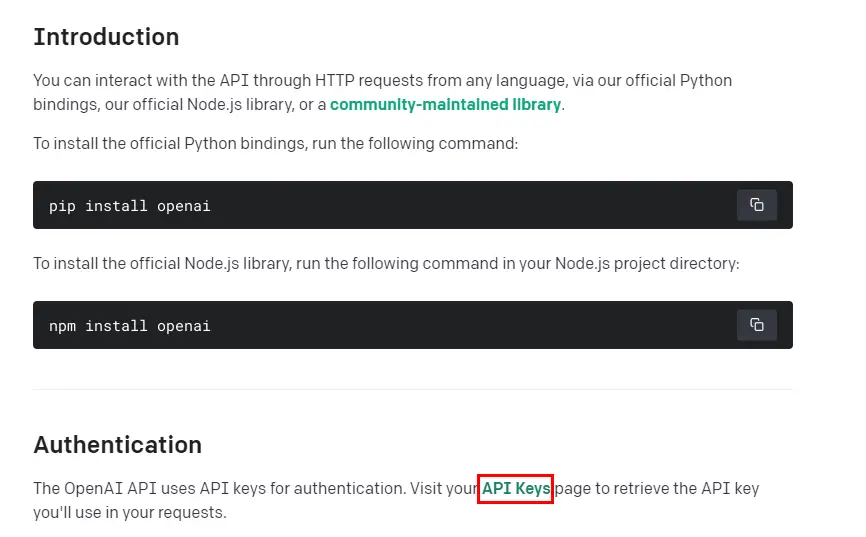
If you click the API Keys link, this is the page you will be taken to:
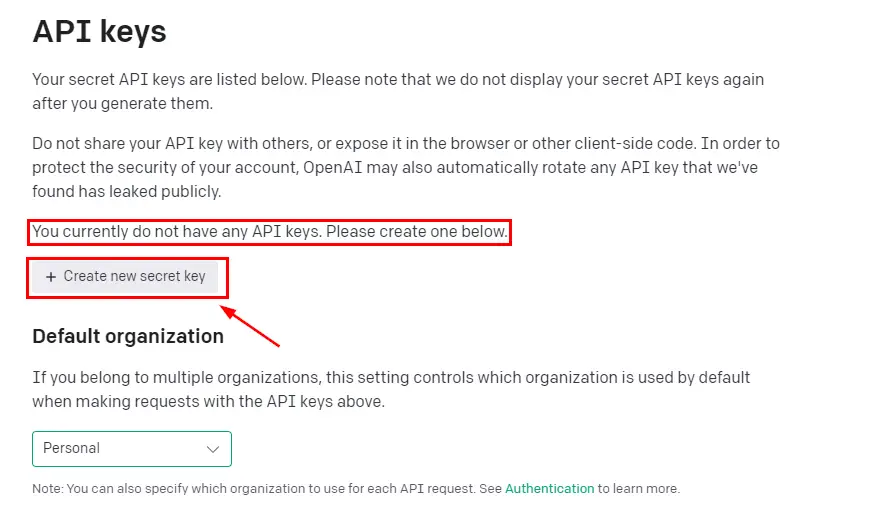
You can now create the API key and make sure you copy and keep it safe.
For security reasons, we are not allowed to use the API key directly in our views.py file, so we will create a separate file for storing it. Inside the assistant folder create a new file called secret_key.py:
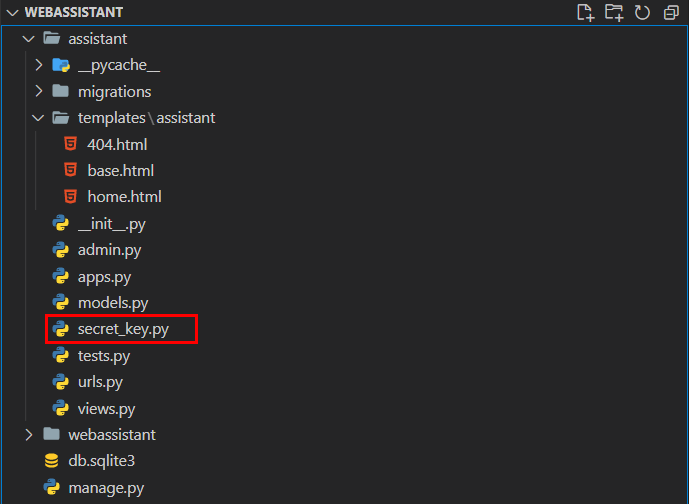
Open this file and make it look like this:
API_KEY = 'put your API key here'Here you will just replace the text with the real API key you have just generated, make sure the key is inside the quotes.
Implementing the Send Prompt Functionality
Now that we have designed the interface for the web assistant and that we have successfully generated our API key, let us now integrate this API with our Django application. Open the views.py file and make it look like this:
# importing render and redirect
from django.shortcuts import render, redirect
# importing the openai API
import openai
# import the generated API key from the secret_key file
from .secret_key import API_KEY
# loading the API key from the secret_key file
openai.api_key = API_KEY

# this is the home view for handling home page logic
def home(request):
    try:
        # if the session does not have a messages key, create one
        if 'messages' not in request.session:
            request.session['messages'] = [
                {"role": "system", "content": "You are now chatting with a user, provide them with comprehensive, short and concise answers."},
            ]
        if request.method == 'POST':
            # get the prompt from the form
            prompt = request.POST.get('prompt')
            # get the temperature from the form
            temperature = float(request.POST.get('temperature', 0.1))
            # append the prompt to the messages list
            request.session['messages'].append({"role": "user", "content": prompt})
            # set the session as modified
            request.session.modified = True
            # call the openai API
            response = openai.ChatCompletion.create(
                model="gpt-3.5-turbo",
                messages=request.session['messages'],
                temperature=temperature,
                max_tokens=1000,
            )
            # format the response
            formatted_response = response['choices'][0]['message']['content']
            # append the response to the messages list
            request.session['messages'].append({"role": "assistant", "content": formatted_response})
            request.session.modified = True
            # redirect to the home page
            context = {
                'messages': request.session['messages'],
                'prompt': '',
                'temperature': temperature,
            }
            return render(request, 'assistant/home.html', context)
        else:
            # if the request is not a POST request, render the home page
            context = {
                'messages': request.session['messages'],
                'prompt': '',
                'temperature': 0.1,
            }
            return render(request, 'assistant/home.html', context)
    except Exception as e:
        print(e)
        # if there is an error, redirect to the error handler
        return redirect('error_handler')

def new_chat(request):
    # clear the messages list
    request.session.pop('messages', None)
    return redirect('home')

# this is the view for handling errors
def error_handler(request):
    return render(request, 'assistant/404.html')
Starting with the imports, we are importing render() and redirect() from django.shortcuts. Then we are importing the OpenAI API, and lastly, we are importing our API key from the secret_key.py file. To load the API key, we are using the openai.api_key = API_KEY
home(request): This is the main view for handling the home page logic.
- First, it checks if the session has a
messageskey. If not, it initializes the session with a system message. This system message instructs ChatGPT to behave as you want. In our case, it's a simple message instructing ChatGPT to respond with short and concise answers. - If the request method is POST, it means the user has submitted a new prompt and temperature setting.
- The prompt and temperature are extracted from the form.
- The user's message is appended to the
messagessession list. - The session is marked as modified to ensure the changes are saved.
- The OpenAI API is called with the messages and temperature settings using the
openai.ChatCompletion.create()method. Note that if you have access to the GPT-4 API, you can easily switch by simply changing the model name from"gpt-3.5-turbo"to"gpt4". - The assistant's response is extracted and appended to the
messagessession list. - The session is marked as modified again.
- The context is prepared, including the session messages, an empty prompt, and the temperature setting. This context is rendered in the
assistant/home.htmltemplate.
- If the request method is not POST, it renders the home page with the current messages and default temperature settings.
- First, it checks if the session has a
new_chat(request): This view is called when the user clicks the "New Chat +" button.
- The messages list in the session is cleared by using the
pop()method. - The user is redirected to the home view, where a new conversation will begin.
- The messages list in the session is cleared by using the
error_handler(request): This view handles any errors that might occur during the execution of the home view.
- It renders an
assistant/404.htmltemplate, which should display an appropriate error message.
- It renders an
The views are responsible for managing the user inputs, API calls, and session data, ultimately providing the context for rendering the assistant/home.html template with the chat history and other necessary information.
Now we are good to go to test our application, check if the server is running if not fire it up, go to the home URL and refresh the page, enter any prompt you want:
If you have slow or no internet at all this is the output that you will get:
 Congratulations! You have successfully built your own web assistant application.
Conclusion
That's it from this clear-cut tutorial, you have now built a web assistant using Django and OpenAI ChatGPT API!
This tutorial has walked you through the process of setting up and configuring your development environment, building a basic web interface, and integrating the ChatGPT API with Django. We hope you found it helpful and that the skills learned will be used in your future Django projects.
Learn also: Conversational AI Chatbot with Transformers in Python.
Happy coding ♥
Why juggle between languages when you can convert? Check out our Code Converter. Try it out today!
View Full Code Convert My Code


Got a coding query or need some guidance before you comment? Check out this Python Code Assistant for expert advice and handy tips. It's like having a coding tutor right in your fingertips!